Taxi Truck Consignments
In TransVirtual it is possible to create Taxi Truck type consignments which are essentially multi-leg consignments.
To be able to create these types of consignments, you MUST have the below setting enabled in your global settings:

To be able to create these types of consignments, you MUST have the below setting enabled in your global settings:
Configuration > General > Global Setup > Consignment Related Rules.
This article will detail how to create taxi truck type consignments and how to load and deliver them on a mobile device.
Taxi Truck consignment creation
With the above setting enabled, your consignment creation page will look like the below:
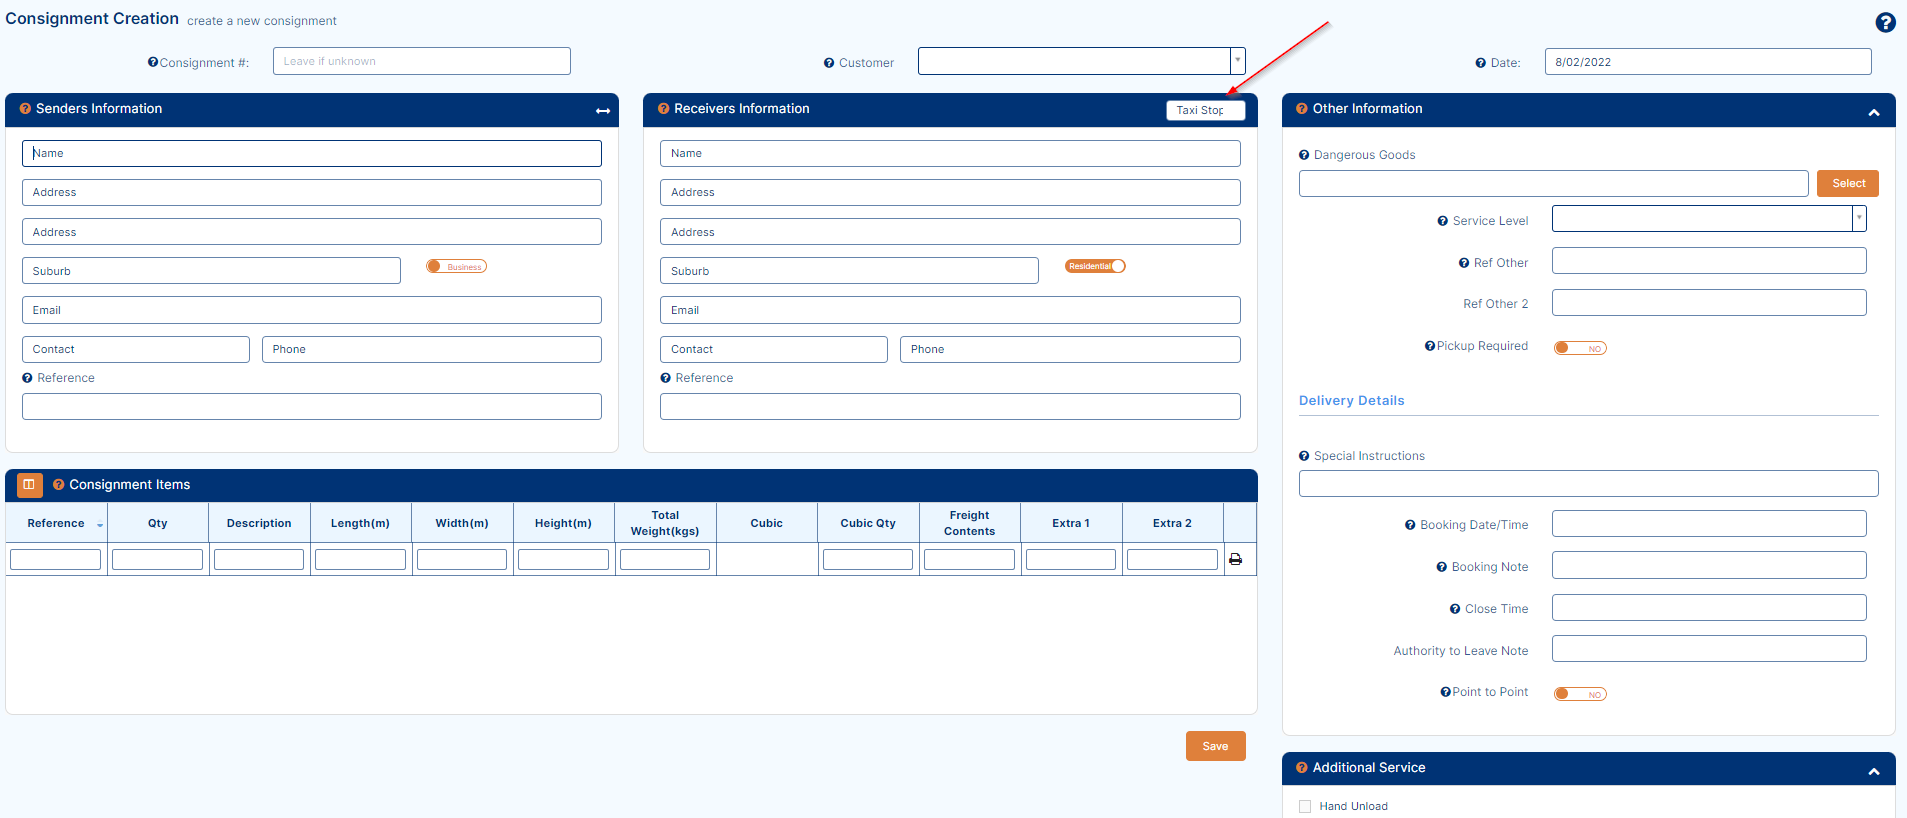
Home > Consignment Actions > Consignment Creation
OR
Transport > Operational Tasks > Consignments > Create New button top-right (2022 menu users)
As you can see in the above, there is now an option to add a Taxi Stop which is essentially the number stop of each receiver you add (the leg number,etc).
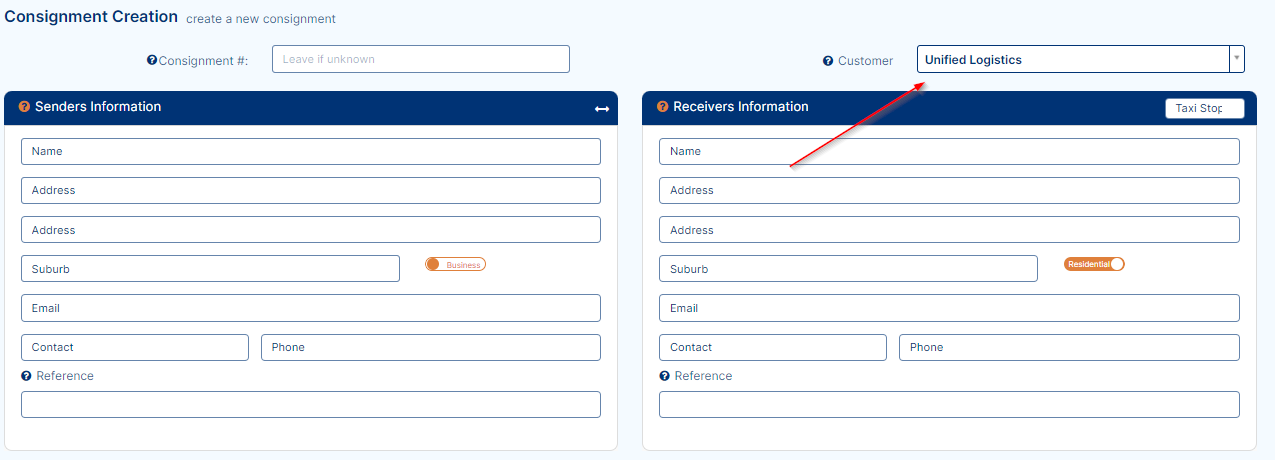
To create these types of consignments, start by selecting the relevant customer this consignment will be for:
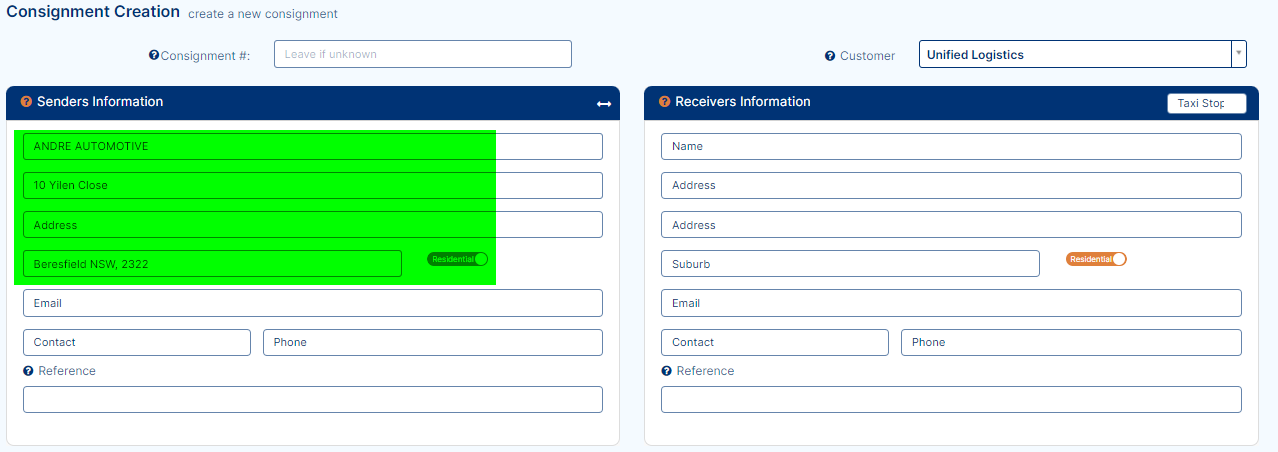
You then need to enter the sender information:
From here you need to specify the number of receiver stops (legs) there will be for this consignment:
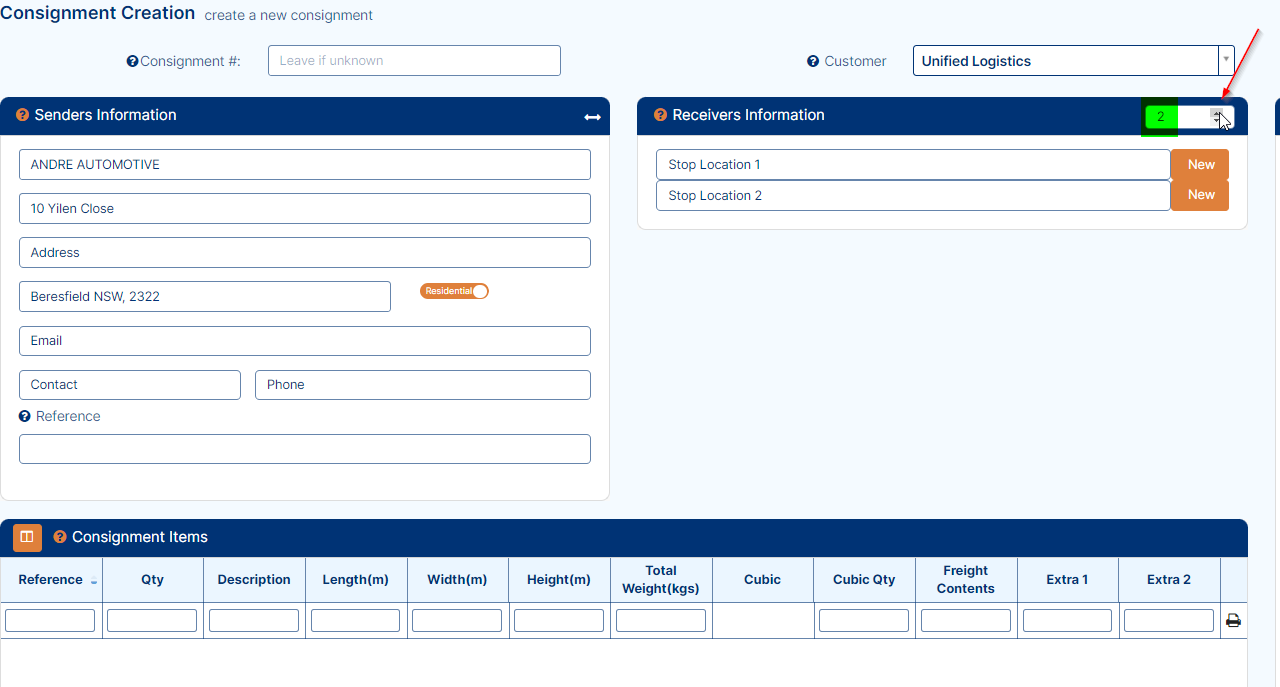
Enter the correct number of stops using the arrow selectors as per the above and then enter the relevant receiver information for each stop, like so:
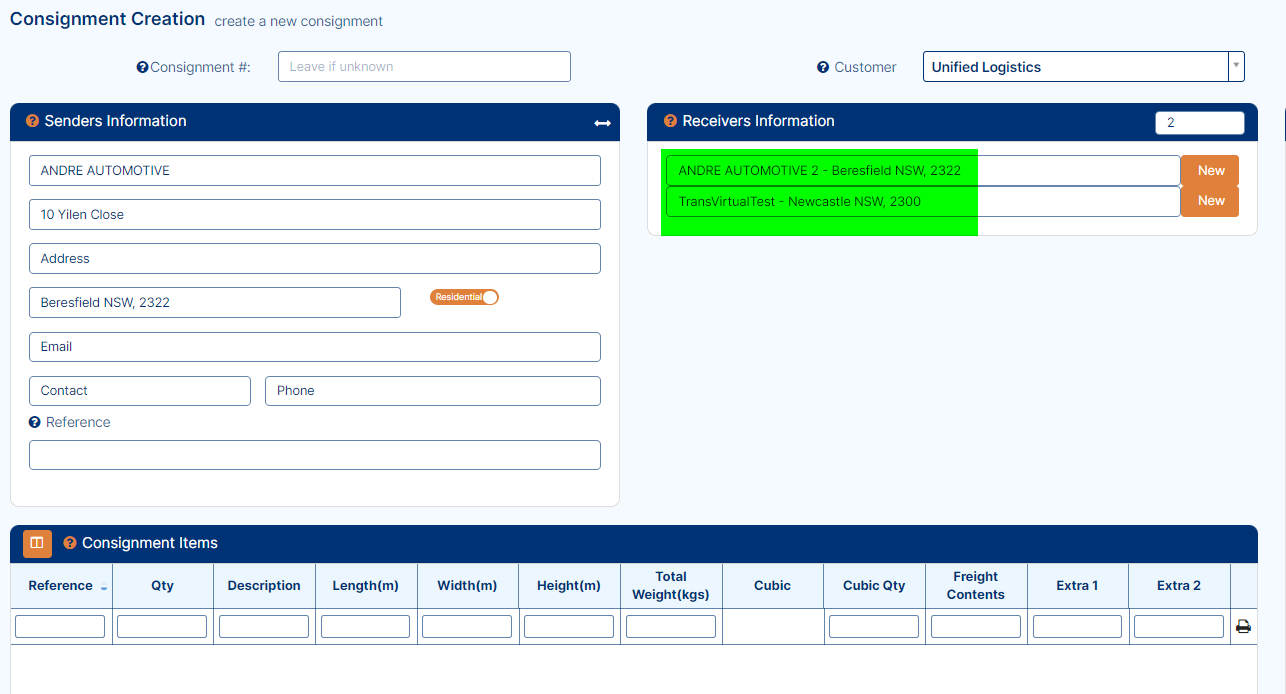
Stop 1 will be the line at the top and each subsequent stop will be listed in descending order.
Once the stop count and receiver details have been entered, you need to fill out the rest of the consignment details which should include a Service Level, the Consignment Items and any extra information that may be required:
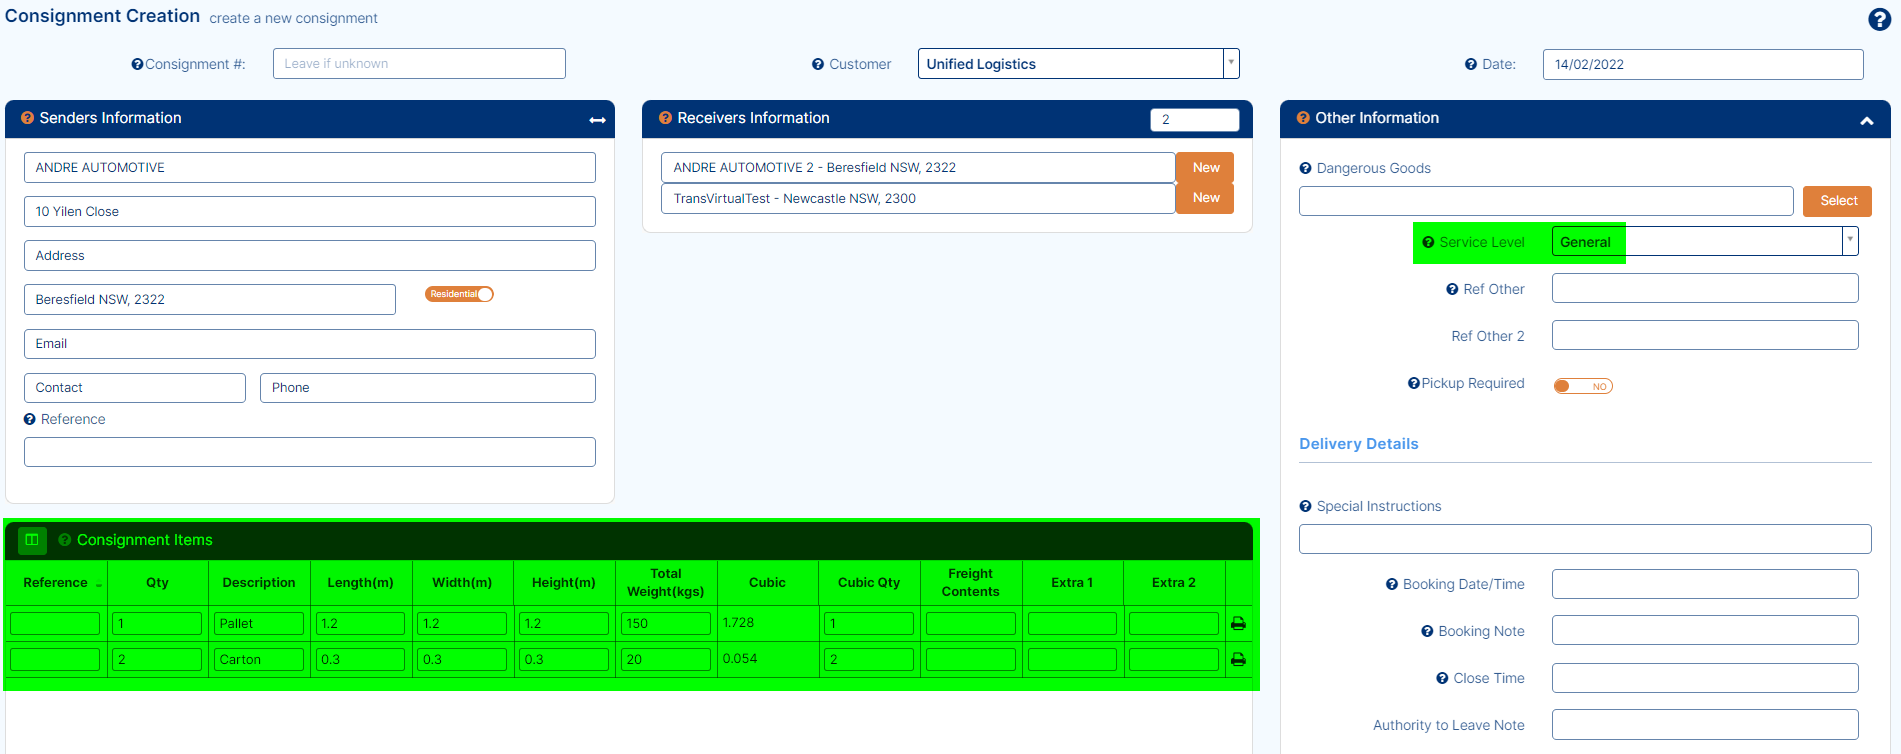
Once all details have been entered as required, click the Save button to create the consignment, or press the enter button on your keyboard.
Once created, the consignment will look similar to the below:
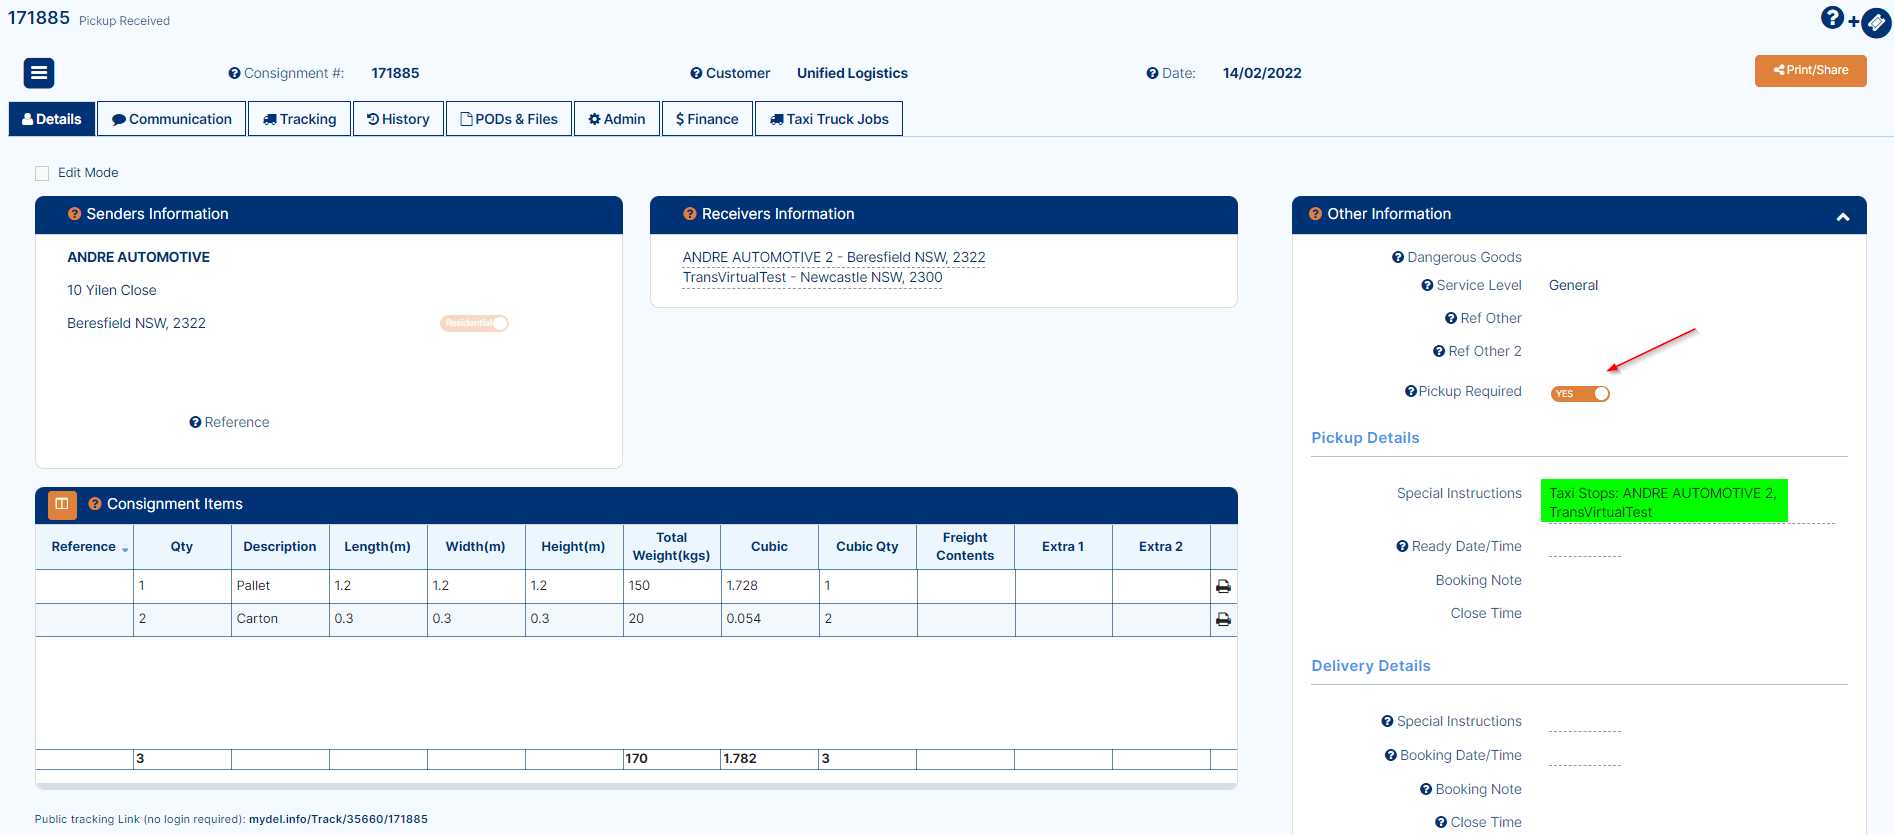
You will notice in the above image that this example consignment has been created as a pickup type consignment and the stop or leg information has been added as a note to the pickup special instructions.
The reason for this is that Taxi Truck type consignments are essentially consignments that a customer has requested a driver of yours please come and pickup the relevant freight and then deliver the respective items to each of the receiver locations listed.
Once the consignment has been created, the items on the consignment need to be 'assigned' to a leg/receiver/stop.
To do this, click on the first receiver:
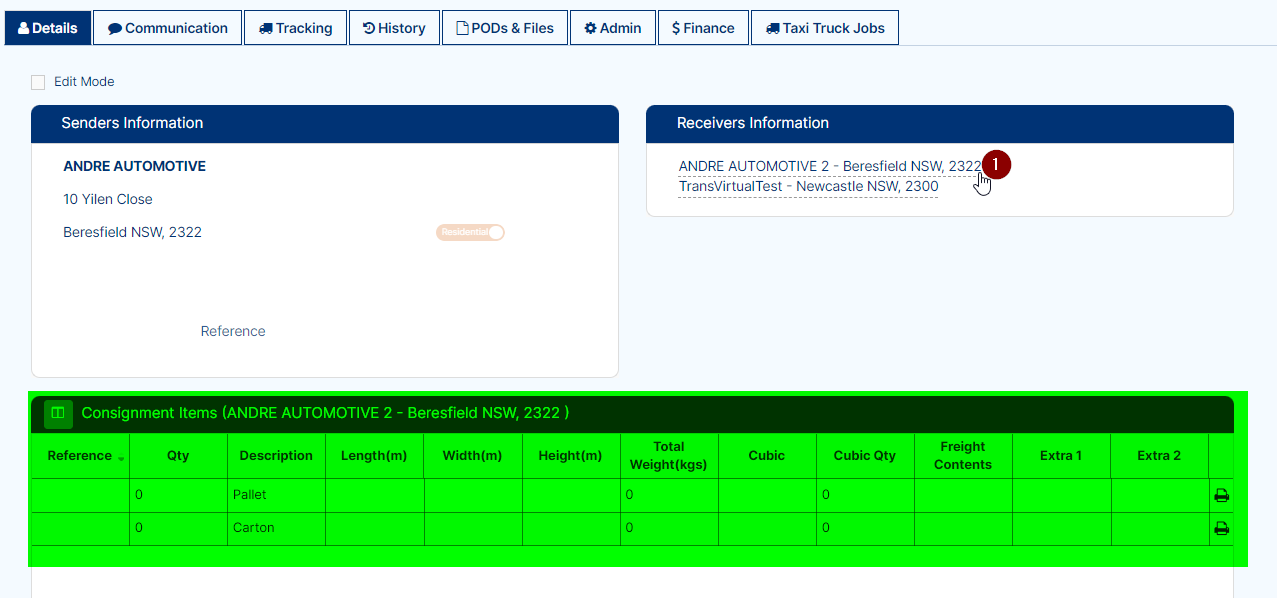
You will then notice that, once a stop/receiver is clicked, the consignment items change to 0 amounts.
This is because you now need to tell the system how many items and what items are to be delivered to the selected stop.
Click the edit mode button after clicking a receiver/stop, and then edit the consignment items and save to 'assign' those items to that stop:
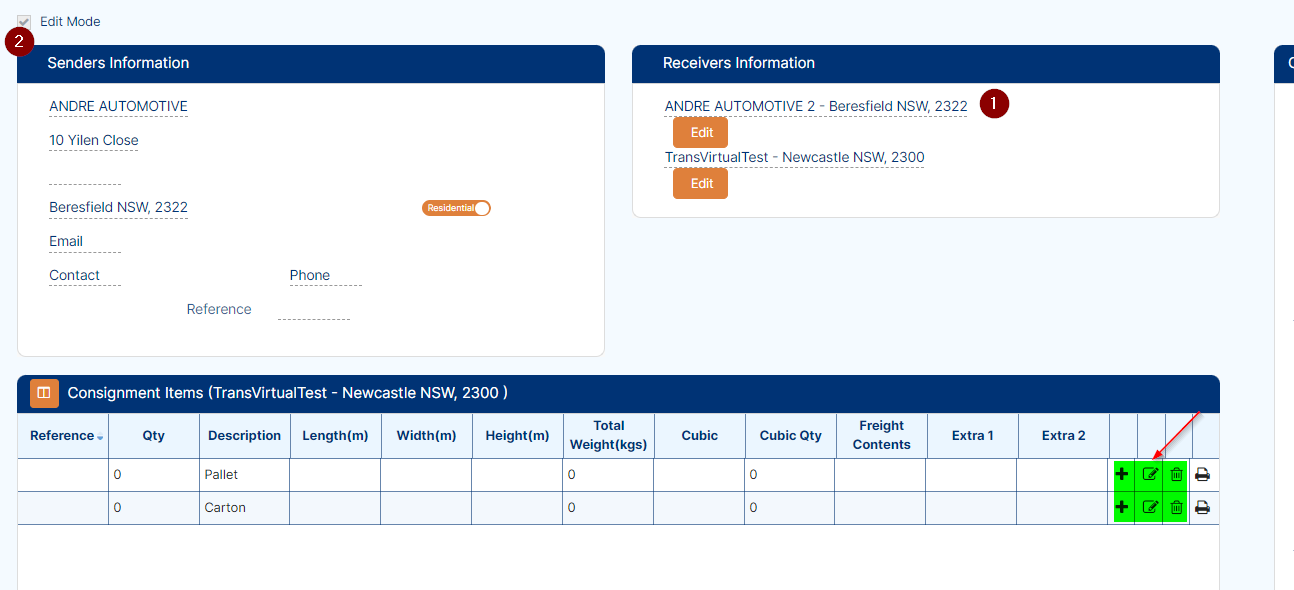
Edit the rows accordingly and click save to 'assign' those items to that stop.
Repeat the process for each stop you have.
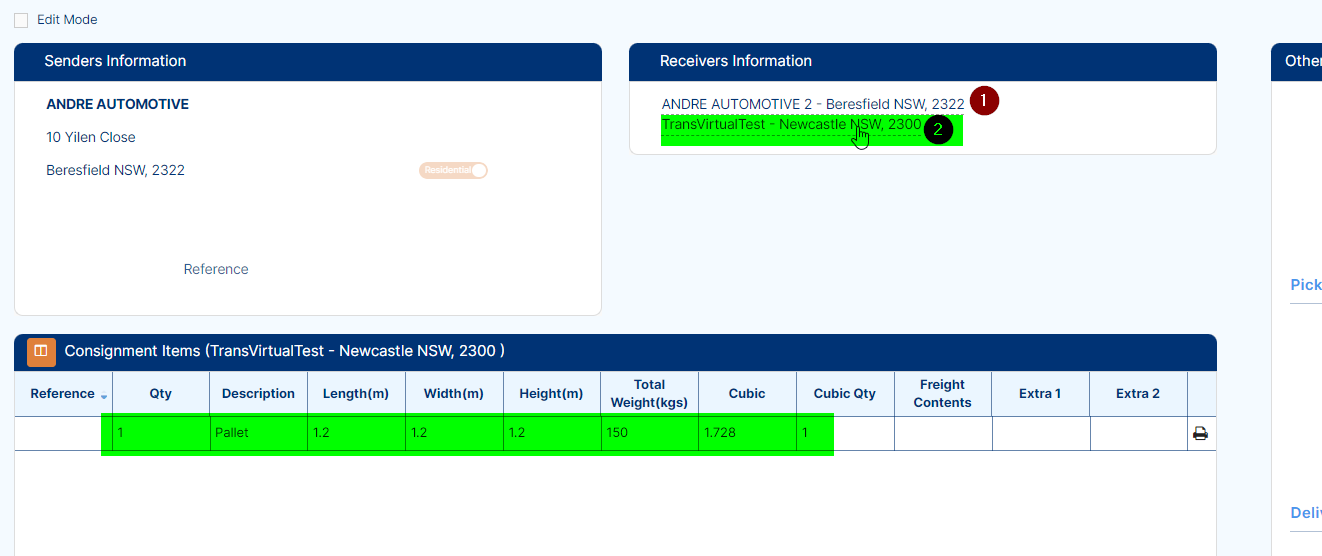
Once all stops have been correctly updated with the relevant items, clicking each stop will show you what items are going where:
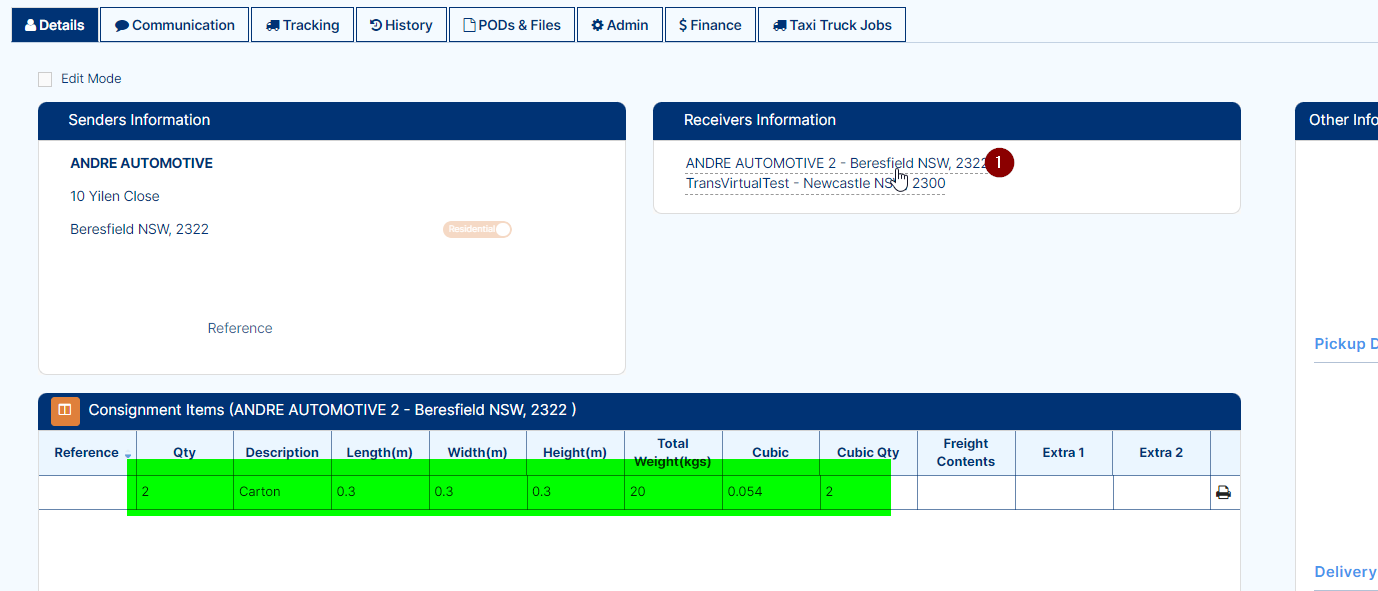
The first stop (Andre Automotive 2) is for 2 cartons at 20kg total weight.
The second stop (TransVirtual Test) is for 1 pallet at 150kg:
To create these types of consignments, start by selecting the relevant customer this consignment will be for:
You then need to enter the sender information:
From here you need to specify the number of receiver stops (legs) there will be for this consignment:
Enter the correct number of stops using the arrow selectors as per the above and then enter the relevant receiver information for each stop, like so:
Stop 1 will be the line at the top and each subsequent stop will be listed in descending order.
Once the stop count and receiver details have been entered, you need to fill out the rest of the consignment details which should include a Service Level, the Consignment Items and any extra information that may be required:
Once all details have been entered as required, click the Save button to create the consignment, or press the enter button on your keyboard.
Once created, the consignment will look similar to the below:
You will notice in the above image that this example consignment has been created as a pickup type consignment and the stop or leg information has been added as a note to the pickup special instructions.
The reason for this is that Taxi Truck type consignments are essentially consignments that a customer has requested a driver of yours please come and pickup the relevant freight and then deliver the respective items to each of the receiver locations listed.
Once the consignment has been created, the items on the consignment need to be 'assigned' to a leg/receiver/stop.
To do this, click on the first receiver:
You will then notice that, once a stop/receiver is clicked, the consignment items change to 0 amounts.
This is because you now need to tell the system how many items and what items are to be delivered to the selected stop.
Click the edit mode button after clicking a receiver/stop, and then edit the consignment items and save to 'assign' those items to that stop:
Edit the rows accordingly and click save to 'assign' those items to that stop.
Repeat the process for each stop you have.
Once all stops have been correctly updated with the relevant items, clicking each stop will show you what items are going where:
The first stop (Andre Automotive 2) is for 2 cartons at 20kg total weight.
The second stop (TransVirtual Test) is for 1 pallet at 150kg:
If needed, you can add in extra stops via the Taxi Truck Jobs tab on this consignment:
You can also delete or remove a stop here using the bin icon against each stop.
This tab also allows you the ability to modify the details of each stop and view each stop as its own individual consignment:
Simply click the stop from the list on the left, then the details for it will appear on the right.
If updating any details, ensure you click Update at the top to save the changes!
If you would like to view this stop as its own consignment, simply click the View Consignment button. You will then see a screen similar to the below:
This page will display much the same as per a standard consignment would, but there will be a message in yellow at the top stating this is a child Taxi Truck job and will provide a hyperlink to be able to view the original 'parent' taxi type consignment.
You will notice that when you do this, this consignment will only be for the stop you clicked as each job is technically its own consignment, but for this process the consignments are 'linked' together in a taxi truck arrangement.
How to deliver a Taxi Truck consignment using a mobile device
Once created in the web portal, the consignment will then need to be assigned to a driver via the consignment history tab or via the pickup allocation screen.
Remember, Taxi Truck consignments are created as pickups and will therefore display in the pickup allocation screen.
Click here for further information on how to assign a pickup to a driver using the pickup allocation screen.
Once assigned to the driver, a pop-up will display on their device alerting them that a new pickup has been assigned to them:
The driver can then see this by clicking into the delivery page:
Click the OK button to acknowledge the pickup.
From here, check the check-box to confirm you are actioning the new pickup
This will then take you into the consignment and provide details on what is to be picked up:
Click the pen icon to get the pickup signed for when you arrive; confirming all items are picked up:
Click complete when signed for.
The consignment then appears green in the delivery page as the pickup has been completed.
From here, to complete the delivery components/legs, the driver simply needs to load scan the freight onto their device.
The legs then appear as 'separate' consignments (number will be original taxi connote with an underscore and index of the leg number) straight in the delivery page - no need to tap leave depot as you would with a standard consignment:
From here, simply click the legs using the check boxes as you arrive at each location and deliver and sign for each leg; very similar method to a standard consignment delivery:
Then sign for it:
Click complete and the job will now appear in the delivery page in green as it has been completed:
Repeat the process until all legs have been delivered.
You will then also get a POD for each leg of the original taxi truck consignment as each leg is technically a consignment in its own right:
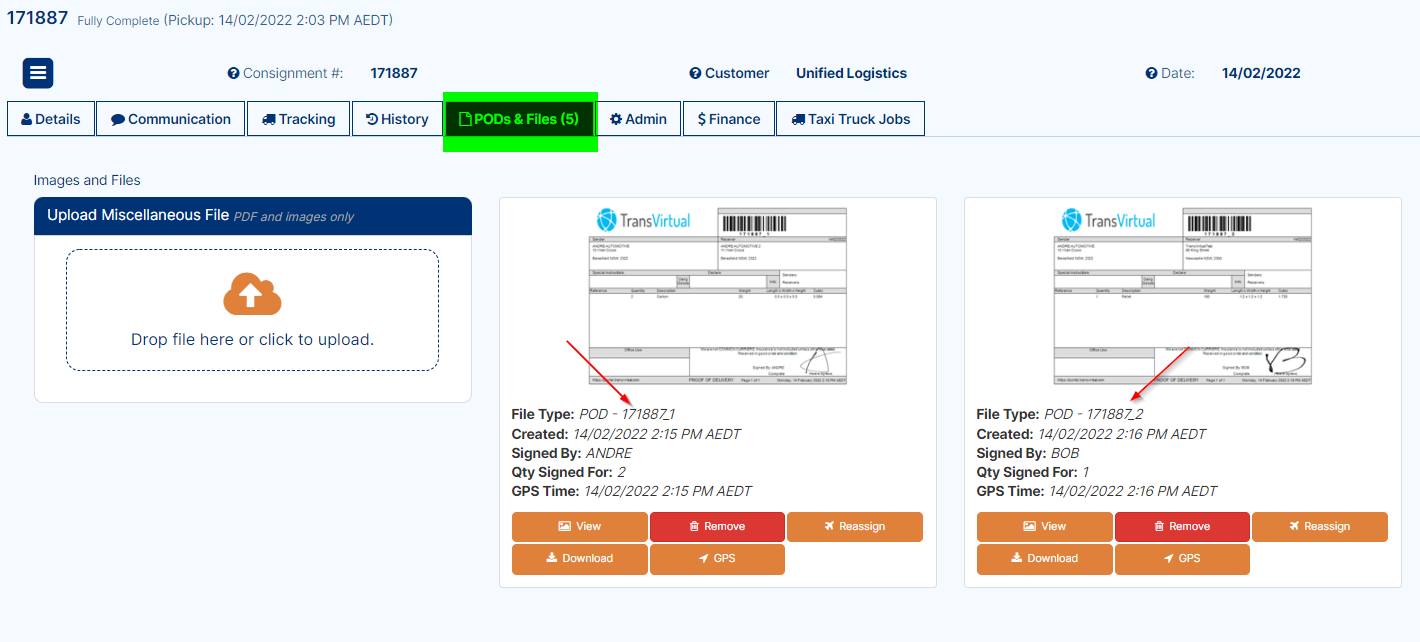
Once all the legs have been delivered, the Taxi Truck consignment is now considered complete.
Once all the legs have been delivered, the Taxi Truck consignment is now considered complete.
Extra Information
Taxi truck type consignments DO NOT support EDI functionality. They also WILL NOT work between linked TransVirtual accounts - you can't assign to a linked account as the data transfer will not work as expected (for internal use in your own TransVirtual account only).
You also will be unable to use the consignment copy function to re-create Taxi Truck type consignments:
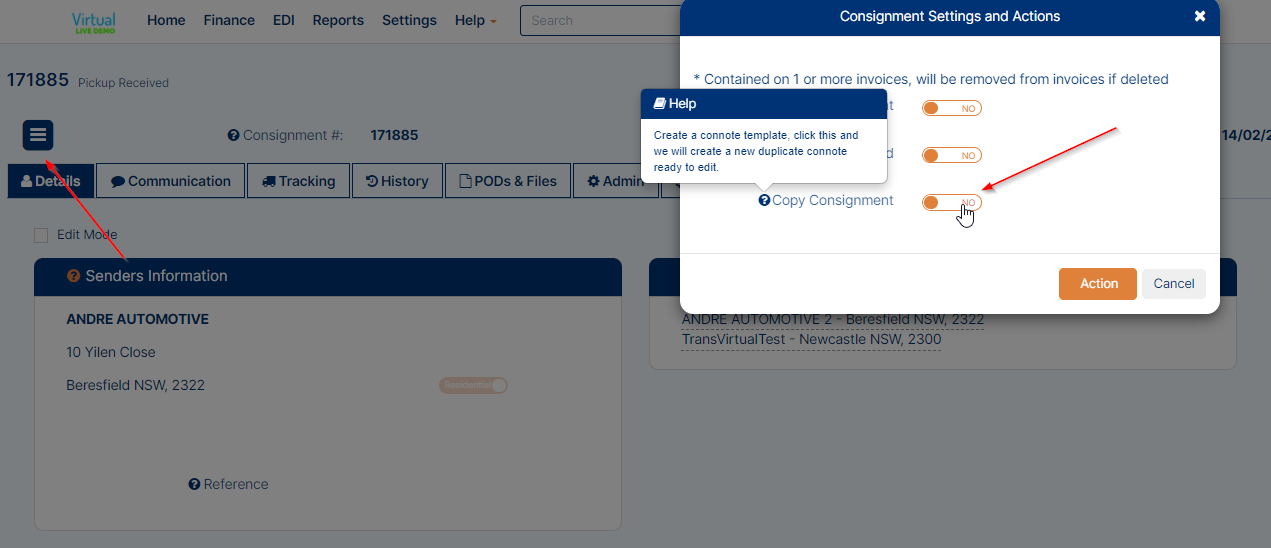
You also will be unable to use the consignment copy function to re-create Taxi Truck type consignments:
The copy function will create a new consignment but it WILL NOT copy across the legs as they appear in the original Taxi Truck consignment.
Each new Taxi Truck consignment will need to be created from the consignment creation page to ensure its accuracy.
If when printing the labels for a taxi truck type consignment they appear blank, this likely means that you have not entered the receiver leg information such as number of items and weights, etc.
Related Articles
Consignment Creation
How to Create Consignments Refer the below steps to create a consignment(s). To create a consignment, on Transvirtual web portal, go to Transport > Operational Tasks > Consignment, consignment filter page will display. On consignment filter page, ...How to Bulk Reprice Consignments
Navigate to Transport>Operational Tasks>Consignments and filter the screen to the consignments you wish to reprice. Use the select All option as below or select the required consignments individually. Once selected as below select the Bulk Action ...Pickup & Deliver
The Delivery/Pickup page is used to perform Deliveries and Pickups on the mobile application. Once you have Loaded Consignments onto your device. Click here for further information on doing this. Overview 1. Once you tap on the Delivery page you will ...Recurring Consignment Templates
Recurring Consignment Templates Recurring consignments can be created and used for daily pickups or deliveries that happen on a repeating basis, this function saves time to create new consignments each time as the system will automatically do this. ...Allocation Controller
The Pickup Allocation screen allows the pickup controller/staff member to see unassigned pickups and allocate them to a driver or agent. You can also see assigned pickups, but the primary function of the pickup allocation screen is to assist with ...