Pickup Allocation
The Pickup Allocation screen allows the pickup controller/staff member to see unassigned pickups and allocate them to a driver or agent.

You can also see assigned pickups but the primary function of the pickup allocation screen is to assist with assigning new pickups to the relevant driver or agent.
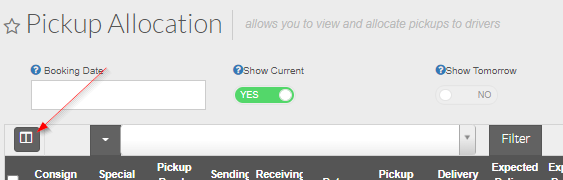
In the TransVirtual Web Portal, select the following: Home > Consignment Actions > Pickup Allocation

Users using the updated 2022 menu should go to Transport > Operational Tasks > Pickup Allocation
Arriving here you will see a page like the below:
If your screen appears blank as per the above it could be due to the below settings not having been enabled:

Each setting here does a slightly different thing; you can click the helper icon next to them to learn what each setting does:
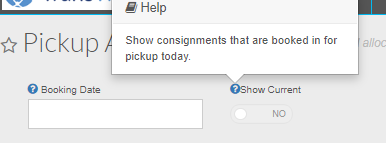
Enabling the Show Current toggle will display pickups booked in for today, like the below as an example:
Entering a booking date will remove options for Show Current, Show Tomorrow etc. Remove the booking date and tab away for these options to be returned
How to assign a pickup
- To assign to a driver or agent, select a consignment by either clicking on the consignment row or clicking the checkbox next to the consignment:
Bulk assignment is possible by simply selecting multiple consignments at once!
- Here you receive a brief overview (located top-right in Job Information and Assignment section) of the pickup & its location. This information allows you as the allocator to make an informed decision about whom to assign the pickup.
- After deciding whom to assign the pickup, click on the name of either the relevant driver or agent located bottom right.
Doing this will then prompt you to confirm you wish to assign the selected connote/connotes to that driver/agent:
You will then see this prompt:
Click Yes, assign job and the selected consignment will be assigned to that driver or agent.
If assigning to a driver and that driver is using a recent version of the mobile app, the pickup notification informing them they have been assigned a new pickup will display on their device almost immediately.
They can then work this into their run and action accordingly.
They can then work this into their run and action accordingly.
How to see consignments assigned to a driver
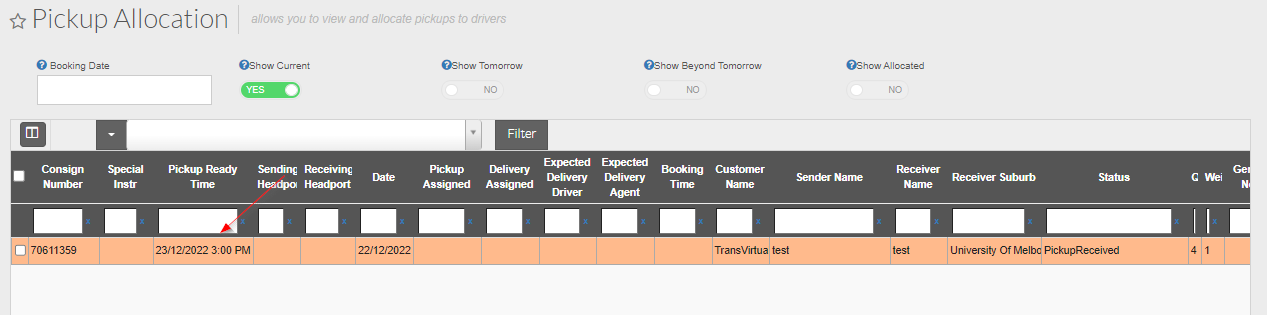
When consignments are assigned to a driver, a consignment count will display alongside their name indicating how many connotes they have been assigned, like the below as an example:
In the above, driver Andre has been assigned two Pickups. This 2PU icon is actually clickable and when clicked will present you with more detailed information about what consignments that driver has been assigned:

Here you can see that both consignments assigned to this driver are listed and details are provided for quantities, weights as well as what type of assignment has been performed - both of these were assigned as pickups but there is the ability to assign delivery type consignments to a driver (these are simply consignments that require no collection from the sender).
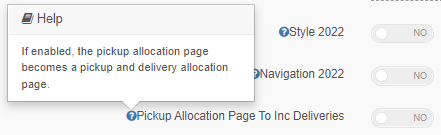
There is the ability to turn the pickup allocation screen into an allocation screen which allows you to also assign deliveries!
To do this, go to Settings > General > Global Setup > General Tab > Enable the below setting:
To do this, go to Settings > General > Global Setup > General Tab > Enable the below setting:
Information on jobs assigned to an Agent
This operates in a slightly different manner and will display any prices an agent may have against a consignment:
In the above, the consignment being assigned to this agent has an agent price of $19.80
This figure is the amount the agent will charge (your cost or part of) and is based on the agent rate card that this agent is attached to.
This figure is the amount the agent will charge (your cost or part of) and is based on the agent rate card that this agent is attached to.
Jobs assigned to an agent are viewable via their Agent Manifest. Click here for further information on this.

Note: Agents are displayed as closest at the top to furthest away at the bottom (in relation to selected consignment and based on last known GPS).
Extra Information on assigning to a driver
There is also the ability to see on a map, the distance between a driver's current location and the selected consignment that you are thinking of assigning to them.
To do this, click on the Pindrop below the consignment drivers name:
To do this, click on the Pindrop below the consignment drivers name:
You will then be presented with a map showing where the selected consignment is located. The driver will display as a truck icon on the map if GPS data for their device is available:
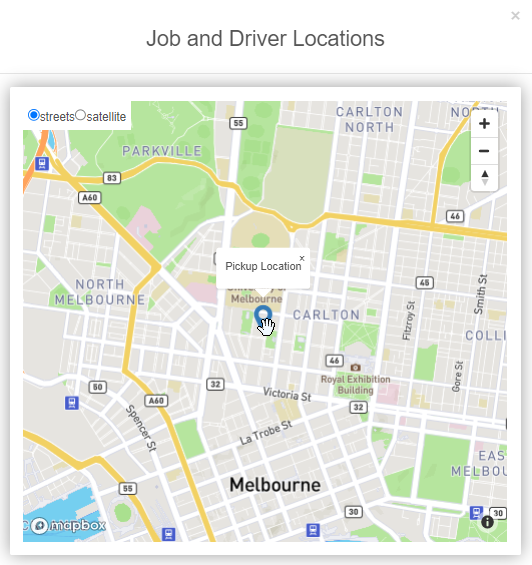
In the above, the driver is either very far away from this selected pickup or they do not have GPS enabled on their device and as such no GPS reading can be provided - which then means the system cannot display the distance between the selected pickup and the driver (you can zoom in and out by clicking and holding ctrl and then scrolling on your mouse).
Where GPS data is available from a device the map will display like the below:
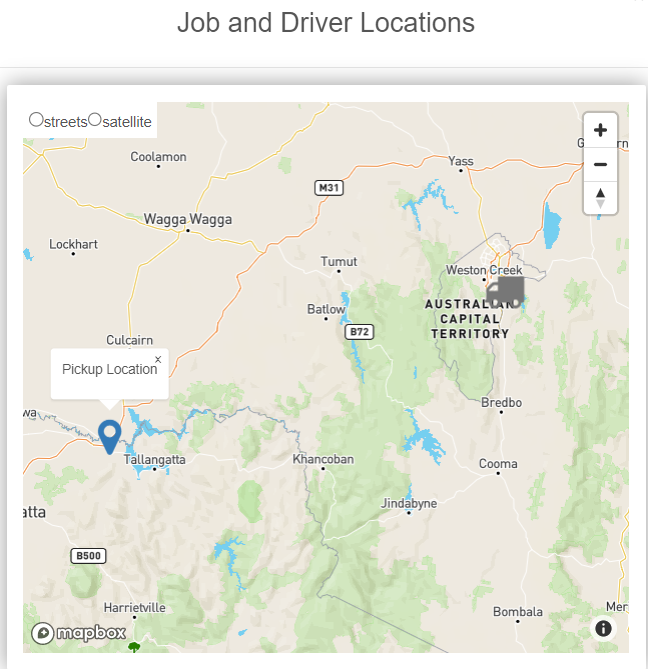
Where GPS data is available from a device the map will display like the below:
Un-allocating a consignment
If you or someone else accidentally assigns a consignment to a driver or agent by mistake when using the pickup allocation page, there is the ability to un-allocate the job from that driver or agent (remove the job from them).
For example, the below consignment has been incorrectly assigned to driver Andre as Andre does not work in the area that the consignment is located:
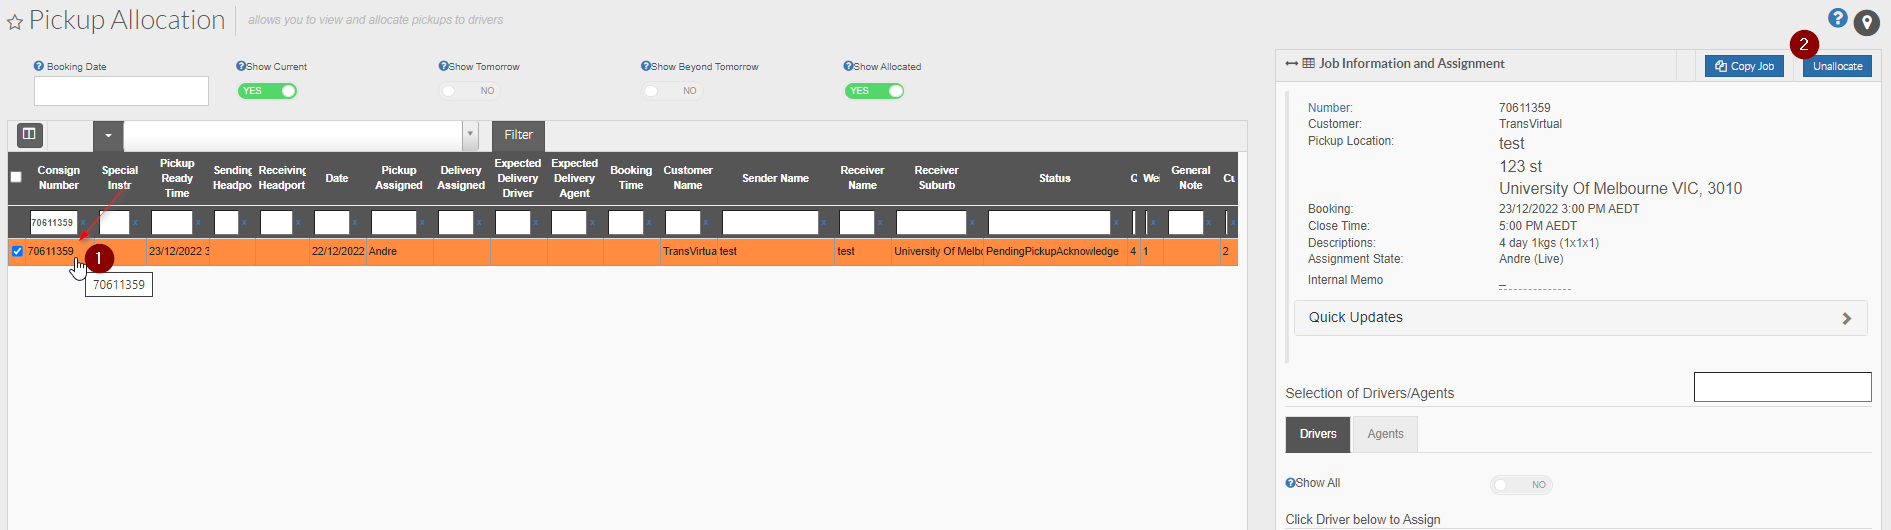
For example, the below consignment has been incorrectly assigned to driver Andre as Andre does not work in the area that the consignment is located:
To un-allocate, simply click the consignment row and then click on the button that says Unallocate located top-right of the page.
Clicking this will present you with the below prompt:
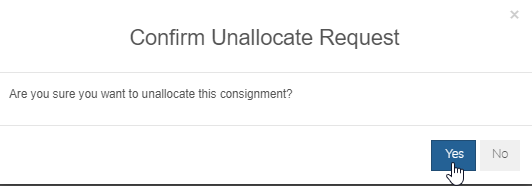
Clicking this will present you with the below prompt:
Click Yes to confirm you wish to un-allocate this consignment and once done the consignment will no longer be assigned to that driver or agent.
If the assignment was to a driver initially, un-allocating a consignment would remove the consignment from that user's device as they are no longer required to action it.
If the assignment was to a driver initially, un-allocating a consignment would remove the consignment from that user's device as they are no longer required to action it.
Creating a saved search filter
This operates in much the same way as the search filter in the consignment search page - the purpose of this functionality is to allow you to create a saved search query for information you regularly wish to look up or search for when using the Pickup Allocation page. Click here for further information on this.
Keep in mind that if there are columns you don't have but require, use the column selector to add them in:
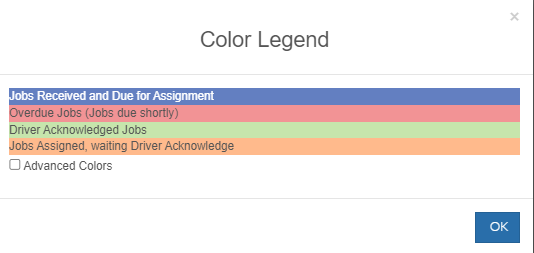
What do all the different colours mean?
You will likely notice when using the Pickup Allocation screen that the consignment rows flash or appear in different colours.
Each colour represents something different.
To identify what each colour is used for, scroll to the bottom of the page and click on the Color Legend located bottom-left:

Each colour represents something different.
To identify what each colour is used for, scroll to the bottom of the page and click on the Color Legend located bottom-left:
This is also where the export button is located! Much like the consignment search page and other pages in TransVirtual, this button allows you to export the data seen in the grid to an excel or csv file.
This will then bring up this popup window:
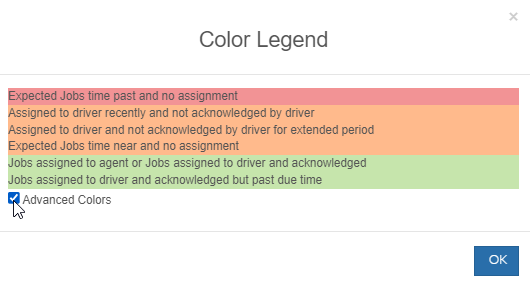
Clicking on the advanced colors checkbox will provide further breakdown if required:
Summary
- Drivers and Agents will be sorted by the distance from the pickup to the driver's current location or agent's headport - if their position is known. This means the list of drivers shown bottom-right will have the driver closest to the selected consignment listed at the top and drivers further away will appear in ascending order (closest and smallest distance at top, to farthest and biggest distance at bottom).
- Drivers will have total pickups allocated to them on the right hand side of the row.
- You can search the Drivers or Agents if you have a large number - use the filters to search for certain results.
- You have a few switches at the top of the screen to filter the display list.
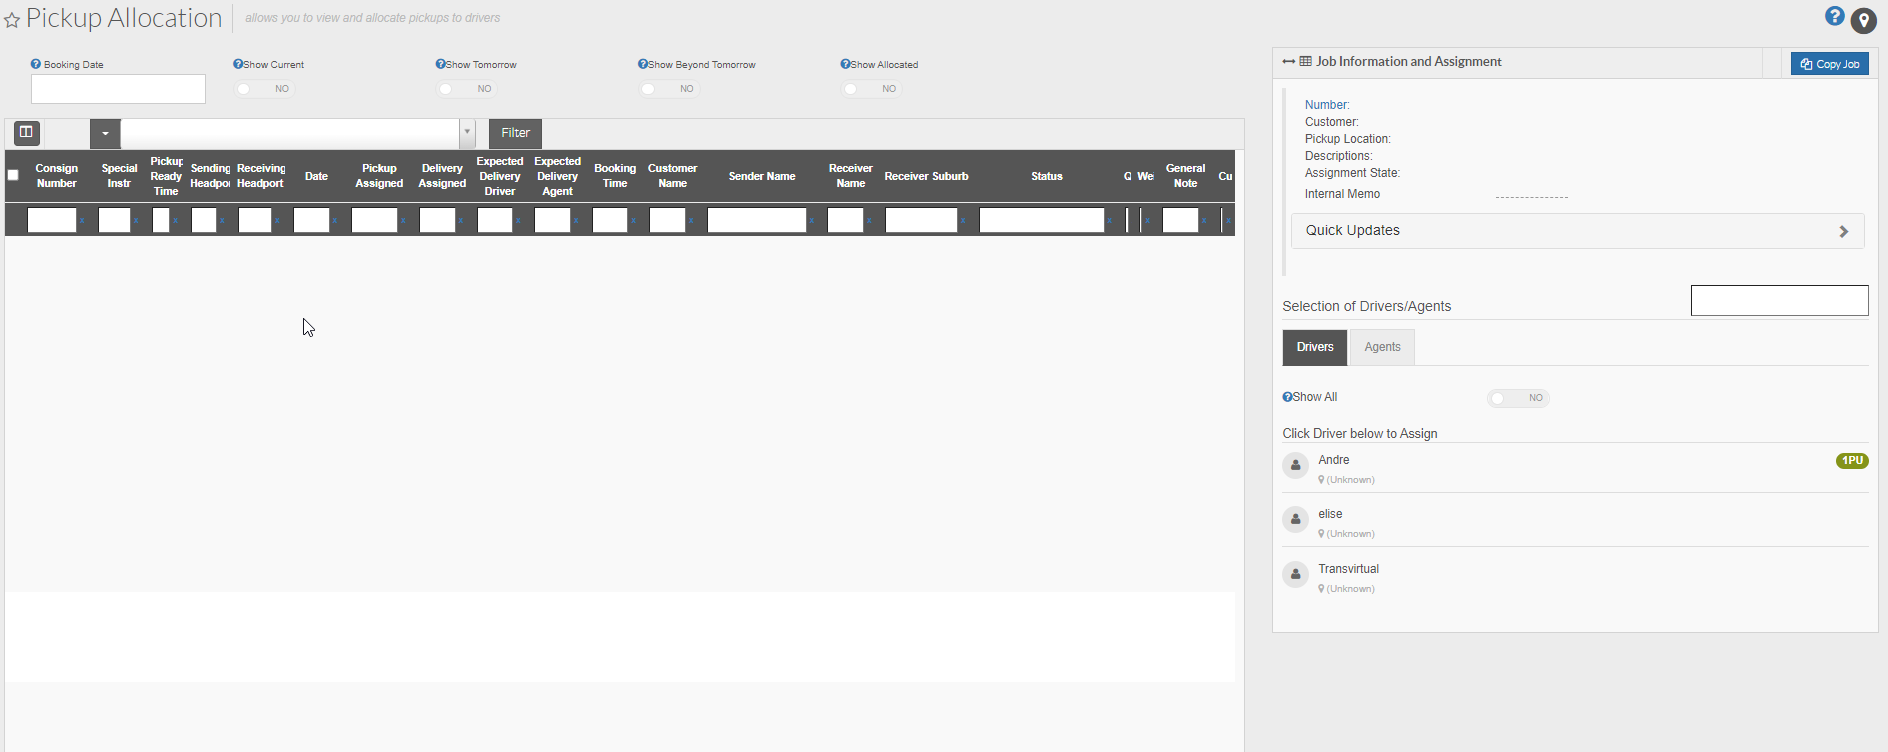
- Show Current: Show consignments that are booked in for pickup today.
- Show Tomorrow: Show consignments that are booked in for pickup tomorrow.
- Show Beyond Tomorrow: Show consignments that are booked in for pickup beyond tomorrow.
- Show Allocated: Show consignments that have already been allocated.
- All columns are searchable by entering details in the boxes below the headings.
- You can create filters by clicking on filters - illustrated in the above under heading "Creating a Saved Search Filter".
- If a Staff member appears and is not required consider Disabling Mobile Access in the user card file.
- Agent Drivers who have mobile access will display in the drivers list.