Rate Card Imports
TransVirtual has the ability to import rate cards from a csv file. Below are instructions on how to do this
Rate Card Import
When
creating rate cards, you have the ability to import a csv file to
create the rate card; rather than having to manually create steps 1-4
from within the web portal.
To do, this you will need to first to create an empty rate card and then enter the rate card. Make sure the rate card has a zone list attached to it.
To do, this you will need to first to create an empty rate card and then enter the rate card. Make sure the rate card has a zone list attached to it.

Click here for help with rate card setup
From within the rate card, click the below to import a csv file:
You will then see a screen similar to the below:
Click to select and upload a file, then click Next to map and import the file!
This
screen will explain that, at a minimum, your file will need to contain
a Service Level, a Freight Item, a From and To zone and a rate of some
sort for EACH row in the csv file.
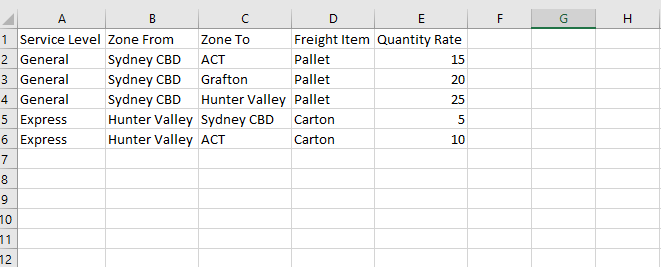
An example of what your import file could look like would be the below:
When uploading you'll be asked to map the columns into TV as per what is in your file, like so:
The text under the Data column will be what the columns are called in your csv file and the Map to field section is what you want that column to import as in TransVirtual.
Click the Next button once the file has been mapped. This will import the file.
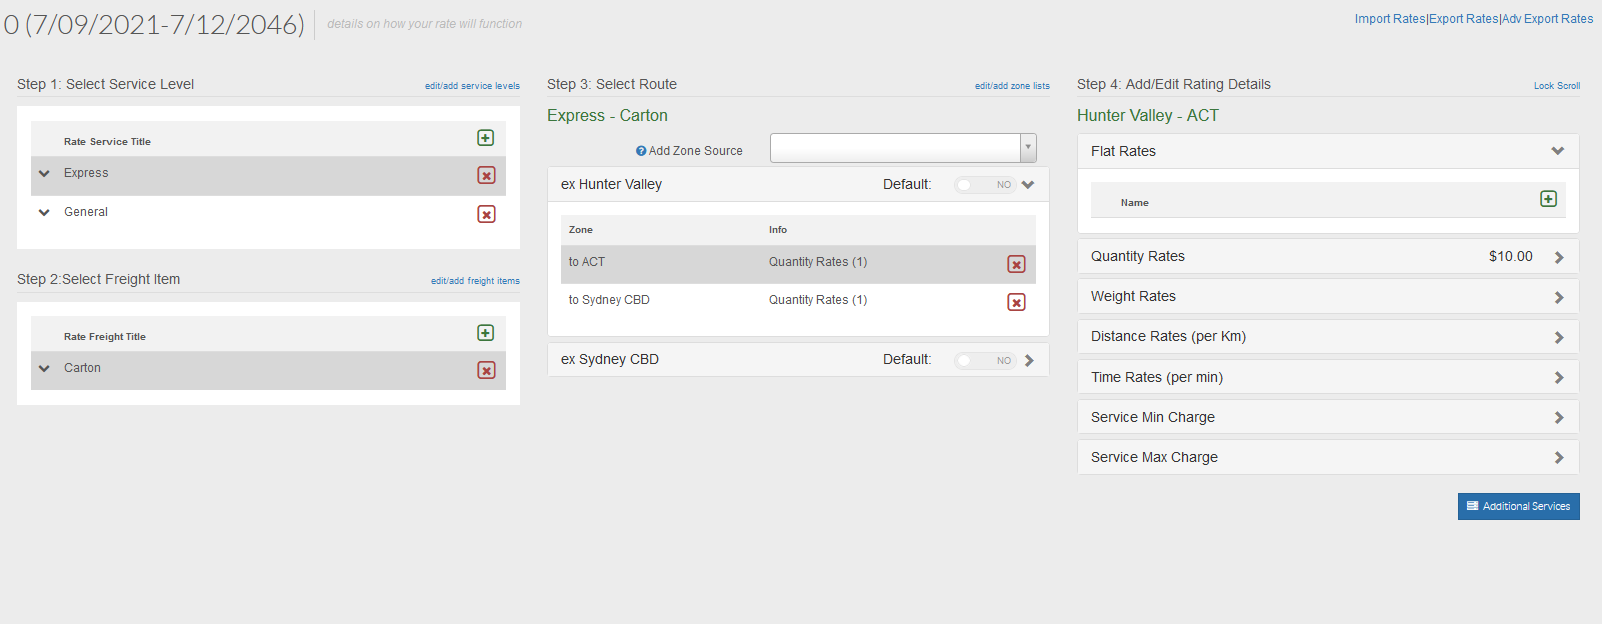
Using the above example, when the file has been imported, the rate card will look like the below:
As you can see, all 4 steps have data in them as per what was in the file.
You can import more than one Service Level, or Freight Item or From/To zone if required.
An example, could be the below:
When this is imported, you would see the below:
You'll notice that multiple Service Levels, Freight Items and Zone Sources appear, with the relevant prices attached to them.
When importing different service levels, etc, you need to ensure that the row simply represents the price that would relate to the zone, freight item and service level - each line in the csv file is a representation of a price for a specific route and freight item etc.

If
you have an existing rate card and are trying to do an import to update
it, keep in mind that csv imports of this kind will overwrite whatever
is already there in the rate card. As a result, it is recommended that
you create a new rate schedule and
do the import there, within that schedule; (don't apply an increase
when creating a new schedule-leave blank) or export the current rate
card data first BEFORE attempting an import.
Importing a rate card from a csv could potentially save you a lot of time.
However, there are important things to note about this process:
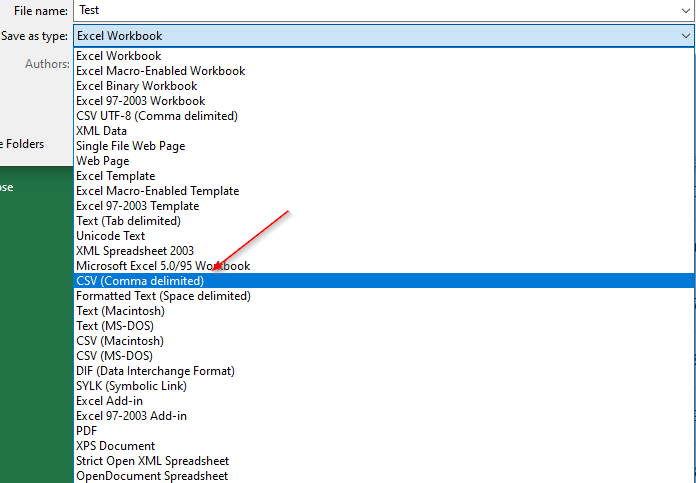
- CSV is the preferred file format. To save as a csv (comma
separated file), click save as on the file and select csv as the file
type:
- You need to also ensure that the appropriate Service Levels, Freight Items and Zone Names all exist in your account BEFORE you attempt the rate card import.
If, for example, your csv file had a Service Level of 'Express' specified, but you did not have an Express Service level setup in your account, the import would fail and the error would explain that the Service Level does not yet exist.
If, for example, your csv file had a Service Level of 'Express' specified, but you did not have an Express Service level setup in your account, the import would fail and the error would explain that the Service Level does not yet exist.
For further help with Rate Cards, please click here.
For help with Service Levels, please click here.
For help with Zone Lists, please click here.
Once a rate card has been created, you can export the current rates using the below button:
Doing
this will then give you a file with many columns such as weight start
break, weight end break, etc. The start and end break columns are simply
used when you apply either a weight or quantity rate to a route and you
charge incrementally more or less when the numbers go up. For example,
you might charge $10 per pallet for the first 10 pallets, then $5 per
pallet for any after that. Using the quantity start and end break
columns, you could say that the first 'break' starts at 0 and ends a 10
and the rate for this band is $10. You could then add a second 'break'
that starts at 11 and ends at 100, and the rate for that band would be
$5.
Handy if required.

If
needed, you could delete all the data out of the file, just leaving the
headings, and you could use this as template for any future csv rate
imports - you'd simply need to populate the rows with the relevant data.
Matrix
You will need to ensure you have setup your zone listing. For Instructions Click Here
With a matrix import you will need a file similar to below there the heading zone and column zone meet will be the respective Route. For this example zone 2 to zone 5 is Route 6 and will have a respective price.
Navigate to Finance>Rate Cards>Customer Rate Cards and click on New Rate

Users of the 2022 navigation update should proceed to Finance>Configuration and Setup>Rate Cards>Customer Transport Rates and click on new rate.
Select the customer for this rate card and click Create
Once created select the rate card and choose the respective zone list from the dropdown list then click Update
Now we want to open the rate schedule by clicking on the effective date as below
Select the appropriate service level by selecting the '+' icon as below
Select the appropriate Freight item for your rates by selecting the '+' icon as below
Select the Zone Source for your Rates, this is the zone where your customer is located
Right click beside any of the zone to rows as below and select Linked Routes
You will then see the below screen, select Import Zones
Drag and drop your Matrix Rate CSV file or click and select then click Import
The Rate Schedule will now be populated as below and you will see your route numbers as highlighted below
Rates now just need to be entered in Step 4 of the schedule, for our example Route 7 has a rate of $20.00 per carton