Zone Lists
Zone Lists provide you a way you define areas, regions or locations used by features throughout TransVirtual..
By default you will have two zones setup on your account initially
- Headports
- AutoAssignments
Create a Zone
- Click on the
 New Zone button
 - Enter the Zone Name
- Enter Other Names for the Zone in the "Other Names (AKA)" box
- Enter a zone short name.
- Click on the Save
 button
Edit/Modify a Zone Name
Standard Zone Lists
- Click on the
 button beside the zone you need to modify
- Here you can enter or change any of the values available
- Zone Name - Full Name of Zone
- Other Names (AKA) - Alternate Names for the Zone
- Zone Short Name - Shortened Versions of the Zone Name e.g "SYD" as opposed to "Sydney"
- Once complete, click on the Save button
Advanced Zone Lists (Headports)
- Click on the button beside the zone you need to modify
- Here you can enter or change any of the values available
- Zone Name - Full Name of Zone
- Other Names (AKA) - Alternate Names for the Zone
- Zone Short Name - Shortened Versions of the Zone Name e.g "SYD" as opposed to "Sydney"
- Location Name - Address/Location Name
- Address 1 & Address 2 - Address lines relevant to this location
- Suburb - Suburb detail of the location
- Location Phone - Contact Number for the location
- Location Email - Contact Email for the location
- Time Zone - Time Zone for this location/zone
- Silent Zone - If zone is to be hidden from Mobile Device Selection
- Floor Location List - Comma Separated Listing of locations within this Zone for scanning. e.g "Bay1A" used for identifying locations within a depot.
- Once complete, click on the Save button
Delete/Disable a Zone
Click on the

button beside the zone you need to delete.
Click on the Yes button to confirm.

When Zones are deleted they are actually disabled. If you re-create a Zone with the same name it will re-enable the deleted one. If you wish to delete a zone to start over, rename the zone to something different before deleting.
Editing Zone Lists - Suburbs
How to Add, Remove and change suburbs assigned to a zone

Any changes will take approx 10 mins to become active in system and note any existing consignments with headports or route zones will not update
1. Go to Zone List Directory (Settings>Lists and Zones>Zone List Directory).
2. Select the zone list you wish to make changes to from the left column.
3. Click on Edit Zones/Suburbs from the right columns of the screen. 
4. Select the zone you are wanting to add or change a suburb too from the left column.
5. From the right column select the Rules by Suburb tab as highlighted below
6. You will be presented with a list if suburbs. To assist with filtering type the suburb, name or state into the column filter and press Enter
7. You should now have the suburb visible that you are wanting to add or edit.
8. Right click with your mouse on the suburb you are wanting to change and you will receive 2 options as below
9. If you are wanting this suburb to be in the zone click Add suburb to zone otherwise if you are wanting to remove select Remove suburb from zone
If attempting to remove a suburb from a zone be aware if this has been assigned via a map or postcode rule this won't change
Import Zone List
If required, it is possible to create a zone list by importing a csv file into TransVirtual.
To do this, you will need to first create a csv file with your zone list data.

A CSV file is a plain text file - it stands for comma separated values file and to create one you would open up excel and use the save as function to select .csv as the file type.
The below is an example of what your csv file could look like:
You can see in the above that there are four columns; one each for Zone Name, Suburb, State and Postcode.
These four columns will define what suburbs, states and postcodes belong to what zone, in this zone list.
It is recommended that all import files contain Zone Name, Suburb, State and Postcode as this provides the best possible data.
Ensure that the data is entered correctly and that you have saved your document as a csv.
From here, go to Settings > Lists and Zones > Zone List Directory > New Zone Listing. You will see the below appear:
Give your zone list a name and click Create.
Click the newly created zone list from the grid on the left, then click Edit Zones/Suburbs on the right:
You will then enter the zone list.
Click New Zone at the top to see the below window:
Click Import Zones.
You will then see the below:

If your csv files has headings, toggle Ignore First Row to yes.
You then need to map the file using the Column Mapping.
You will then see the below:
If your csv files has headings, toggle Ignore First Row to yes.
You then need to map the file using the Column Mapping.
Click in the field and select the appropriate field names as per what is in your file, from left-to-right.
Your mapping could look like the below:

Once mapped accordingly, upload the relevant csv file, then click Import.
Your mapping could look like the below:
Once mapped accordingly, upload the relevant csv file, then click Import.
The file may take a few minutes to import if it contains a large volume of data!
Once the file has been imported, the page will refresh and you will then see the results of your import, like so:
As you can see in the above, the import was successful and two zones have been created; Newcastle and Sydney.
These two zones have suburbs in them as per the example file above.
See Attachment for sample import.
No Service and Limited Service
In TransVirtual there is the ability to create a zone list that outlines the areas that you do not service and the areas that you offer limited service to.
To set this up, you first need to define what suburbs, states and postcodes belong to each of these two zones.
If you wish to create this zone list via an import, your import file should look similar to the below:
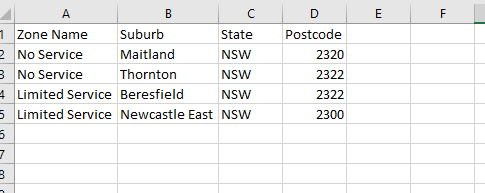
As you can see, each suburb is listed against either a No Service or Limited Service zone, depending on what category it falls into.
Once your file has been created, simply save as .csv and import as per the above instructions - see Import Zone List in this article.
You can also create this zone list manually.
To do so, go to the zone list directory under Settings > Lists and Zones > Zone List Directory:

Click New Zone Listing and create the zone list - give it an applicable name.
From here, go back to your newly created zone list and click on it from the list and click Edit Zones/Suburbs to go into the zone list.

From here, click the New Zone button as per the above.
For this particular zone list you should only create two zones at most; one called 'No Service' and one named 'Limited Service'.
You can if required, only have one of these zones if you only have a No Service area and not a Limited Service area; but the zones MUST be named as per the above.
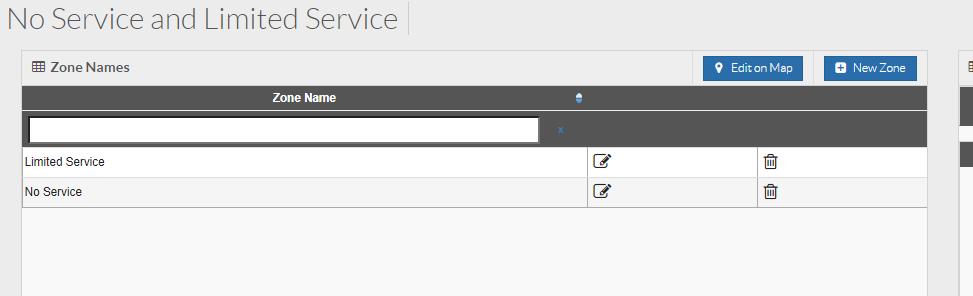
Once you have created your zones, they will appear as per the below:
This zone list allows you the ability to add custom pop-up messages for when a customer tries to book in a job that fits into one of these zones.
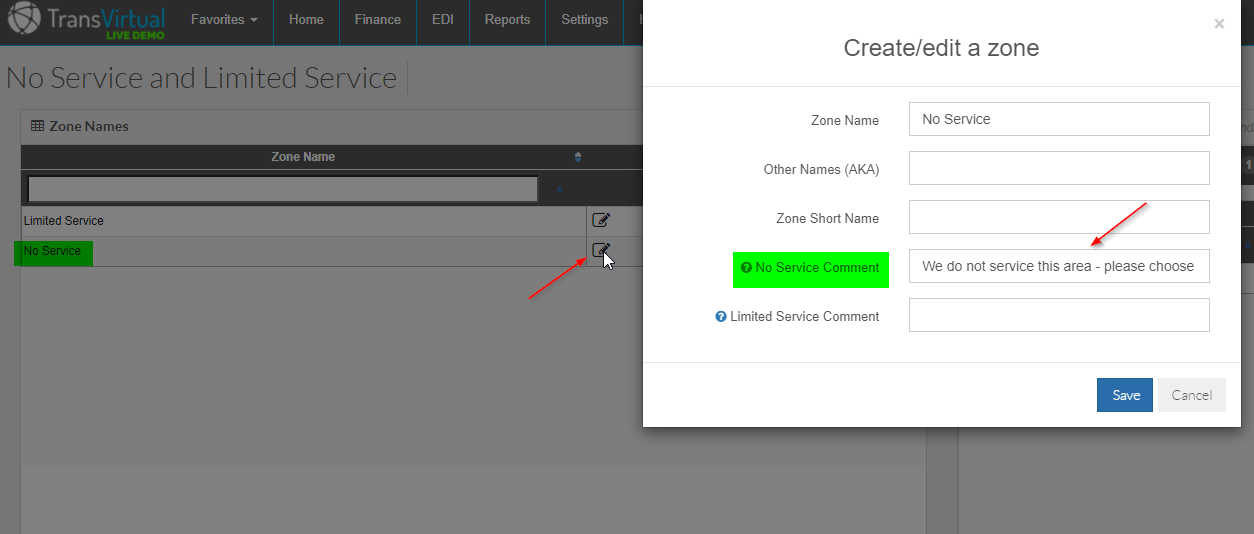
To customize these messages, click the edit icon as per the below:
To set this up, you first need to define what suburbs, states and postcodes belong to each of these two zones.
If you wish to create this zone list via an import, your import file should look similar to the below:
As you can see, each suburb is listed against either a No Service or Limited Service zone, depending on what category it falls into.
Once your file has been created, simply save as .csv and import as per the above instructions - see Import Zone List in this article.
You can also create this zone list manually.
To do so, go to the zone list directory under Settings > Lists and Zones > Zone List Directory:
Click New Zone Listing and create the zone list - give it an applicable name.
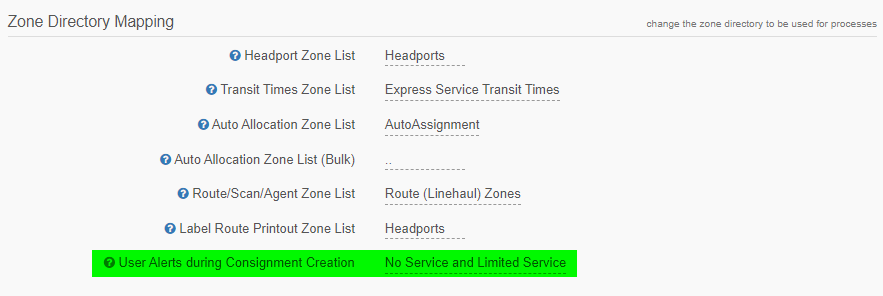
Once your zone list name has been setup (before you enter the zone list and create the zones), you then need to assign it to the below field in the Global Setup page:
This section can be found under Settings > General > Global Setup > General Tab > Zone Directory Mapping.
Simply double-click on the dotted lines and then choose and save the zone list you have just created for this purpose.
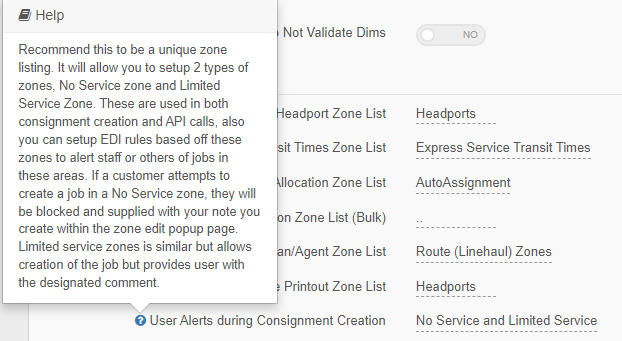
The helper icon also gives you an indication of how it is used:
As you can see, this zone list applies to the web portal (consignment creation page within TransVirtual) and to API connote creation - if someone attempts to create a connote for a No Service area via API they will be returned the No Service message (you will enter - explained below) and the connote creation call with fail.
Note: This setup does not apply to EDI created consignments!
From here, go back to your newly created zone list and click on it from the list and click Edit Zones/Suburbs to go into the zone list.
From here, click the New Zone button as per the above.
For this particular zone list you should only create two zones at most; one called 'No Service' and one named 'Limited Service'.
You can if required, only have one of these zones if you only have a No Service area and not a Limited Service area; but the zones MUST be named as per the above.
Once you have created your zones, they will appear as per the below:
This zone list allows you the ability to add custom pop-up messages for when a customer tries to book in a job that fits into one of these zones.
To customize these messages, click the edit icon as per the below:
In the above, after clicking on the No Service zone edit button, enter a message in the No Service Comment field.
Ensure to save after entering the comment.
To add a comment for the Limited Service area you need to do the same thing, but this time click on the edit icon against the Limited Service zone and then only enter a message of your choosing into the Limited Service Comment field:
Please note: You will notice that when clicking on either edit icon that you have the ability to enter comments for both the No Service and Limited Service zones.
Please ensure that whatever zone edit button you click, you only modify the comment related to that zone; so if you click the No Service edit icon you MUST ONLY enter text for the No Service comment, and vice versa. The reason for this is that if you click the Limited Service edit icon and add a No Service comment, the system will treat all suburbs in the Limited Service zone as if they were part of the No Service zone, and consignments with these receiving suburbs will not be able to be created via the web portal or API.
Please ensure that whatever zone edit button you click, you only modify the comment related to that zone; so if you click the No Service edit icon you MUST ONLY enter text for the No Service comment, and vice versa. The reason for this is that if you click the Limited Service edit icon and add a No Service comment, the system will treat all suburbs in the Limited Service zone as if they were part of the No Service zone, and consignments with these receiving suburbs will not be able to be created via the web portal or API.
Once you have created the zones and added the relevant pop-up comments, simply go through and add the applicable suburbs to each zone.
To do this, click on the zone on the left, then click Rules by Suburb.
From here type and search for the correct suburb:
Once the correct suburb has been found, right-click on it and then select Add Suburb to zone.
You will then notice the Current Zone has been populated:
Repeat this process until all applicable suburbs are in zones.
You would only choose to do this manually if you did not have many suburbs to enter into this zone list; typically though importing this list would be quicker and more efficient.
Once the zone list has been implemented as per the above, allow 15 minutes for it to take effect.
From now, when someone tries to book in a consignment that lies in one of these zones, they will experience similar to the below:
or:
Please keep in mind that any connotes created with receiver suburbs listed against the No Service area will be blocked from creation and you will see a red error message with the text you entered against this zone. Any consignments for Limited Service areas will flag with a yellow message at the top with the text of your choice and the consignment creation will be allowed.
No Service areas = will be blocked from creation
Limited Service areas = consignment creation allowed but yellow alert message displayed
Limited Service areas = consignment creation allowed but yellow alert message displayed
Related Articles
Staff List
Creating a New Staff Card In your TransVirtual web portal menu, click on Home > Card Files > Staff List Click on the button in the top right corner of the page. Enter a new username, ensure it ends with a @yourcompanyname (no need to include a .com) ...Import Types with Examples
In TransVirtual there is the ability to import different kinds of lists into different pages or sections of TransVirtual. These imports are achieved by uploading a list of data in csv format - the purpose of the import process is to allow you to be ...Vehicle Lists
Vehicle Lists This screen is where vehicles are listed and kept for data control. Here you can keep a history of your vehicles and any other relevant information they have. Below is the information you can store and utilise in vehicle lists. The ...Address Lists
The address list contains a list of each of the addresses you have picked up from and delivered to. Addresses can be entered into the list in a few different ways: They can be Manually Added - whilst within the Address List page They can be Imported ...Photos and Images EDI Import
In TransVirtual there is the ability to import photos and images and attach them to relevant consignments. This is done by creating EDI (Electronic Data Interchange) Import rules in your account that can accept information via Email, FTP or Manual ...