Customer Rate Cards
Rate Cards allow for pricing to be setup based on Service Levels, Freight Items, Zones and various pricing structures
In Order to setup a rate card you will need to have at least one service level, Freight Items e.g. Cartons, Items Pallets etc as well as a zone listing in place which separates different areas being suburbs or Postcodes for different prices
 Please note: The setup for agent rate cards is largely the same as what is detailed in this article; the main difference being where you enter/create the rate card. Agent rate cards are created under Finance > Rate Card > Agent (Onforwarder) Rate Cards.
Rate Card Setup
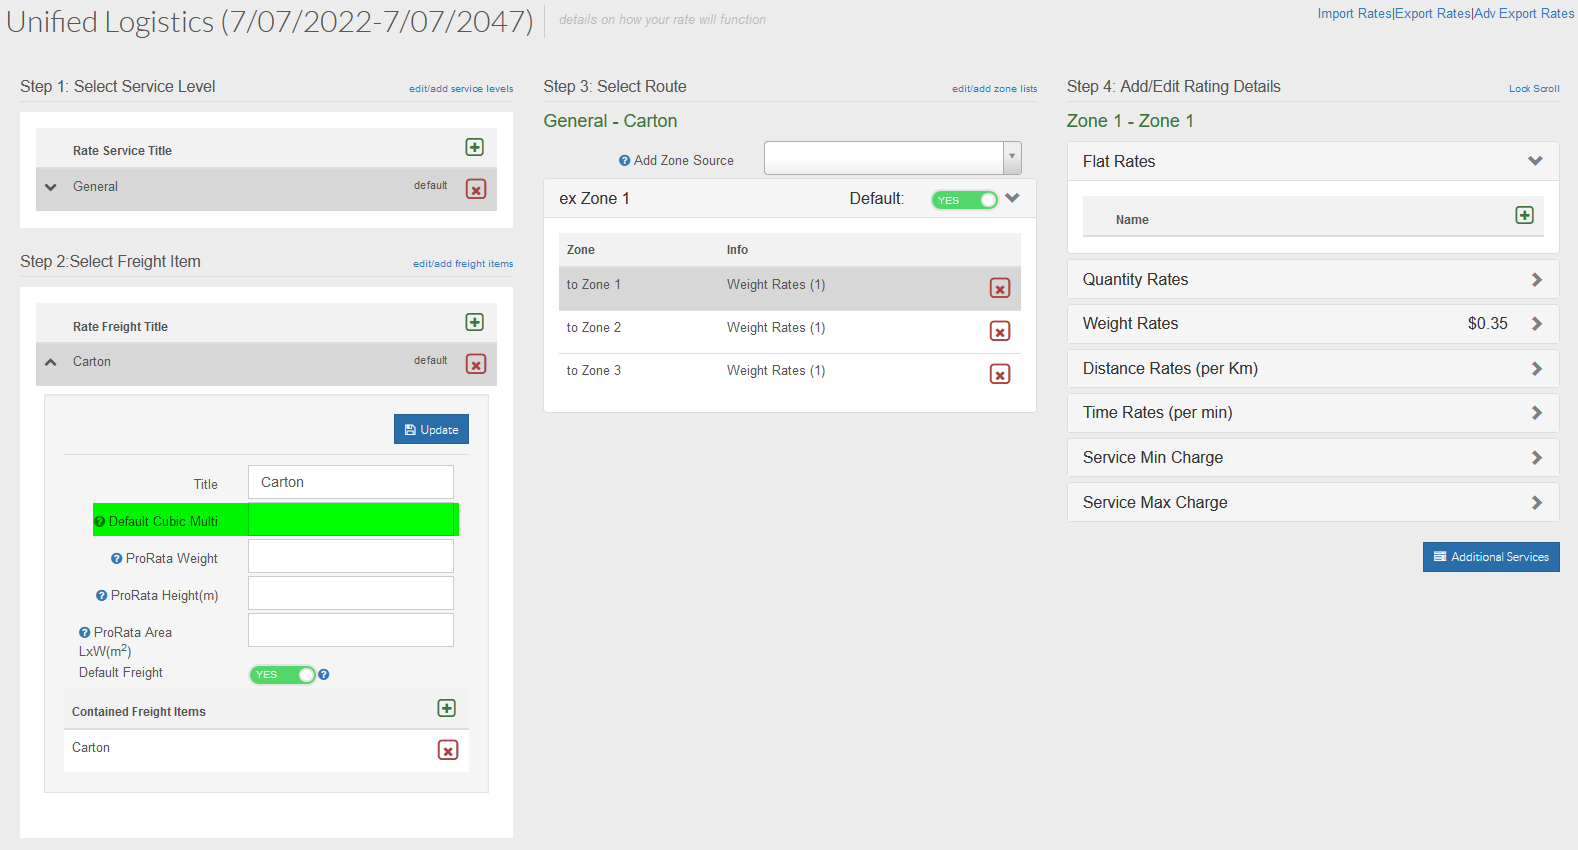
We will begin with creating a rate card by selecting New Rate
You will then need to select a customer from the Drop Down List below and click on 
Once your Rate Card is created you can then select this from the left hand side of the screen and the right hand side will change to reflect the details of this card.
We will now need to set the Zone listing required for this rate card from the Zone Listing drop-down and select  from the top right corner.
Once this is done we are now ready to setup our rates by clicking on the effective date as circled below.
We will now need to set the Service Level by clicking on the green plus symbol as below and selecting your desired service level for this rate card
Next you will need to select your Freight Item by clicking on the green plus symbol as below and selecting from the drop down list. In this example we have selected Carton
We now need to choose our zone source, this will be the most common zone from which you freight will leave from
This will then populate with your 'to' zones as below
Now for each of those zones we can setup different rates based on your agreed rates with your customer to these areas.
First of all is Flat Rates, these will apply once for each connote and would be your basic on connote charge on a connote & kilo rate setup
Secondly we have Quantity rates, these will apply for each Item based on the quantity of items entered against the consignment
If you have multiple quantity breaks these can be added by selecting the green '+' icon as highlighted below
These will be entered as below, if there are 5 items these will be charged as $10.00 each
If you wish to charge the first 4 items in this example $20.00 then the fifth at $10.00 you would select Progressive Rate as below
There is also an option with quantity rates to charge by the cubic value of the consignment, in the below example if the Total Cubic of the consignment is 5 cubic metres the charge will be $50.00
Thirdly you can setup rates based on weight which are typically used in conjunction with a Flat or Basic rate as above, in this example we are charging $0.80 per kilo if the consignment weight is less than 500kg and so on. We can also use progressive rates which will charge $0.80 up to 500 then $0.60 up to 1000 and so on
The next option for pricing is by Distance and charged per kilometre, this is used in conjunction with the Route Optimisation Module and allows for charging based on the distance the driver travels to perform the delivery and can also be overridden to be based on departure from your depot and return even if the driver performs deliveries in the course of their travels

Please note this distance calculated may be impacted by various factors including Address Accuracy, GPS of driver pickup and delivery locations and will likely not always align with the same result you may receive from other mapping software as we assume the shortest route by distance.
Similarly Time Rates charged per minute can be setup to be based on time taken to perform the delivery and includes option to override based on time taken to depart from and return to depot even if the driver proceeds directly to the next delivery
Please note this time calculated may be impacted by various factors including Address Accuracy, GPS of driver pickup and delivery locations and will likely not always align with the same result you may receive from other mapping software as we assume the shortest route by distance.
Lastly you have 2 options for Minimum and Maximum charges, these are based on the entire charge of the consignment including all of the above charges and can be set to allow for small charges based on few items or low weights where the cost to service this area or the expected/agreed volumes with customer have not been achieved on this occasion and are entered as a price exclusive of any levies and taxes
Charging the greater of the cubic weight equivalent vs the dead KG weight - how to
If required, TransVirtual has the ability to automatically charge and apply the greater of the cubic weight equivalent or the dead weight.
This is done through the use of a Cubic Multiplier, found in step 2 of a rate card:
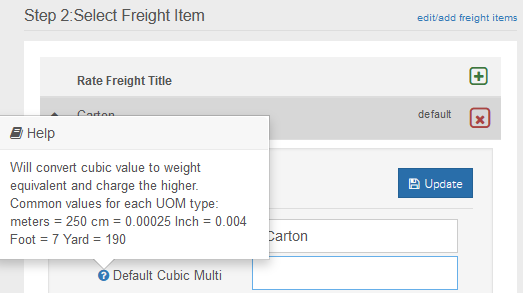
Common Cubic Multiplier values are 250 or 333.
The purpose of a Cubic Multiplier is to convert the cubic value of a consignment item row to an equivalent weight value; if this value is greater than the original dead weight value, the system will price the consignment using the cubic weight value calculated from the Cubic Multiplier.
The formula used by the system when using Cubic Weight (using a cubic multiplier) = (length x width x height) x item row qty x Cubic Multiplier x weight rate for relevant zone.
An example below:
This is done through the use of a Cubic Multiplier, found in step 2 of a rate card:
Common Cubic Multiplier values are 250 or 333.
The purpose of a Cubic Multiplier is to convert the cubic value of a consignment item row to an equivalent weight value; if this value is greater than the original dead weight value, the system will price the consignment using the cubic weight value calculated from the Cubic Multiplier.
The formula used by the system when using Cubic Weight (using a cubic multiplier) = (length x width x height) x item row qty x Cubic Multiplier x weight rate for relevant zone.
An example below:

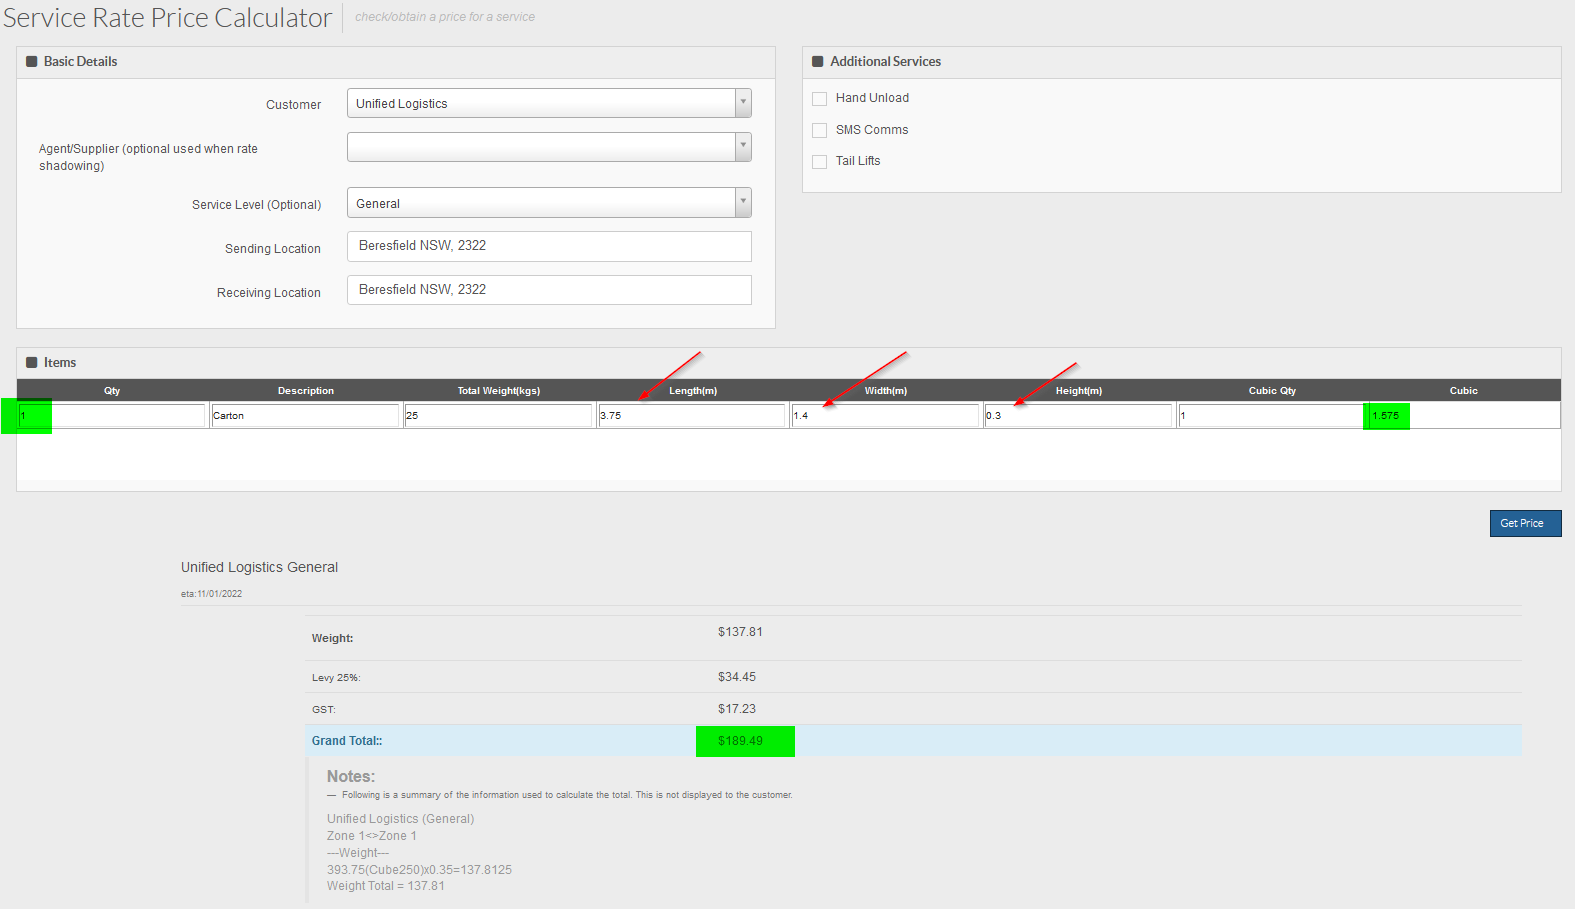
Customer Price Calculator can be used to test rate card setups. Click here for more information on this.
In the above, Beresfield is in Zone 1 of the zone list that the Unified Logistics rate card uses.
The weight rate for Zone 1 to Zone 1 is $0.35 per KG.
Every KG will incur an extra $0.35.
You will notice in the above that there is one item listed here and it has rather large dimensions.
The cubic value specified based on these dimensions is 1.575.
When a Cubic Multiplier of 250 is added to this Carton freight item (Step 2 of the rate card), the resulting price is much higher than simply charging for the dead weight.
If there was no Cubic Multiplier setup in this example, the price would be the below:
You can see that, when a Cubic Multiplier of 250 has been added, the resulting price is much higher because the system is converting the item row cubic to a weight rate and charging for this.
Keep in mind that the system automatically charges the higher of the cubic weight equivalent vs the dead kg weight value!
A consignment item row refers to a single row of a consignment. The above images only have one Consignment Item row.
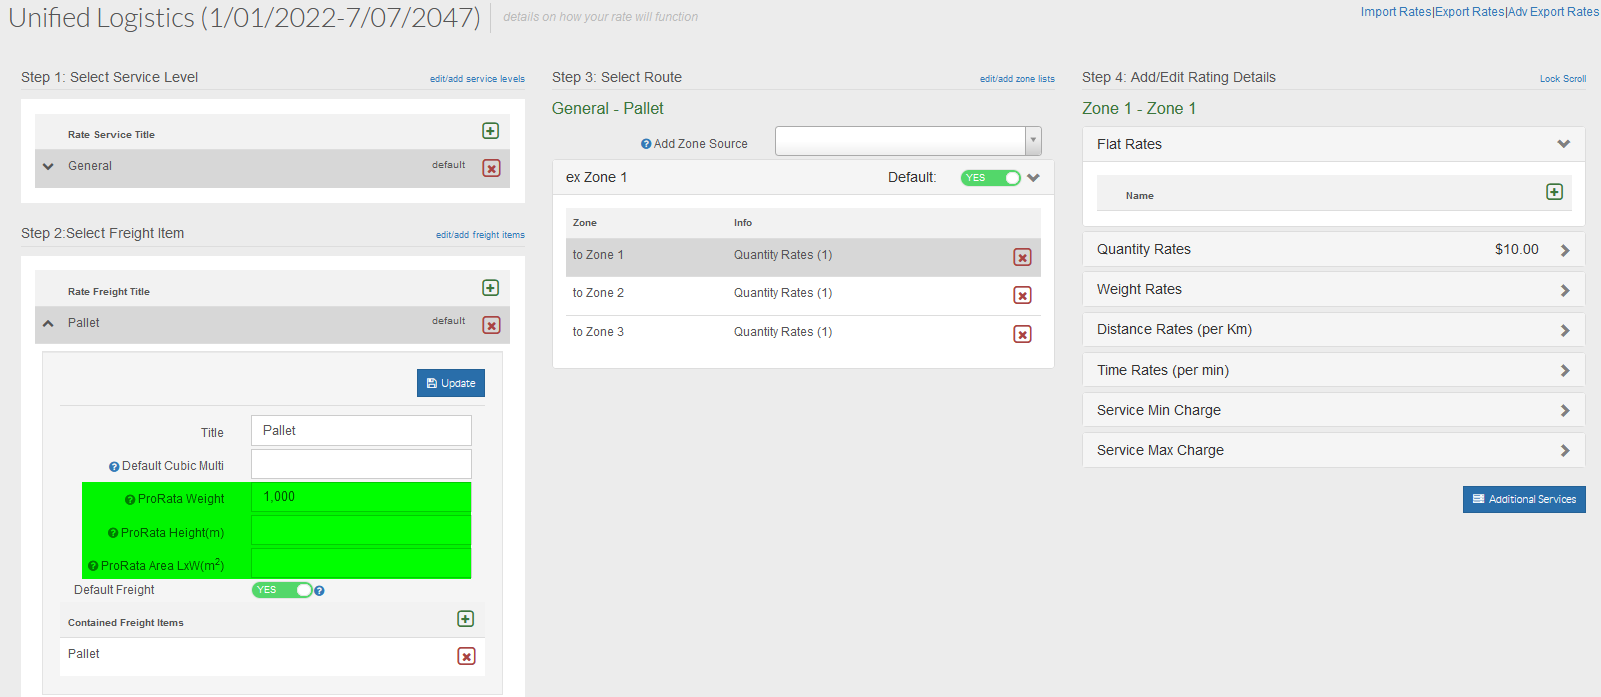
Pro-rata rate setup; what is this and how to setup?
If required, rate cards in TransVirtual allow users the ability to setup pro-rata rates that can be applied to consignments when using quantity rates.
These are setup in step 2 of the rate card and are attached to the appropriate freight items:
These are setup in step 2 of the rate card and are attached to the appropriate freight items:
Pro-rata weight is the most commonly used of these.
A good example of where this would be used would be when you want to charge for excessive weights but you typically charge quantity rates for that freight item. Maybe you normally charge a quantity rate for pallets (set price per pallet) but you want to charge extra if a pallet exceeds a specified weight?
A good example of where this would be used would be when you want to charge for excessive weights but you typically charge quantity rates for that freight item. Maybe you normally charge a quantity rate for pallets (set price per pallet) but you want to charge extra if a pallet exceeds a specified weight?
How could this be setup?
To use a Pro-rata weight setup you need to ensure that step 4 of the rate card uses quantity rates.
From here, enter a value into the below field - the value you enter will be the weight at which you wish to start charging extra for when an item exceeds that weight:

From here, enter a value into the below field - the value you enter will be the weight at which you wish to start charging extra for when an item exceeds that weight:
Note: The Pro-rata weight field works per item on a consignment item row!
Once you do this, any items exceeding that weight will be charged extra, for example:
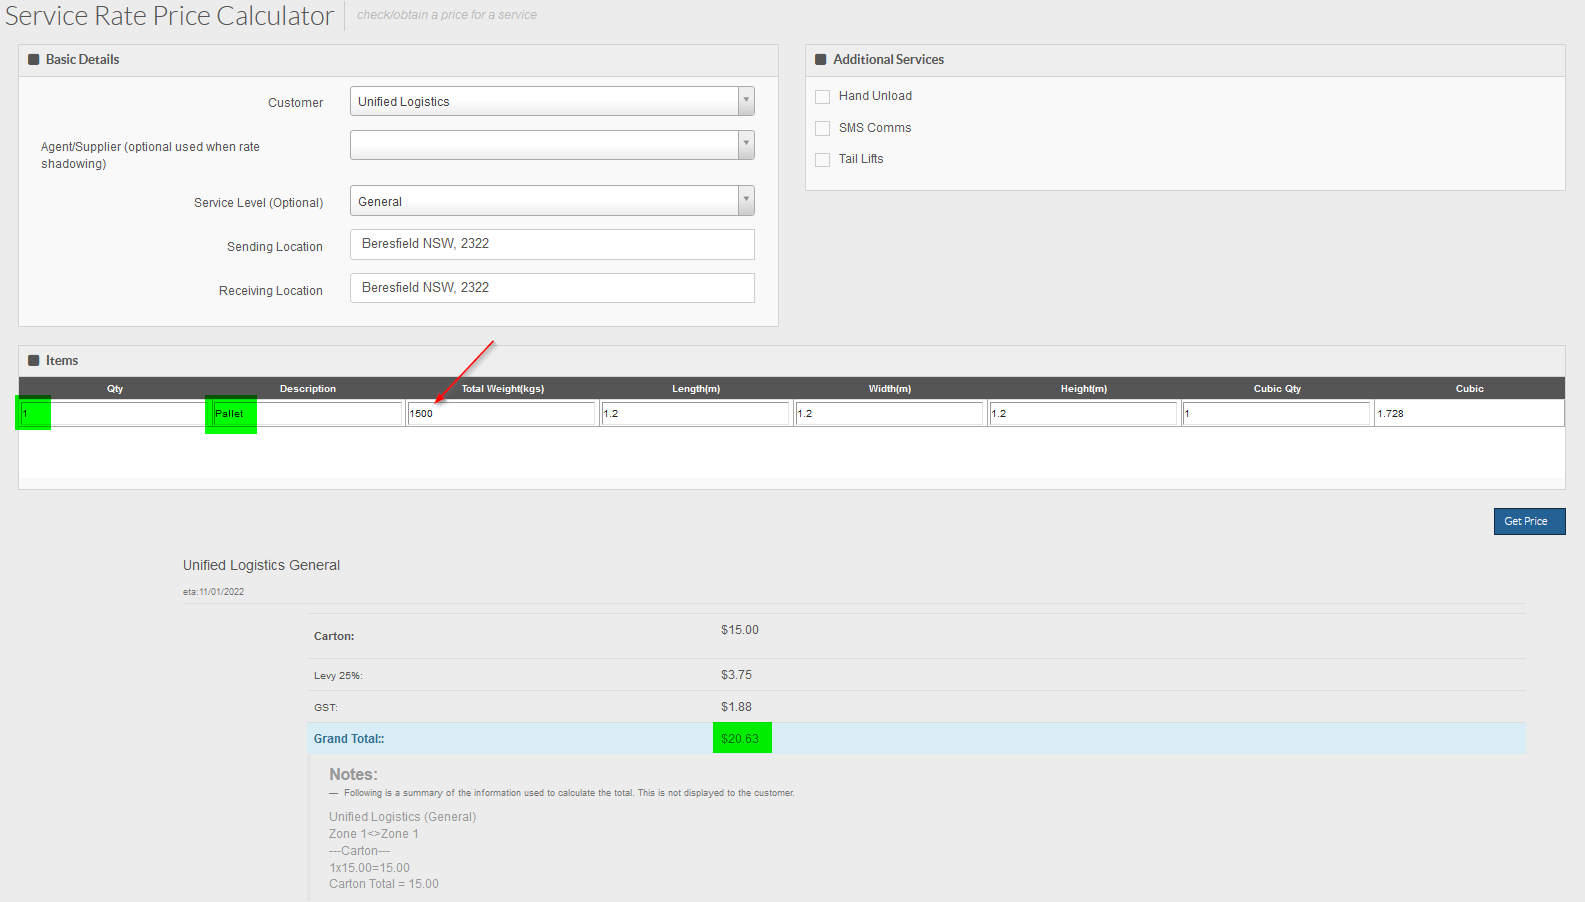
In the above example, Beresfield to Beresfield is Zone 1 to Zone 1 and when a pallet is sent between these locations it would normally cost $10.
However, we have implemented a pro-rata weight of 1000 and this pallet has a weight of 1500 for this pallet.
This means that the pallet will be charged extra because it exceeds the standard allowable weight limit.
The resulting price is $15 per pallet (rather than 10) plus any applicable levies and GST etc.
It is important to note that the pro-rata weight setup applies per item.
For example:
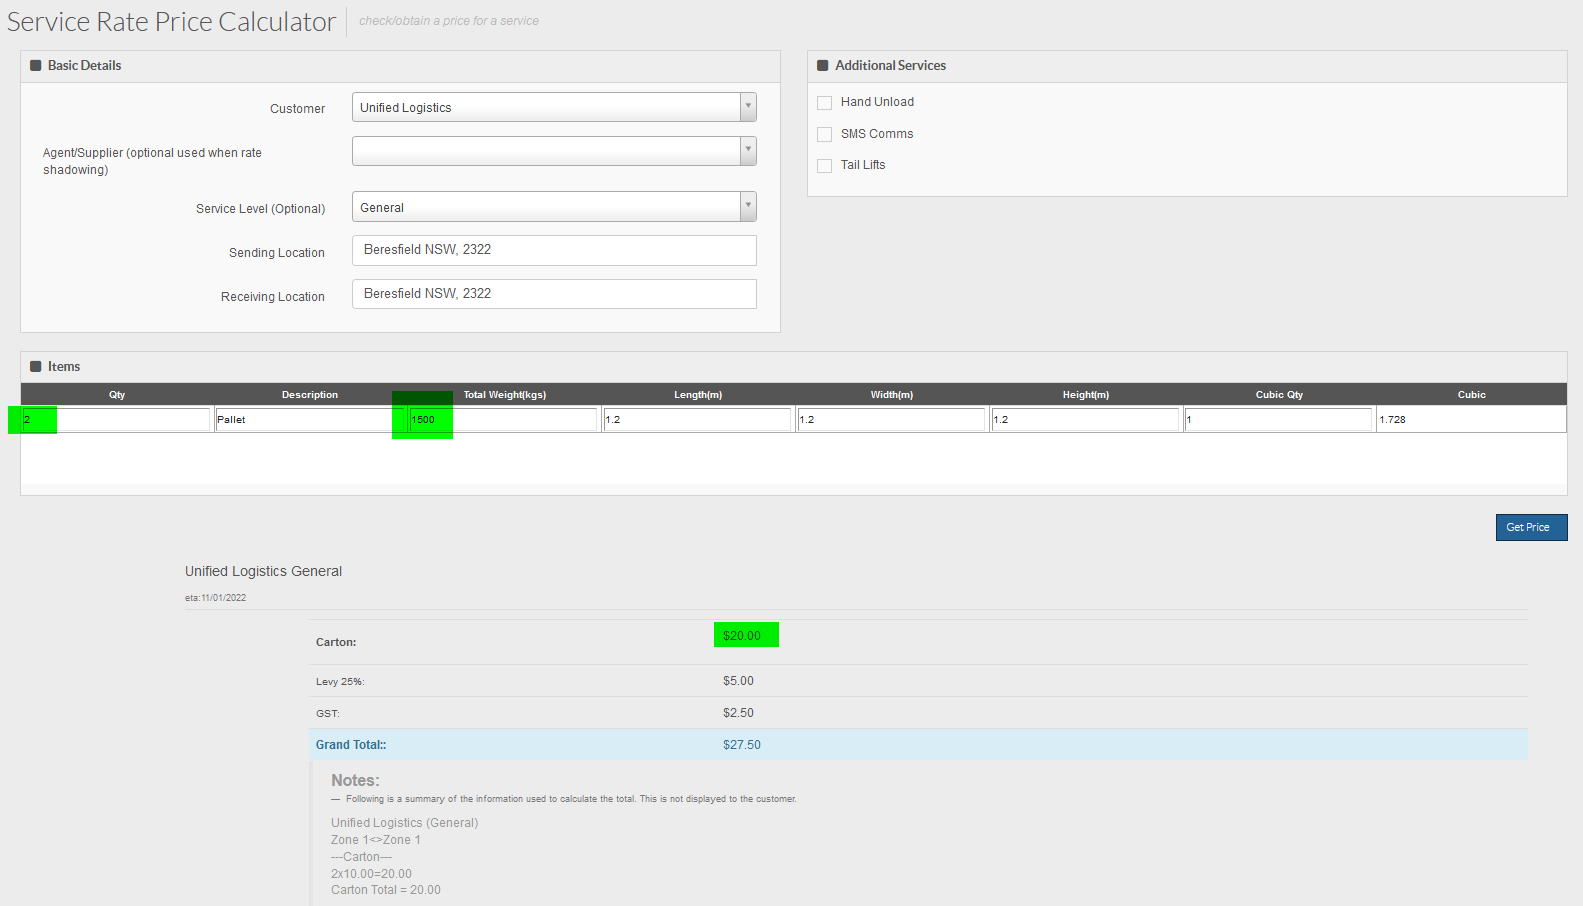
In the above you can see that there are 2 pallets and the total weight for these two is 1500kgs.
This means that the pro-rata does not apply because it will only apply to each pallet that exceeds 1000kg; in this scenario each pallet would weigh approximately 750 kgs (the system averages the weight between the number of items), which is under the allowable 1000kg.
As a result, the standard $10 per pallet rate applies and no extra is added on.
The formula used for pro-rata weight is:
(Dead Weight / Item row quantity) / pro-rata weight value x standard quantity rate for relevant zone.
So; Dead Weight divided by Item Row Quantity, divided by the pro-rata weight value, then multiply by quantity rate.
In the above example for 2 pallets the formula would have looked like: (1500 / 2) / 1000 x 10 = $7.50 per pallet
This is a lower amount than the standard $10 rate per pallet, hence the standard pricing is used.
In the above example for 2 pallets the formula would have looked like: (1500 / 2) / 1000 x 10 = $7.50 per pallet
This is a lower amount than the standard $10 rate per pallet, hence the standard pricing is used.
Pro-rata height and area setups can be implemented in a similar fashion to the above, though these are less commonly used in TransVirtual.
Importing Rates
Please Click here for information on importing rates
Copy Rate Schedule
If you have two customers with similar rate structures or simply have a template rate card to construct other rate cards from you can copy these via the below process.
If you navigate to (Finance->Rate Cards->Customer Rate Cards
From here you can select your rate card from the listing on the left that you wish to copy too and this will then give you the relevant rate card info on the right.
You will see towards the bottom right your rate schedules
You will then need to click on the green '+' to add a new schedule to the customer your copying the rate too
You will be presented a popup screen which you will need to select a date for the rate card to apply from and then a list of alternate rate cards
Select the rate card you wish to copy from and select create
The schedule will then populate with the relevant rate card details
Freight Item Overrides
Freight Item overrides allow you to force line items to price differently to their description depending on criteria set. Most common use is if a pallet were to be larger than 1.2 x 1.2 to charge accordingly due to oversized dimensions
1. Once you have setup your Rates and Freight Items in Step 2 you can expand this and you will see the below Override button
2. If you click on this you will be presented with the below screen
3. Firstly you will need to set your criteria and you can use the data filter wizard to create these as below
4. In this example we are going to make an Item which is over 50kg to be charged as a Skid price so firstly we select the field in our case the Average Weight of the Single Item Row to be greater than 50 and select Add Rule
5. You will now have your logic displayed in the window as below
6. We can now select which Alternate Freight Item we wish this to price as
7. In this example this will be a skid, Now any matches to this freight item where the average weight is over 50kg we will price these using skid rates
8. Another example of this as follows is to override to an alternate freight item but rather than have rates individually setup we can multiple according to your requirements e.g. A pallet greater than 1.2 x 1.2 may be charged at double the price due to space taken in a truck. So as below we have a Pallet Freight Item and Pallet - Oversize (2 spaces).
9. Under the Pallet Freight Item select your Override button and we will need to build your data filter, in this example we will have 2 parameters
10. The result will be in the examples as below, in this case the system has included the word 'and' meaning that both the lenght and width will need to be over 1.2 for this to apply. We can change this word to 'or' if desired meaning only one of the dimensions will need to be greater to apply.
11. We also need to set the alternate freight item as below and select Save
12. We now move to our override under the Pallet - Oversize (2 spaces) freight item
13. In this case we don't need to set any further parameters and can simply select the Use Rate from Alternate Step 2 tab as below
14. We now need to select which alternate freight items price to use, in our example this will be the prices against the Pallet freight item and as we wish to charge double the quantity we put '2' in the Multiply field. Be cautious when using weight and qty breaks as multiplying the qty could force the price to go into an alternate qty break depending on your desired result.
15. Now as below Step 3 will display the following as no rates are to be set
Rate Card Increase
From time to time you may need to increase the rates for your Customers or Agents. This article will detail how to do so. The process is exactly the same for both Agents and Customers-the only thing that changes is the page you go to initially.
1. Start by navigating to either the Customer or Agent rate card pages of TransVirtual; Finance > Rate Cards > Customer Rate Cards OR Finance > Rate Cards > Agents(Onforwarder) Rate Cards.
2. From here select the rate card you need to apply a rate increase to. Use the search filters to find the appropriate rate card and then select the correct rate card by clicking on it.
3. Once you have selected the appropriate rate card, you will see the settings for that rate card appear on the right.
4. Click on the green arrow as shown in the above picture. You will then see something like this.

The blue/white question marks next to headings/fields in TransVirtual are clickable and give you an explanation on what each field/heading is used for or does.
5. Select the date you wish to have this rate increase start from. Add in the percentage increase in the bottom field. Click Create.
6. You will then see your new schedule appear-listed under the effective rate schedules. The rate increase will be effective from the 'Effective Date' 
7. The new rate schedule has now had the increase applied to all aspects of the previous rate card.
Charging for Distance (km) or Time (min)
If needed, you have the ability to add a charge for Distance (per km) or Time (per minute), to a consignment. The best way to do this is to setup a rate card with specified values from zone to zone. The below details how to get this happening.
This requires the Optimal Route Module
1. The first thing you need to do is to ensure that you have the Optimal Route (ETA) Module enabled.
It is very important that you have this module enabled as doing so provides you with accurate distance and time figures from point A to B for a consignment.
The system calculates the distance from the sending address to the receiving address, as well as the time it would take to complete this trip.
This module is charged per device.
2. Once you have this module enabled, the next thing you need to do is enter your desired Distance or Time rates into the appropriate rate card.
You will notice that after enabling this module, two new sections appear in step 4 of the rate card.
The blue/white question marks next to the fields are clickable and give you an explanation as to what these fields are used for/do.
3. Once you enter values for these fields any new consignments will acquire these rates-if applicable. Any pre-existing consignments you have will pick these rates up after a re-price is done-assuming they are applicable to the consignment; correct customer etc.
4. You can see the pricing information for a consignment in the Finance tab of that consignment.
Extra Information
There is the option in a rate card to have the Distance or Time charges price manually:
This means that rather than the system calculating a price automatically based on the distance between sender and receiver locations (and the calculated time required to travel between these points), you can manually enter a price for this charge. What will happen if you have this toggle enabled is that the system will apply a 0 price to your consignment initially, which you will then change to the price you deem correct:
This may be particularly useful if you don't know what these charges are initially. You may not know these values until after the delivery is done, and so having this 0 charge there ready to be changed may come in handy.
Price Each Line Independently
The cubic weight multiplier is a total sum of cubic weight multiplied together for a total price.
When you toggle "Price Each Line Independent" the cubic weight in each line will be priced and not multiplied together.
For our example customer today "Matt's Milk Supplies", they have their rate card set to "Price Each Line Independent" .
Finance > Customer Rate Cards > Rate Card > Advanced Settings > Toggle Price Each Line Independent
Once the consignment is created, with appropriate details, Matt's Milk Supplies rate card will calculate the cost based on flat rate.
As you can see in the below consignment the cubic weight has been calculated by each line individually.
Now demonstrating the difference, we will turn off the Price Each Line Independent setting.
You can see, that now the setting has been turned off, the cubic weight is now multiplied and calculated together.
In conclusion, this is a setting used to separate the cubic weight so that it can be priced individually.
This can be a handy tool when you have large consignments, however, it will need to be monitored regularly to create the desired outcome.
Additional Services
In TransVirtual you have the ability to add charges for any additional services you may provide alongside the consignment. Click Here for Detailed Instructions
Additionally however you can overide your account wide charge for individual customers via their rate card
Locate and edit the customers current rate schedule
Expand out the Service Level and select Additional Services
The account default prices will appear 'greyed out' as below
Type the prices relevant for this customer over the system prices as below. -1 can be entered for no charge to be applied for this particular customer
additionally you also have the ability to apply different prices per route in step 4 of the rate schedule
Shadow Rates
In TransVirtual there is a concept of Shadow Rates which has two main functions
- Customers can obtain rates from and Agent Rate card with a margin/markup applied where required
- If a customer has a specific set of rates but can also shadow a primary rate card which may have a fully comprehenive set of rates e.g customer has agreed rates for pallets but they send a carton as a one off for which they don't have agreed rates for and this can price from a primary set of rates for your business
Setup
Once you have created your agent rate cards or primary rates, Select the customer rate card you would like to apply these agains and select the Shadow Rates tab and select the '+' icon as below
Select the rate card your wanting to shadow from the dropdown list and select Create as below
You can then apply any required margin/markup as below
These rates will then become available when customers are creating a consignment