Automatically Populate a Floor Location using a pre-determined barcode setup
Automatically Populate a Floor Location using a pre-determined barcode setup
This article will run you through how to create a series of barcodes that are linked to Floor Locations in your depot. These barcodes can then be placed on a wall in the appropriate floor location so that when staff are doing scanning (depot, floor) the barcodes can be scanned and the Floor Location section of the app can be populated - indicating where the freight you are scanning will go. This both saves times and reduces human error in selecting an incorrect Floor Location.
Please see the below for the how to:
Please see the below for the how to:
How to
To start, you will need to first identify the floor locations you wish to set up for this process.
The Floor locations you are looking for will be those for the zone/depot you work from. So if your depot is located in Sydney, we will need to identify the Floor Locations for the Sydney zone.
To find these go to Settings > General > Global Setup > Stay on the General tab and scroll down on the right to see this section:
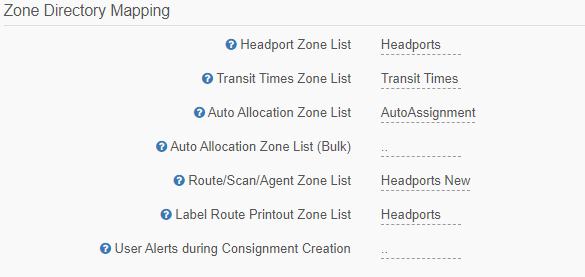
The below field is what we are after:
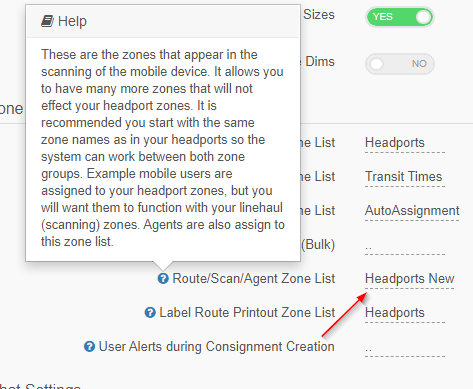
This field tells you what zone list is being used for the zones on the mobile apps - so were the zones that appear on mobile devices come from.
Next, go to Settings > Lists and Zones > Zone List Directory and select the zone listed in the above image > click edit zones/suburbs and open up the zone list:
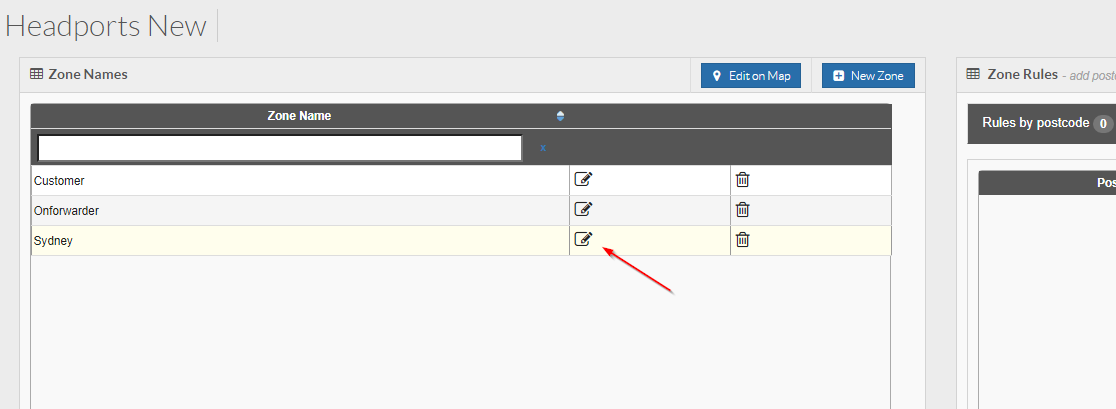
Click on the edit button next to the zone above. This is where we will see any existing floor locations for that zone and also where we can add or edit any new or existing ones:
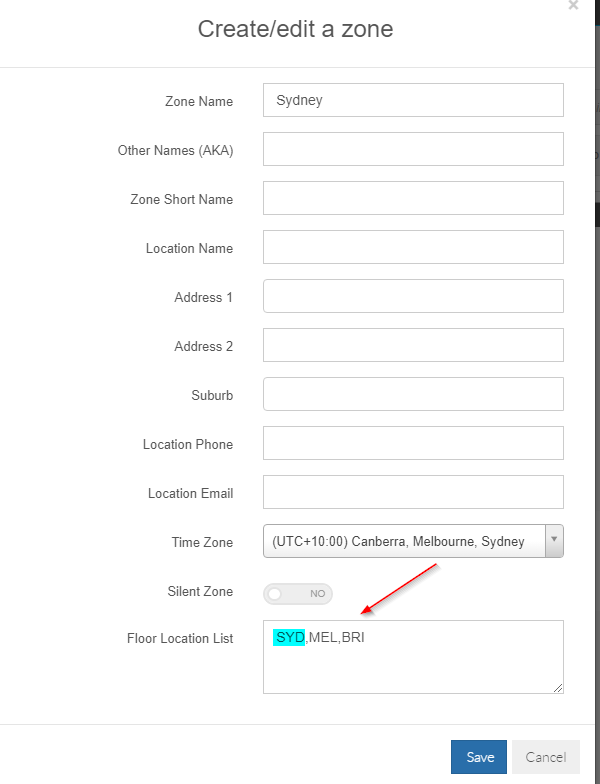
In the above you can see that there are 3 different Floor locations for this zone. Each location is separated by a comma - the commas are not part of the Floor Location name.
Floor Locations can be anything you want but are typically unique names that indicate where freight may be travelling. It is also advisable to keep the Floor Location names short where possible.
Once your Floor Locations are setup, the next thing you need to do is create the barcodes that will be linked to each Floor Location.
To do this, go to this website:
https://barcode.tec-it.com/en/
Arriving at the website you will see a screen similar to this:
The Floor locations you are looking for will be those for the zone/depot you work from. So if your depot is located in Sydney, we will need to identify the Floor Locations for the Sydney zone.
To find these go to Settings > General > Global Setup > Stay on the General tab and scroll down on the right to see this section:
The below field is what we are after:
This field tells you what zone list is being used for the zones on the mobile apps - so were the zones that appear on mobile devices come from.
Next, go to Settings > Lists and Zones > Zone List Directory and select the zone listed in the above image > click edit zones/suburbs and open up the zone list:
Click on the edit button next to the zone above. This is where we will see any existing floor locations for that zone and also where we can add or edit any new or existing ones:
In the above you can see that there are 3 different Floor locations for this zone. Each location is separated by a comma - the commas are not part of the Floor Location name.
Floor Locations can be anything you want but are typically unique names that indicate where freight may be travelling. It is also advisable to keep the Floor Location names short where possible.
Once your Floor Locations are setup, the next thing you need to do is create the barcodes that will be linked to each Floor Location.
To do this, go to this website:
https://barcode.tec-it.com/en/
Arriving at the website you will see a screen similar to this:
 IMPORTANT: The Linear Codes type MUST be Code-128 for this to work.
To create the barcode enter the Floor Location data in the Data window:
It is very important that the data you enter here exactly matches the Floor Location spelling you have listed in your TransVirtual zone list. So if you have an 'SYD' location your data must be entered as SYD. You can also only create one barcode at a time - you cannot do multiples at once; this will not work.
After you have entered your data simply click the Download button after the barcode is generated.
Repeat this process until you have created barcodes for all of your Floor Locations.
Once the barcodes have been created they can now be used in this setup.
Before use however, the individual doing the scanning must be linked to the same location that the Floor Locations are part of.
So, for example, if the Floor locations are for a Sydney zone, the user doing the scanning must be linked to a Sydney location in order for this to work - the simple reason being that a Sydney user would expect these Floor Locations to be available to them when scanning whereas someone from Melbourne would most likely have a completely different set of Floor Locations to use.
To ensure a user has been assigned the correct location, go to Home > Card Files > Staff List > Find and select appropriate user, then double-click to open their card:
The Headport Assigned section is what will populate the below on the device:
Once the user has been setup correctly, it is now time to scan.
Go to the scan page of the app:
Change scan type to be Depot In or Floor:
Now, if the freight you are scanning is to be placed in the SYD (as an example) Floor Location, simply scan the barcode you created for that Floor Location to set the Floor Location:
You then get the Floor Location populate automatically.
This process saves you time and also reduces the likelihood of human error in accidentally selecting the wrong Floor Location.
From here simply scan all freight that is to be placed in that Floor Location.
Once that is done you can then create a manifest which will give you a list of everything scanned for that Floor Location.
To create the manifest once scanning has been completed, simply click the 3 dots top-right and click create manifest:
You can select what information to include in the manifest from the bottom part of this page:
When you are happy, simply click create manifest:
A blue bar appears at the top indicating a manifest has been created and what its number is.
The SNXX part lets you know that this is a scan manifest. Scan Manifests can be found under Home > Manifests > Scan Manifest:
Double-click a manifest to open it. You can the print it off or view a PDF of that manifest.
You do not have to create manifests if you don't wish to.
However, it is advised to do so because manifests give you a record of everything scanned at a certain point in time and are very handy to keep for future reference - in addition to this they only take an extra 5 or so seconds to create.
It is up to you how best to create manifests but a good idea may be to scan all freight for a Floor Location, then create the manifest for that Floor Location, and then move on to the next Floor Location and repeat the process until all scanning has been complete and all freight has been moved to the correct Floor Location.
Extra Information
For this process to work correctly, TransVirtual requires that devices are configured in a specific manner.
If you have issues with this process it could be due to your device not being configured correctly.
Please see the below links to help articles on device types setup:
PM80 Device Configuration
Chainway Device Configuration
Scan SKU Device Configuration
If you have issues with this process it could be due to your device not being configured correctly.
Please see the below links to help articles on device types setup:
PM80 Device Configuration
Chainway Device Configuration
Scan SKU Device Configuration