Consignment Page
SUMMARY / PURPOSE
Use this article to understand and navigate the Consignment page.
This guide explains how to filter, search, and manage consignments efficiently.
OVERVIEW
The Consignment page is the main screen for managing consignments.
Access the page:
- Navigate to Transport → Operational Tasks → Consignments
- Or use Quick Links on the home page → Search Consignments
The consignment page looks like this:
Filtering Columns
Customize which columns display on the Consignment page.
To customize columns:
1. Click the Columns button ( ):
):
2. The Column Selector window opens
Set default columns for user types:
- Default New Staff Users - Sets the current columns as default for new Staff users of your account.
- Default New Customer Users - Sets the current columns as default for new Customers.
- Default New Agent Users - Sets the current columns as default for new Agents.
- Update Current Staff Users - Changes the columns of all current Staff users to what is set here.
- Update Current Customer Users - Changes the columns of all current Customers to what is set here.
- Update Current Agent Users - Changes the columns of all current Agents to what is set here.
3. In the ColumnsSelected area, click the empty blue space to see all available columns
4. Click a column name to add it
5. Click the (x) to remove a column
6. Drag and drop selections to reorder columns
7. Click Update button ( ) to save changes
Using Filters
Now that you have the correct columns laid out you can filter based on premises you require.

NOTE: Check the Date Range filter in the top-right corner. Results outside this range will not display.
Sort by column:
- Click any column header to sort in ascending or descending order
Filter by keyword:
- Type text in the space below column headers
- The page filters consignments containing that text
Advanced Filter Techniques:
Use the % symbol to filter by partial text:
%cash%= contains "cash"%cash= ends with "cash"cash%= starts with "cash"
Use the ! symbol to exclude text:
!cash= does not contain "cash"
NOTE: Symbol filters may not work consistently in all filter fields.Bulk Actions
Perform actions on multiple consignments at once.
To use bulk actions:
1. Select consignments using checkboxes on the left, or click Select All
Once selections have been made, you will have the bulk actions button ( ) available for selection.
2. Click the Bulk Actions button
3. Choose an action from the popup window:
NOTE: Available bulk actions depend on your data and permissions.Bulk Search
Search for specific consignments by entering consignment numbers.
To bulk search:
1. Click the Bulk Search button 
2. Enter consignment numbers in list format (one per line):
This will allow you to bring up a list of consignments you wish to see in the Consignment page:
3. Use the data filter builder to add search criteria:
4. Repeat to add more criteria
5. Click Validate to check for errors
6. Click Show Results to save the filter
Prefixed/Saved Filter
Create reusable search filters for frequent searches.
To create a saved filter:
For example, there might be something you wish to search for often such as data for a particular customer name and sender reference - you want to return consignment results matching these criteria.

These prefixed or saved search queries come in handy when the searches you are performing are done on a regular basis.
1. Click the Filter button ( ) near the top of the page:
2. Name your filter using the top bar:
3. Use the data filter builder to add search criteria:
- Step 1: Select a field (e.g., Customer Name)
- Step 2: Select a condition (e.g., Equal, Contains)
- Step 3: Enter the value
- Click Add Rule
An example might be where you wish to search for a particular customer and only see consignments for that customer where the sender reference is specified text or contains specified text.
If this were the case, your filter name could be something like the below:
4. Once you have entered the name of your filter, you then need to add logic or criteria for what will be involved in the search - what the search parameters are; how the system will search for and return results etc.
Following on with this example, the first step would be to use the data filter builder at the bottom of this window - we need to add in the customer name and make it part of the search query.
Use the field Customer Name from step 1 and then click Next:
In step 2 select Equal then click Next:
In step 3 type and enter appropriate customer name, then click Add Rule. You will then see that the data filter now has logic/text in it:
Our example also calls for criteria related to Sender Reference - we are wanting to only see consignments where the sender reference contains 'JKRowl".
Repeat the same process as above again using the data filter builder at the bottom of the window.
This time however, step 1 will be Senders Ref, then click Next. Step 2 will be Contains, then click Next. Step 3 will be to enter the text required (JKRowl) and then click Add Rule.
This will then add more logic/text to the data filter like so:
This example filter is now ready to go - it is currently setup to return consignment results where the customer listed is Rowlings Industries and the sender reference contains JKRowl.
From here it is advisable to use the Validate button at the bottom to ensure the logic is sound - no errors:
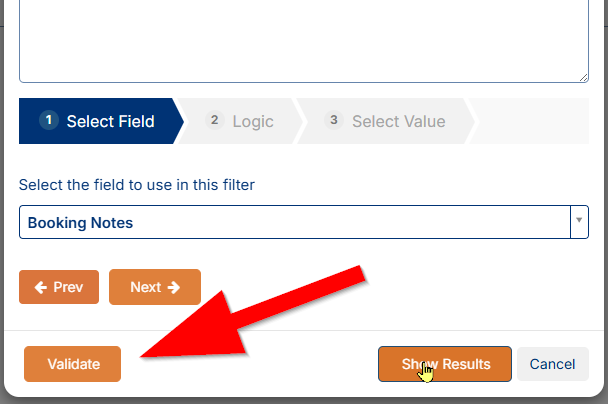
5. Click Validate button. This Validate button will also usually show you how may consignments match your query - green is good, like so:
From here it is advisable to use the Validate button at the bottom to ensure the logic is sound - no errors:
5. Click Validate button. This Validate button will also usually show you how may consignments match your query - green is good, like so:
6. Click Show Results to save the filter
This filter is now usable at any time.
To use a saved filter:
1. Click the dropdown arrow
1. Click the dropdown arrow
2. Select Saved Filters
Ensure you select Saved Filters - the Temporary ones are simply filters that have not been saved/named etc.
3. Click the second dropdown arrow
4. Select your filter
5. Results display immediately:
In the above the search filter has returned only 1 consignment result as there must only be one consignment in this account where the customer is Rowlings Industries and the sender reference contains JKRowl.
NOTE: Keep in mind that the data range selected top-right is also factored in when using the search filters - anything outside of your data range that matches your search criteria will not be returned/displayed in your results.If you are expecting more results than you see, the likely cause will be that the selected date-range top-right of the page needs to be expanded/increased.
To share a filter with all users:
In addition to setting a search filter up for yourself, you have the ability to make your search filter available to all users in your TransVirtual account.
Simply tick on the "SharedQuery:" at the top of the Search Filter pop-up, then click on the Show Results button ( ) at the bottom to save:
This now means that this particular search query will be available to other users in your account and they can utilize to search in the same manner as the above process.
NOTE: This is only a simple example, filters can be very complex and can vary quite a lot in how they are created. IMPORTANT: Ensure to check and test all filter setups.
Exporting Data
Export consignment data to a file.
To export:
1. Navigate to the bottom-left corner of the page
2. Click the Export button (  )
)
3. Choose a format: CSV, Excel 2007, or Excel