Proof of Delivery EDI Import
Proof of Delivery EDI Import
In TransVirtual there is the ability to create EDI (Electronic Data Interchange) Import rules that allow you to upload PODs and attach them to a consignment.
This process would typically be used where an outside system is sending you PODs directly to your TransVirtual account.
An example could be where your agents send you PODs via email for any work they have performed for you. This article will run through how to setup an example of this.
The page used to create these POD Import rules can be found under EDI > Data Import > Proof Of Delivery.
Example Setup
Arriving at this page, your screen will look similar to the below:

To create a new POD Import rule, click the Add Import Rule button.
You will then see a pop-up similar to the below appear:
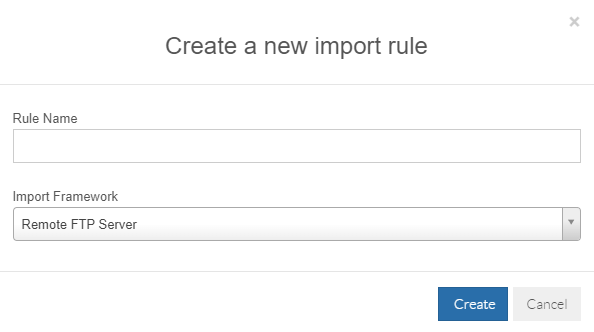
Rule Name = This is simply the name of the EDI rule. The name of this rule should be reflective of what the rule does. For this example, we are going to call the rule "POD Upload via Email".
Import Framework = This is the method that TransVirtual will use to import PODs for this Import Rule. For this example we are going to use Email.
To create a new POD Import rule, click the Add Import Rule button.
You will then see a pop-up similar to the below appear:
Rule Name = This is simply the name of the EDI rule. The name of this rule should be reflective of what the rule does. For this example, we are going to call the rule "POD Upload via Email".
Import Framework = This is the method that TransVirtual will use to import PODs for this Import Rule. For this example we are going to use Email.
Click the Create button to create the POD Import EDI rule.
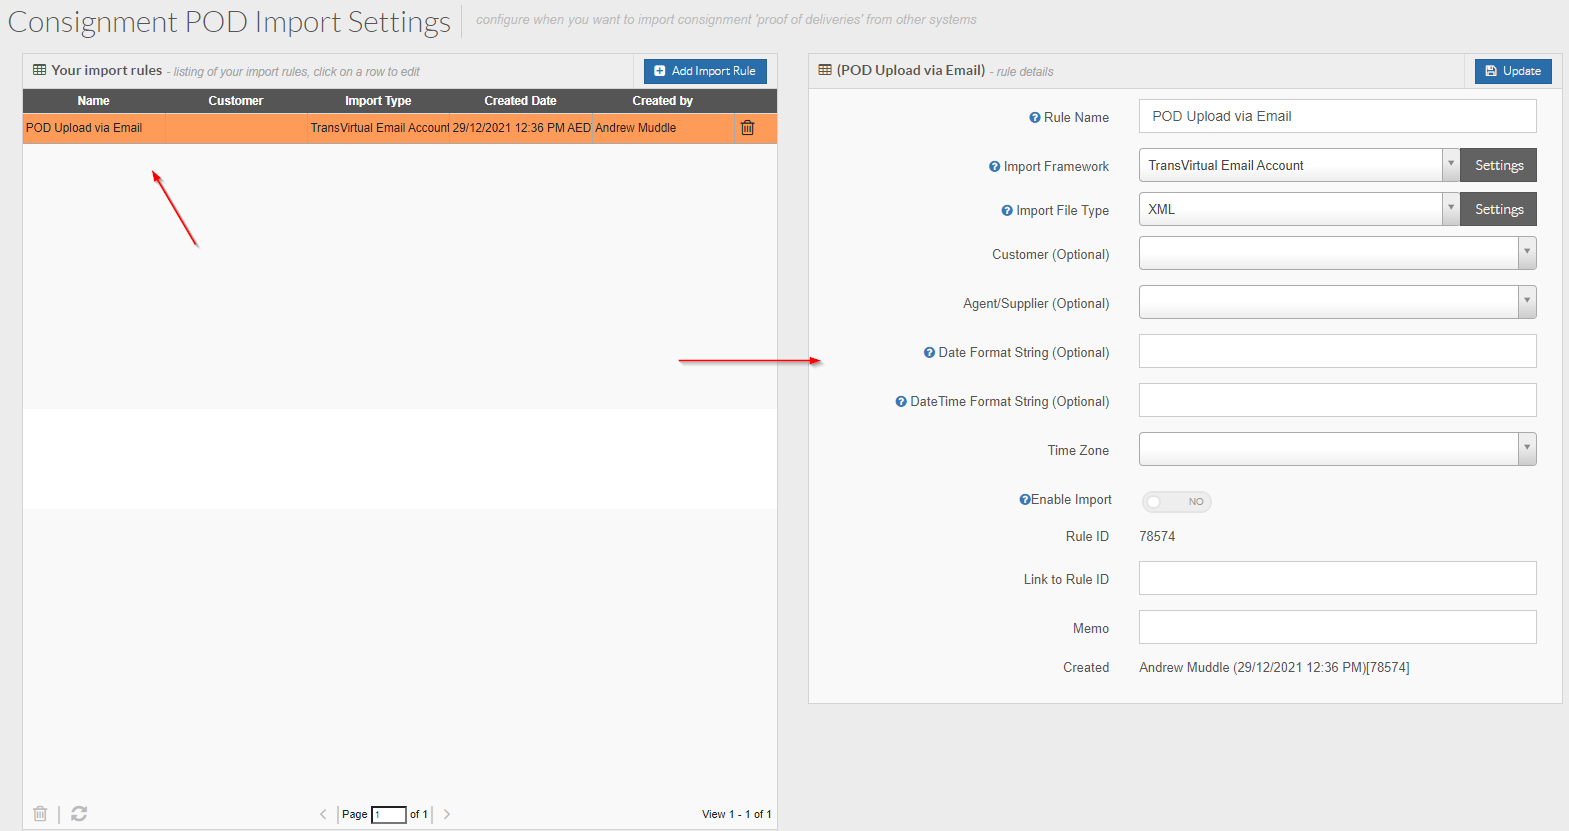
Once created, you will see it now appears in your list in orange, indicating that it is not yet active.
Click on the rule on the left and the settings for it will appear on the right:
Once created, you will see it now appears in your list in orange, indicating that it is not yet active.
Click on the rule on the left and the settings for it will appear on the right:
From here, we need to configure the settings for this EDI Import rule.
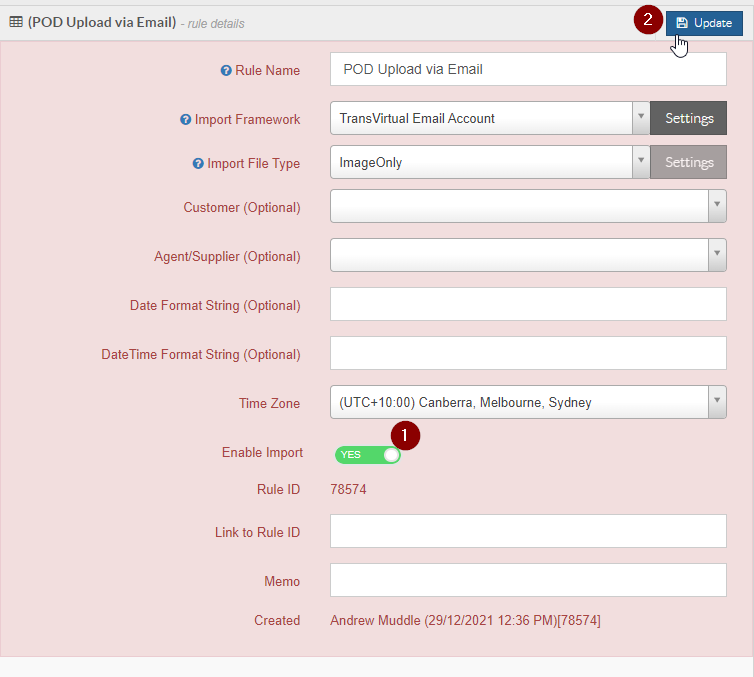
Rule Name = This is simply the name given to this EDI rule and should already be populated from when the rule was created. You can change the name if required, but the name should be reflective of what the rule does/is used for.
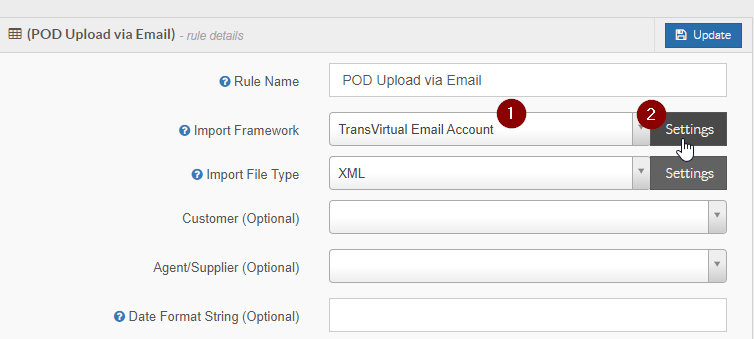
Import Framework = This is the method that TransVirtual will use to import PODs for this Import Rule. This example will use TransVirtual Email Account. To generate an email for this EDI rule, click the Settings button:
You will then see the below pop-up window appear:
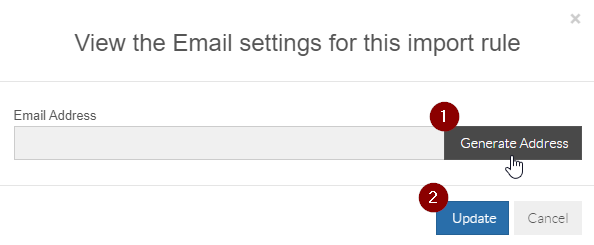
Click Generate Address and then Click Update.
Doing this will then generate a TransVirtual email address that can be provided to anyone who needs it; staff or agents wishing to email POD images to you.
Re-clicking the Settings button will allow you to view the email address where you can copy and paste it if required-to send to agents requiring it.
Import File Type = This is the type of file that will be sent with the email. For this example, we are going to set as Image Only:
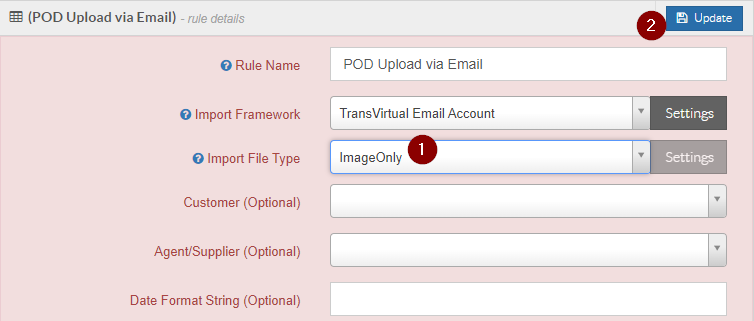
Set as ImageOnly and then click Update.
This setting means that only the POD image is required to be sent as an attachment in the email.
Customer (Optional) = If this POD Import rule is for a specific customer, you can limit to just that customer by setting their name against this EDI rule, in this field.
This is not required though however, as TransVirtual uses OCR software (Optical Character Recognition) that will match any consignment numbers found in a POD image, to any consignment numbers in your account. However, if needed, this setting could be used to ensure only PODs captured by this EDI rule are attached to consignments for the specified customer.
Rule Name = This is simply the name given to this EDI rule and should already be populated from when the rule was created. You can change the name if required, but the name should be reflective of what the rule does/is used for.
Import Framework = This is the method that TransVirtual will use to import PODs for this Import Rule. This example will use TransVirtual Email Account. To generate an email for this EDI rule, click the Settings button:
You will then see the below pop-up window appear:
Click Generate Address and then Click Update.
Doing this will then generate a TransVirtual email address that can be provided to anyone who needs it; staff or agents wishing to email POD images to you.
Re-clicking the Settings button will allow you to view the email address where you can copy and paste it if required-to send to agents requiring it.
Import File Type = This is the type of file that will be sent with the email. For this example, we are going to set as Image Only:
Set as ImageOnly and then click Update.
This setting means that only the POD image is required to be sent as an attachment in the email.
Customer (Optional) = If this POD Import rule is for a specific customer, you can limit to just that customer by setting their name against this EDI rule, in this field.
This is not required though however, as TransVirtual uses OCR software (Optical Character Recognition) that will match any consignment numbers found in a POD image, to any consignment numbers in your account. However, if needed, this setting could be used to ensure only PODs captured by this EDI rule are attached to consignments for the specified customer.
Agent/Supplier (Optional) = Used to set an Agent/Supplier that will be the agent responsible for the PODs. If you specify an Agent/Supplier, when the POD attaches to the relevant consignment, the consignment will be automaticlly assigned to that Agent/Supplier, which will then generate an auto Agent price for Finance reasons. This field should only be used when the Agent/Supplier for any consignment PODs (for this EDI rule) will always be the same.
The rest of the settings featured here are used to specify any date/time formats that may apply to an imported file IF what is contained in the file is different to the standard setup in your account. For this example, we are going to leave blank and use the default values.

Note: Ensure that the correct TimeZone is set!
Once the settings have been configured, you need to activate the rule. Click the Enable Import button and click Update at the top:
You will now notice that the rule appears in white in the list - indicating that it is now active:
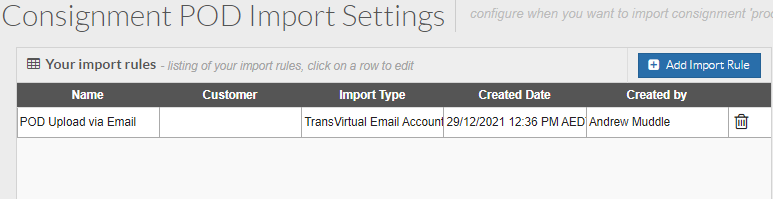
You will now notice that the rule appears in white in the list - indicating that it is now active:
Extra Information - What Next?
Once the POD Import rule has been setup, any PODs emailed to the linked TransVirtual Email address, will be attached to the relevant consignment in your account; provided the POD image is of a good quality.
POD images should be grayscale, 100-200 dpi and of a good quality; no shadows obstructing numbers and the image can't be too small or taken from too far away (the ideal method to generate these POD images would be to scan the paper PODs through a scanner/multi-function printer scanner).
The POD should also be an image type file (PNG, TIF, etc).
If the image looks similar to the below it should work with no issues:
When ready to email these PODs, the POD images should be sent as attachments with the email.
Multiple PODs can be sent in the one email, however, if doing so, there MUST only be one POD per image file.
This process will not work if an image attachment contains more than one page of PODs.
PODs must be single-page, single-image files for this process to work as expected.
The email for this example could look something like the below:
The email is being sent to the email that was generated for this EDI Import rule.
The attached image file only has one POD image in the file and it is grayscale.
The image is a good quality.
Once emailed to the linked TransVirtual email, the POD will attach itself to the corresponding consignment in your account; the status will change to Delivered if required.
If the import fails, what happens?
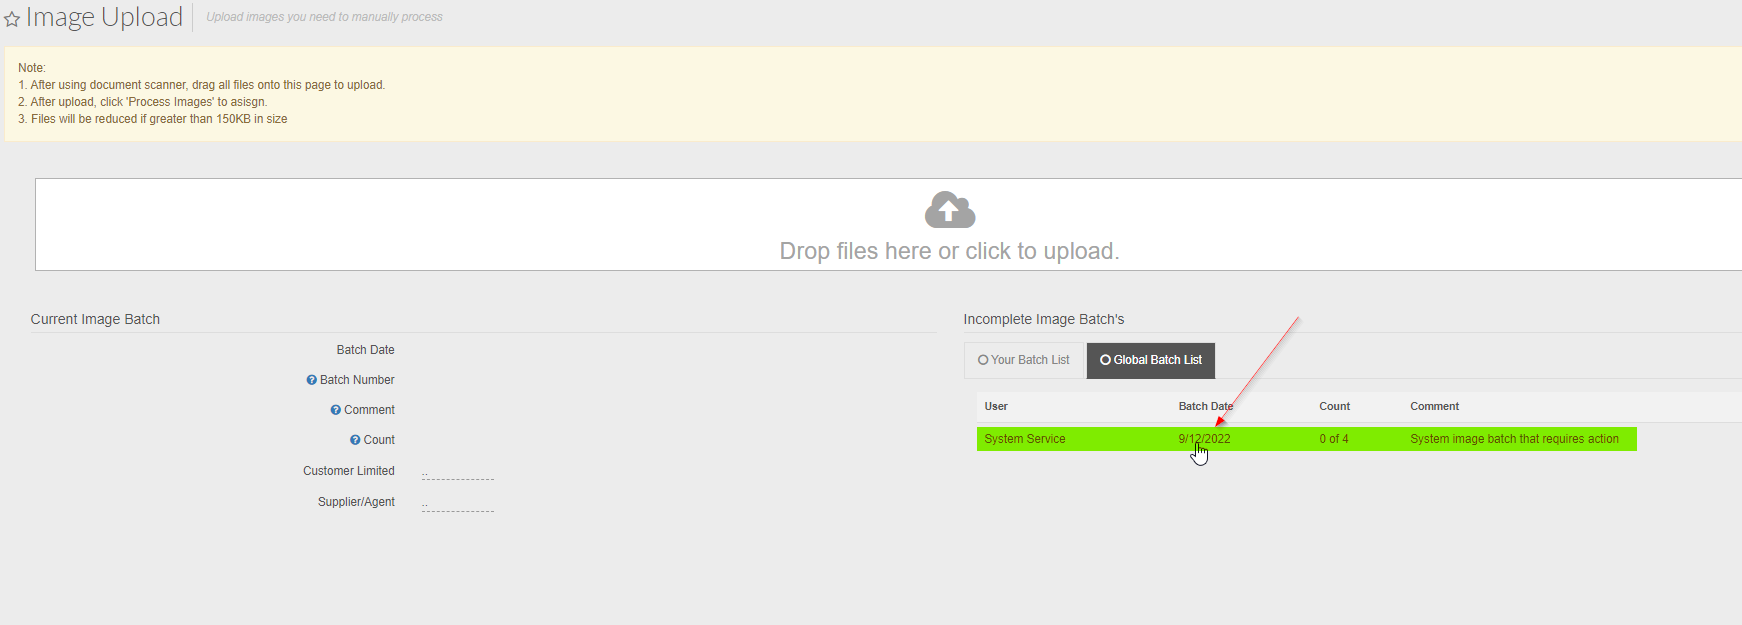
If for some reason the import is unsuccessful, the POD will be added to an open image batch under Home > Image Processing > Upload/Process Images > click the Global Batch List tab OR Transport > Administration > Upload PODs/Images > click the Global Batch List tab.
Looking at the Import History page in the below example, you can see there are 4 Failed POD imports:

Looking at the Import History page in the below example, you can see there are 4 Failed POD imports:
As a result of these having failed to import, they have now been added to an Open Image batch - the reason for this is that if the POD fails to import (maybe due to poor image quality, etc), a staff member should then go through and manually assign the POD to the relevant consignment (if applicable).
This would ensure that all applicable PODs are assigned to their relevant consignments and none are missed.
The 4 failed POD imports can be seen here:
This would ensure that all applicable PODs are assigned to their relevant consignments and none are missed.
The 4 failed POD imports can be seen here:
Double-click on the batch and you will then be prompted to action the batch and assign each image to the relevant consignment.
Further information on how to process an image batch can be found here.
Things to Note
POD Filename usage:
The filename of a POD file can come into play and assist with matching PODs to consignments in the event that the image quality in the file is poor/unusable.
For example, the file in the below is named simply per the consignment it should attach to:
The .png seen here in the filename is added automatically based on the file type - the file is a .png so the extension is added.
When opened, you can see that the image quality of this POD is poor and the barcode/consignment number is not readable:
Typically, you would expect that as a result of this poor image quality the POD would therefore not match to any consignments, but as per the above, this POD was successfully attached to the correct consignment because the filename used was simply the consignment number:
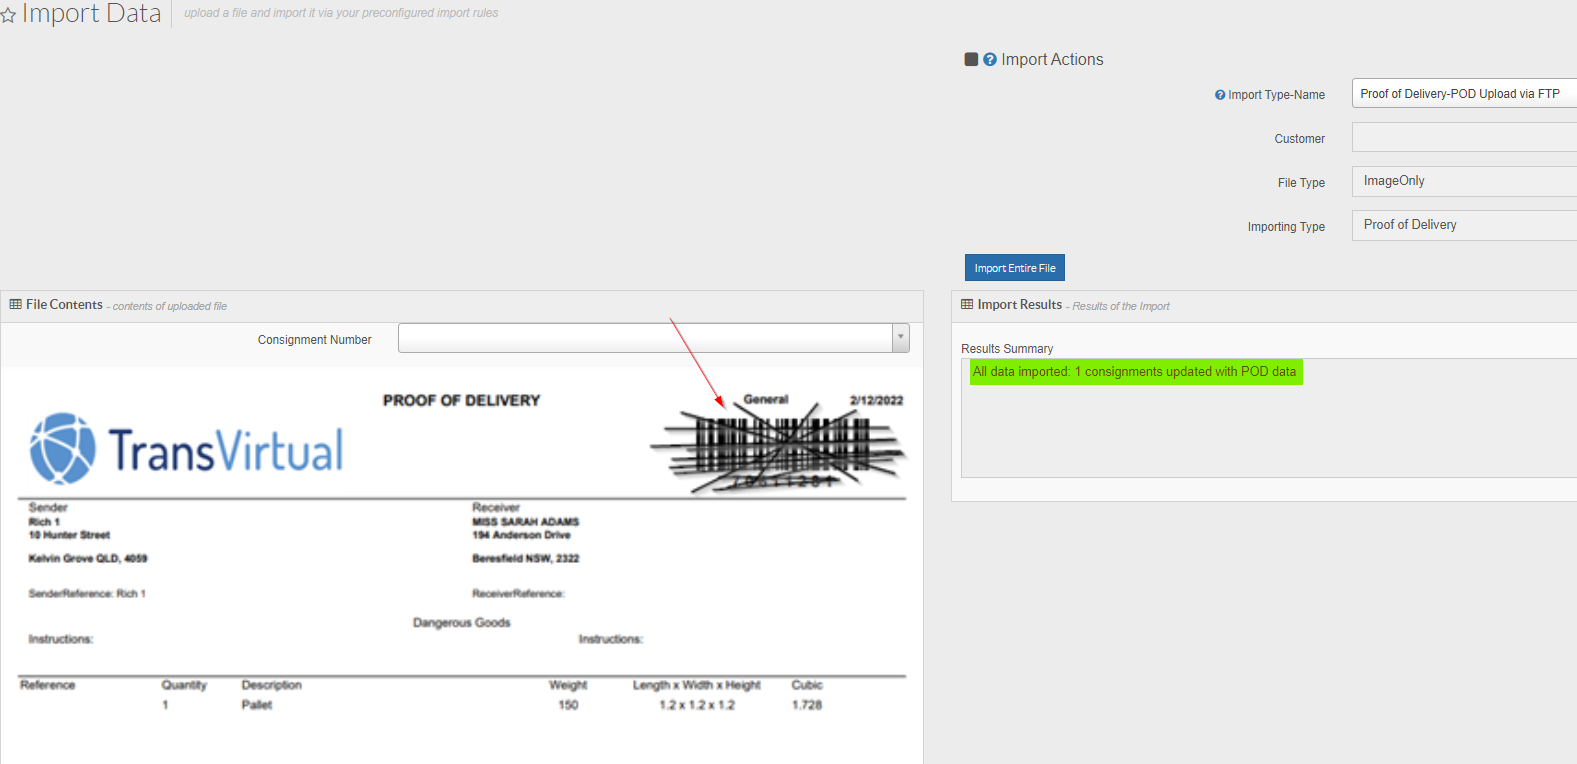
This same functionality does not work with email type imports unfortunately. It will only work if the import type is set to FTP (Remote FTP also), like the below:
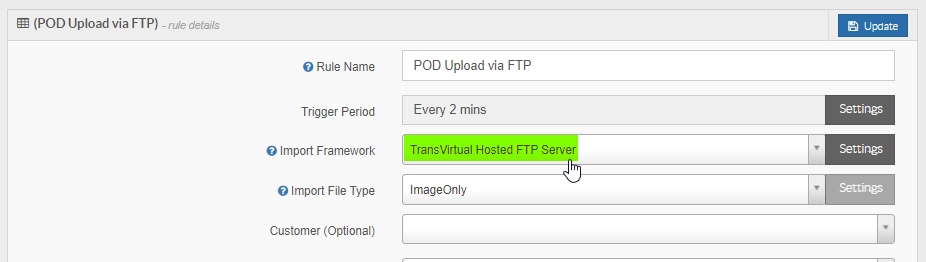
The simple reason for this is due to the way in which the files are received via FTP vs Email.
FTP delivers the file 'more directly', whereas email type POD imports send an email to TransVirtual where TransVirtual has to then extract the image from the email received.
Regardless, a handy functionality for FTP based POD imports.
FTP delivers the file 'more directly', whereas email type POD imports send an email to TransVirtual where TransVirtual has to then extract the image from the email received.
Regardless, a handy functionality for FTP based POD imports.
Date Time listed on POD
Another thing to note is that the POD, if imported into your account and attached to a consignment after the expected delivery date/time, will list the expected delivery date/time as the POD time. For example:
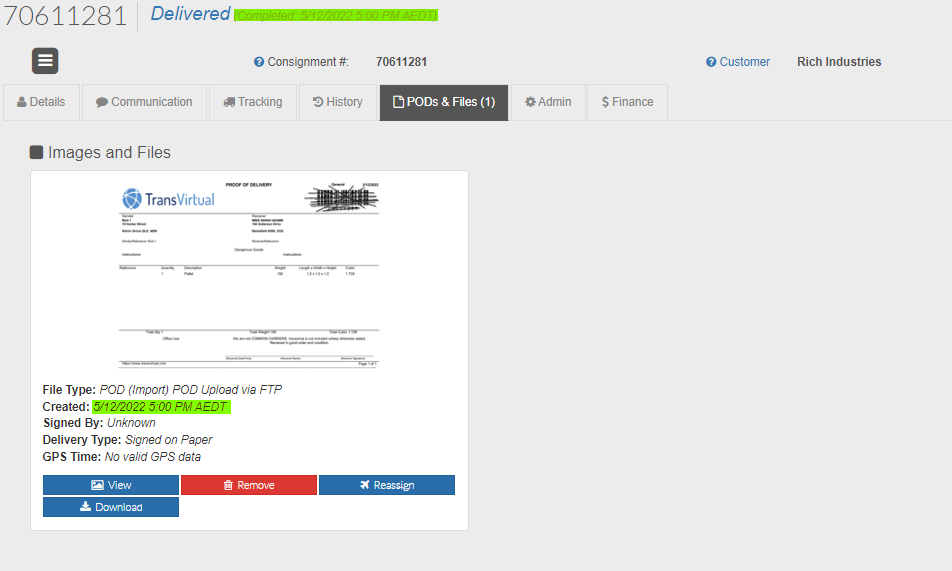
In the above you can see that the POD completion time is listed as 5/12/2022 at 5pm Eastern Australian time.
However, this POD was actually imported several days later on 9/12/2022 at roughly 3:31pm Eastern Australian time:

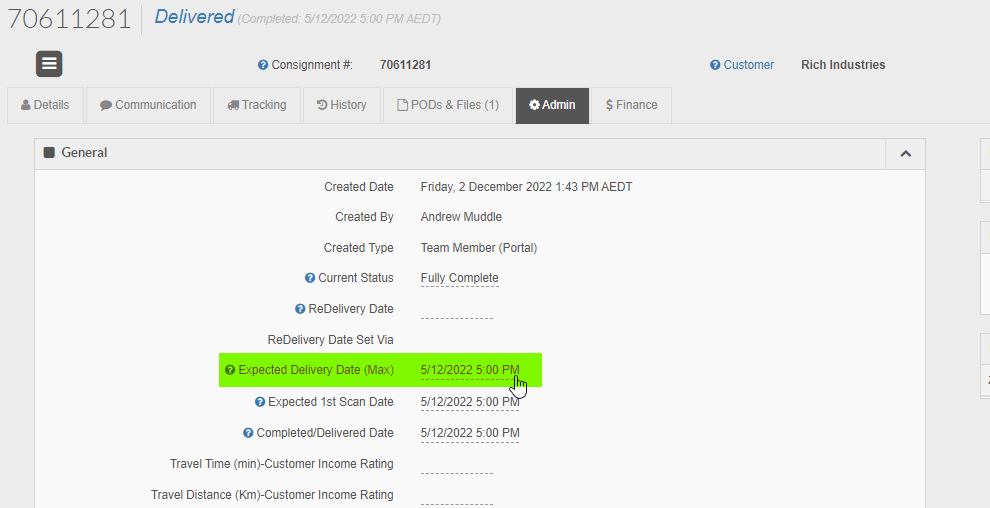
In the admin tab of the consignment, you can see the listed expected delivery date/time:
However, this POD was actually imported several days later on 9/12/2022 at roughly 3:31pm Eastern Australian time:
In the admin tab of the consignment, you can see the listed expected delivery date/time:
The expected delivery date is based on your setup Transit Times.
Because the system (for this example consignment) has no information to tell it otherwise, it has used the expected delivery date for the time and date of POD completion.
The reason that TransVirtual works in this manner for this functionality is that the system will not always be able to read hand-writing on a POD image that specifies when a delivery was completed. By defaulting to expected delivery date/time it also compensates for situations such as where an agent may complete a delivery for you and they complete it on time, but they may take a week or two to email the POD across to you.
If the POD arrives and attaches to a consignment before the expected delivery date/time then the POD completion time listed will be when the POD was imported, like so:
The time listed here is when the import was completed, which is before the expected delivery date/time:
ImageOnlyManualProcess
If you create an import rule and set the import File Type to ImageOnlyManualProcess, like the below:

Any files that come in via this rule will list the import as completed:

But, when opening the import the import will have not matched to any consignment:
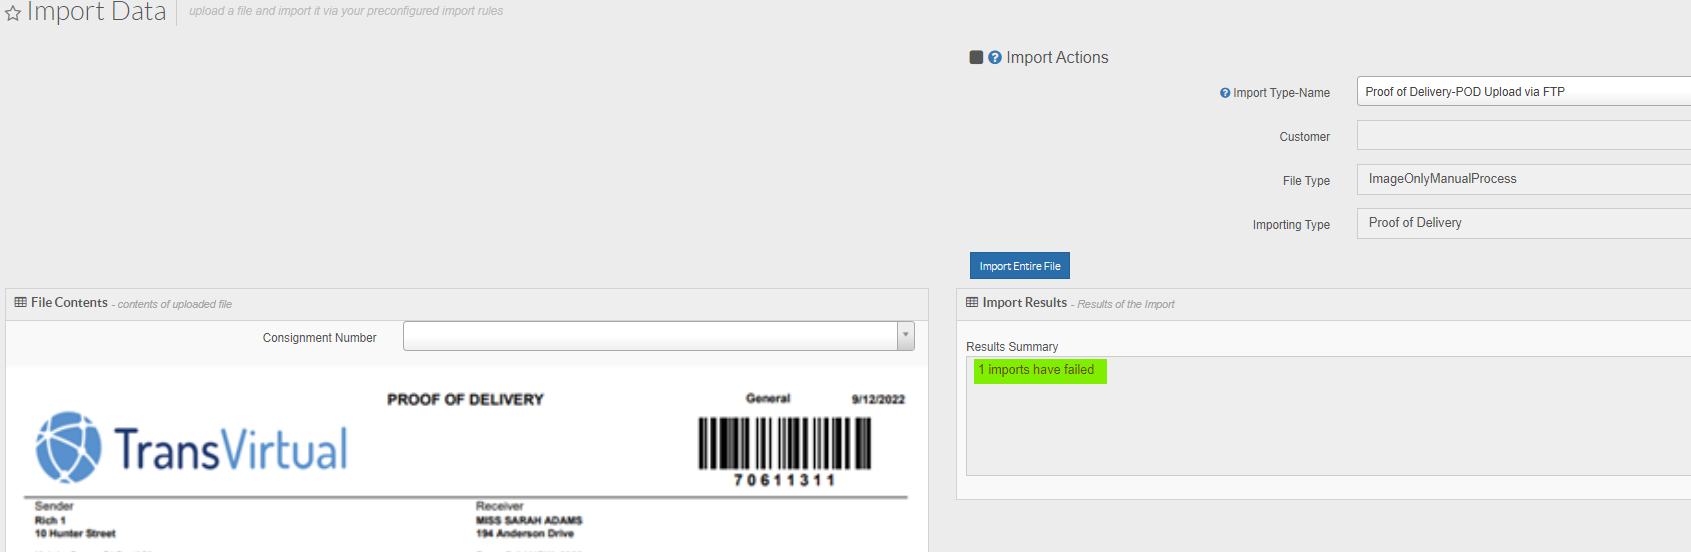
But, when opening the import the import will have not matched to any consignment:
The POD image will then appear in the open image batch as per further up in this article.
The reason for this is that this setting allows you to import the POD images but then have them all be placed in the open image batch so that a staff member can then go through and manually process them when required.