Manifests
Manifests
In TransVirtual there are many different types of manifests. Manifests are simply a collection of consignments into a group. The below will detail the different types that can be generated in TransVirtual and what they are used for.
Customer Manifests
Customer manifests are simply a collation of jobs for a particular customer. They are created automatically as each customer creates consignments in your account.
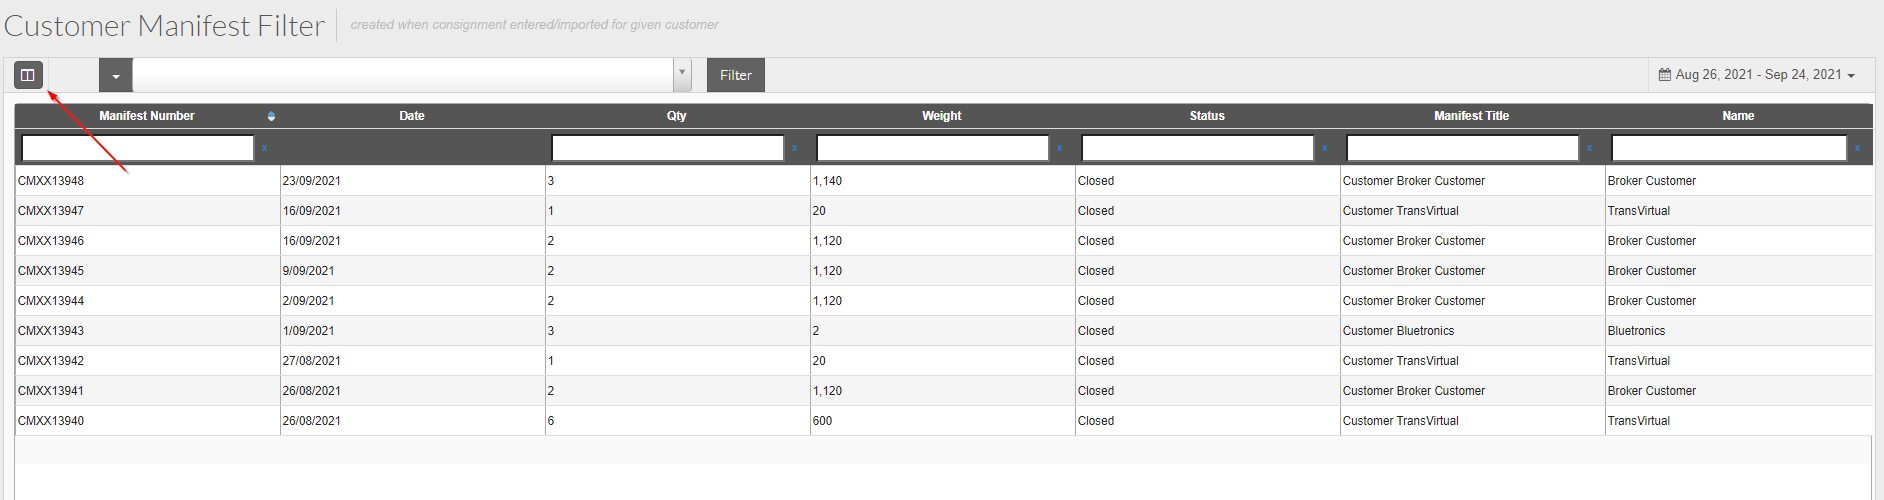
To view your customer manifests go to Home > Manifests > Customer Manifests:

If required, you can modify your date range at the top-right of this filter to view older manifests.
You can also add or remove columns using the column selector at the top-left:
To view your customer manifests go to Home > Manifests > Customer Manifests:
If required, you can modify your date range at the top-right of this filter to view older manifests.
You can also add or remove columns using the column selector at the top-left:
The name column indicates the customer that each manifest row is for.
Double-click to open and view a manifest / or right-click open new window.
Opening a customer manifest will bring you to a screen like this:
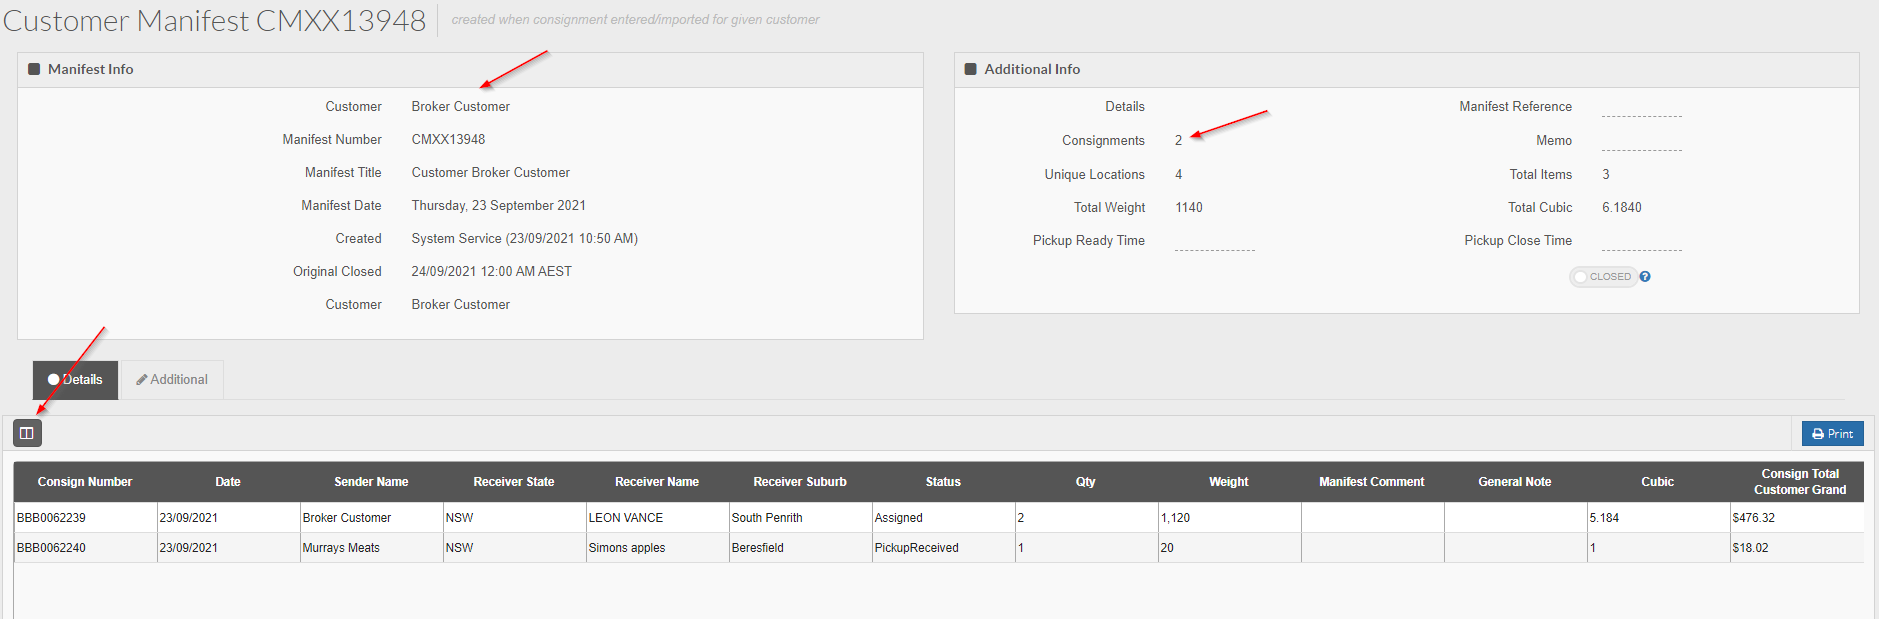
The customer name is listed at the top, as is the consignment count.
Again, clicking the column selector allows you to add or remove from the available columns.
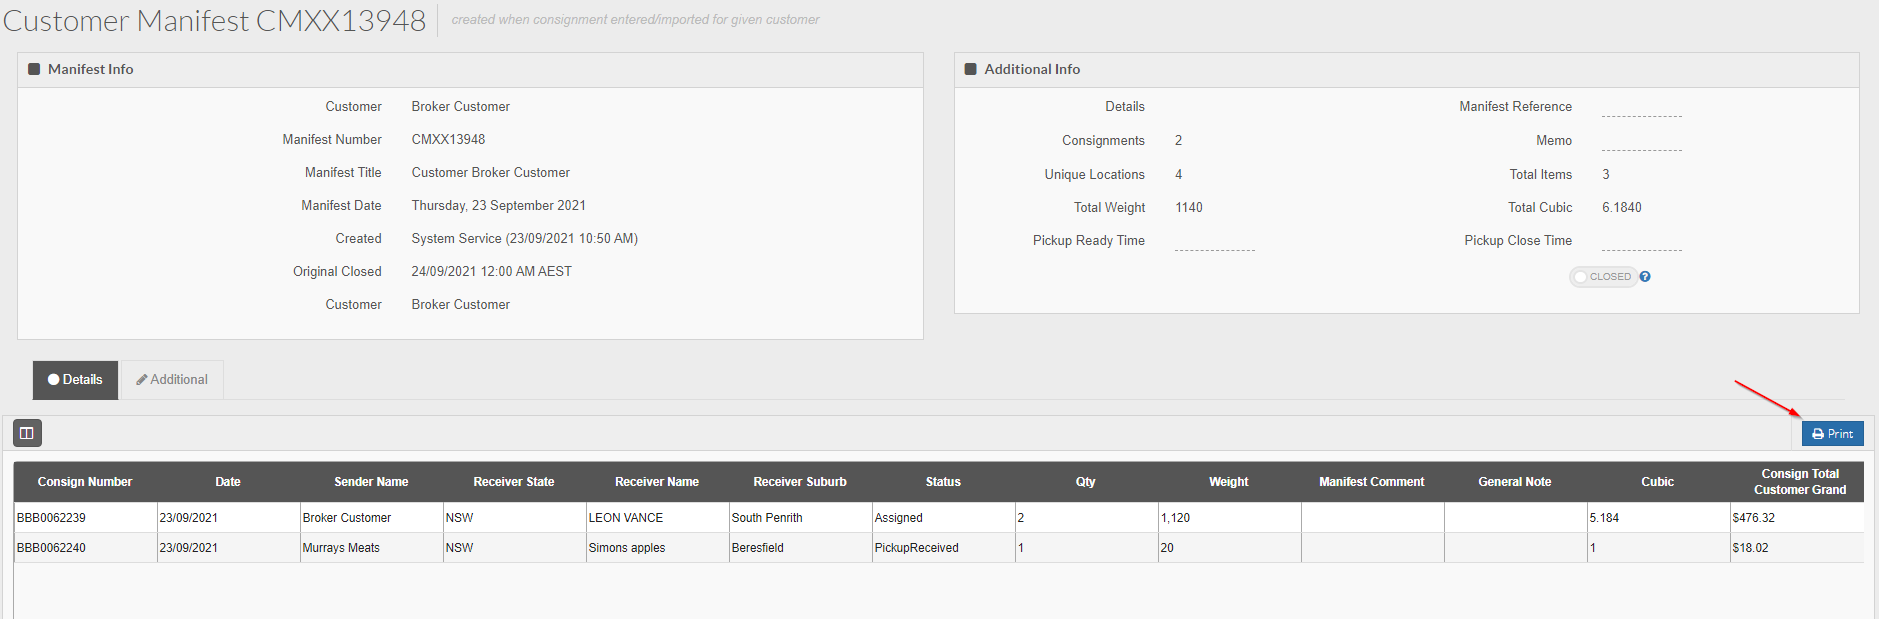
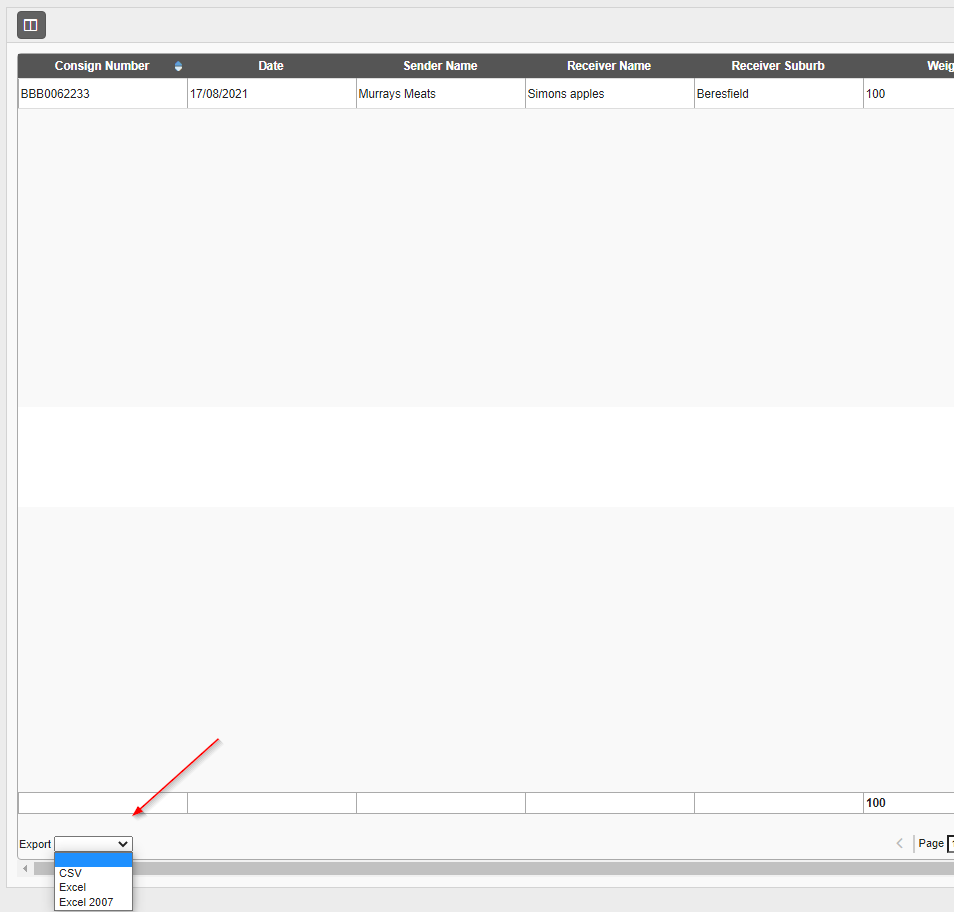
If you need a PDF printout of this manifest you can click the blue Print button:
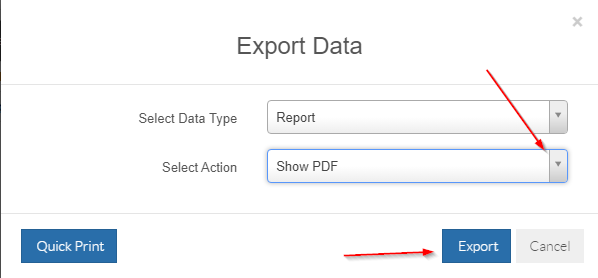
You can show PDF which will bring the PDF up in a separate window/tab.
You can also change the action and email or download the PDF if required. Click Export to action.
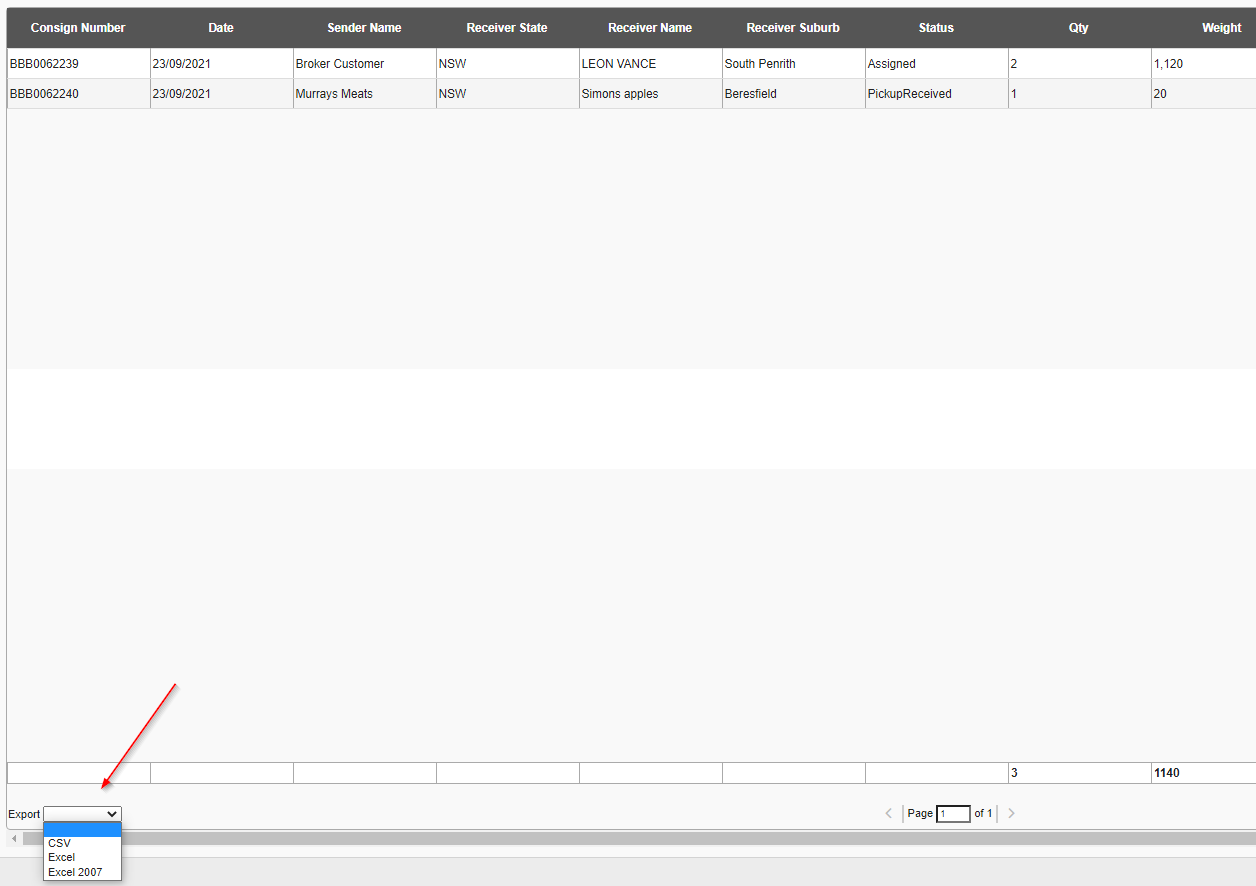
If you need an excel/csv file, you can use the export function at the bottom-left of this page to export into a file of your choice (from the available options):
Customer manifests are typically setup to display at a daily level - meaning that a new customer manifest will be created each day.
However, it is possible to define how customer manifests are created if required.
To do this, go to the customer's card you wish to modify; Home > Card Files > Customer List > Search and select customer + open their card > Consignment Related Rules > Down the bottom of this page:
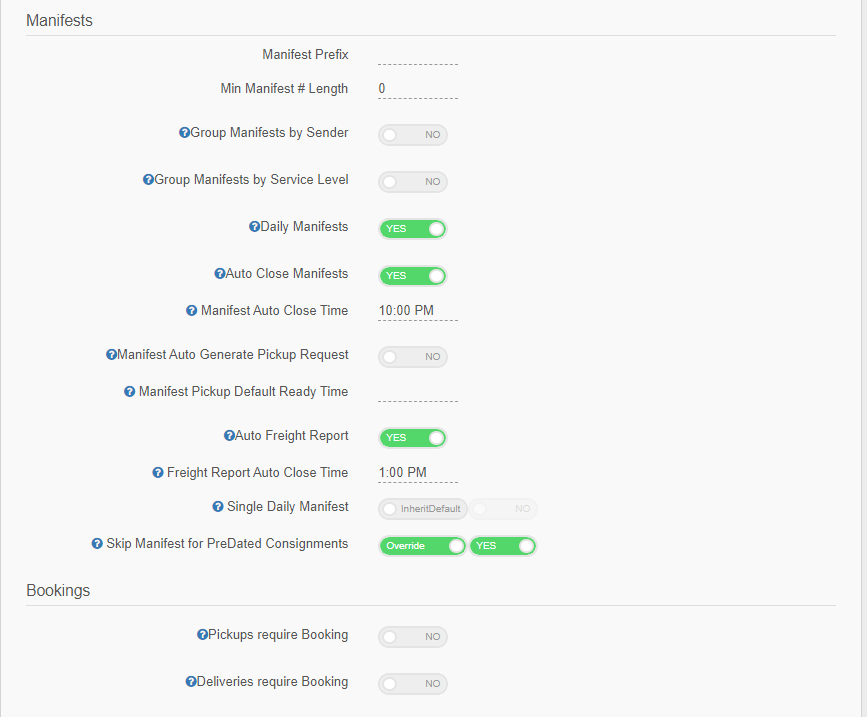
In this section you have the ability to modify the manifest settings for this customer.
Double-click to open and view a manifest / or right-click open new window.
Opening a customer manifest will bring you to a screen like this:
The customer name is listed at the top, as is the consignment count.
Again, clicking the column selector allows you to add or remove from the available columns.
If you need a PDF printout of this manifest you can click the blue Print button:
You can show PDF which will bring the PDF up in a separate window/tab.
You can also change the action and email or download the PDF if required. Click Export to action.
If you need an excel/csv file, you can use the export function at the bottom-left of this page to export into a file of your choice (from the available options):
Customer manifests are typically setup to display at a daily level - meaning that a new customer manifest will be created each day.
However, it is possible to define how customer manifests are created if required.
To do this, go to the customer's card you wish to modify; Home > Card Files > Customer List > Search and select customer + open their card > Consignment Related Rules > Down the bottom of this page:
In this section you have the ability to modify the manifest settings for this customer.

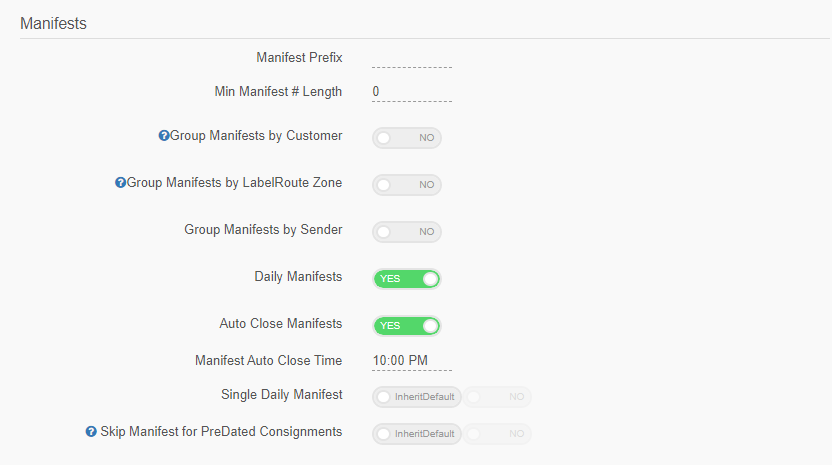
Note: Clicking the blue/white question marker helpers will provide an explanation of what each setting will do:
The standard customer manifest setup is to have a new manifest daily.
To do this you would need the Daily Manifest toggle enabled and would also need to ensure that the daily manifest is closed manually each day or the auto-close manifest toggle is enabled and a time for this is also set.
If you wish to only have one manifest per day for each customer you would need to ensure that the Single Daily Manifest toggle is enabled:
One Important thing to note here is this setting:
The purpose of this setting is to allow you to automatically create a pickup consignment linked to a manifest. This linked consignment is essentially a 'summary' consignment for the manifest it has been linked to.
If you had a customer manifest with 10 consignments on it, this setting would create a pickup consignment that would have all of the consignment items from those 10 consignments on it.
Keep in mind that if you have this setting enabled, if the original consignments on a manifest have been created as pickups, the pickup flags will be disabled (turned off) and the original consignment will no longer be a pickup.
The reason this happens is because it does not make sense to have two pickups for the same connote. Creating a linked pickup connote means you are creating pickup requests for all of the consignments on a manifest, which then means the pickup required flag on the original consignment is now redundant.
Agent (Onforwarder) Manifest
An agent manifest is simply a collection of consignments that have been assigned to an agent.
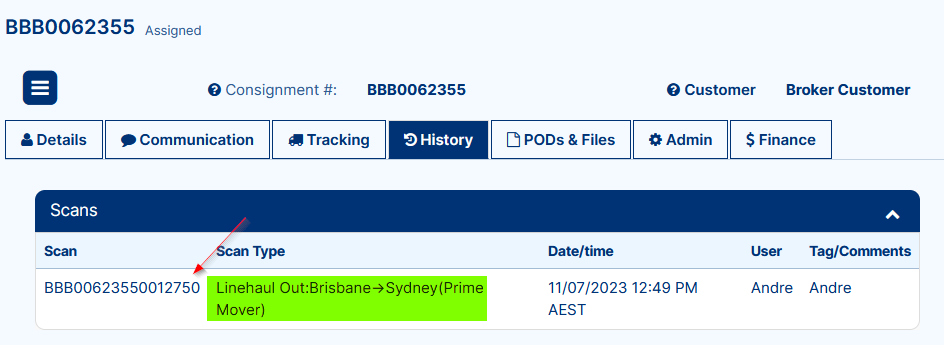
You can either assign a connote to an agent by manually doing so in the history tab of a connote itself:

Or by setting up Auto-Assignment rules. Click here for instructions on how to set these up.
Agent Manifests can be found under Home > Manifests > Agent (Onforwarder) Manifest:
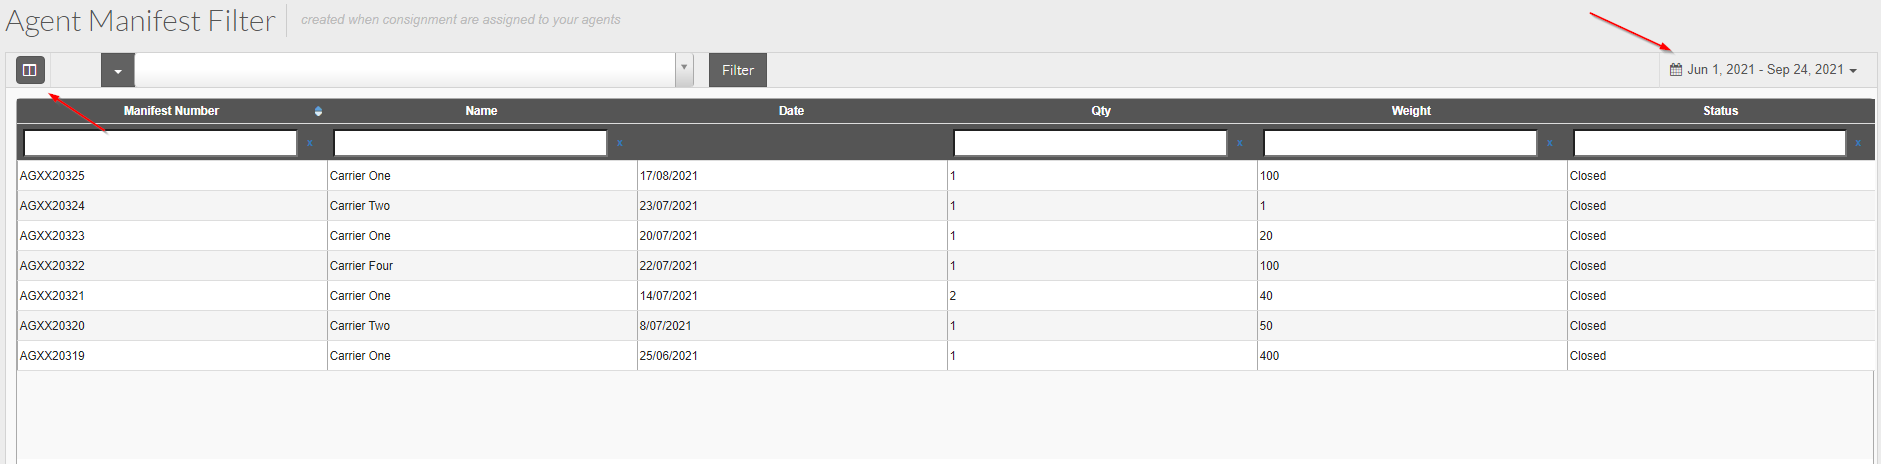
You can change the date range top-right to view older manifests and add or remove columns using the column selector top-left.
Opening an agent manifest brings you to a screen similar to the below:
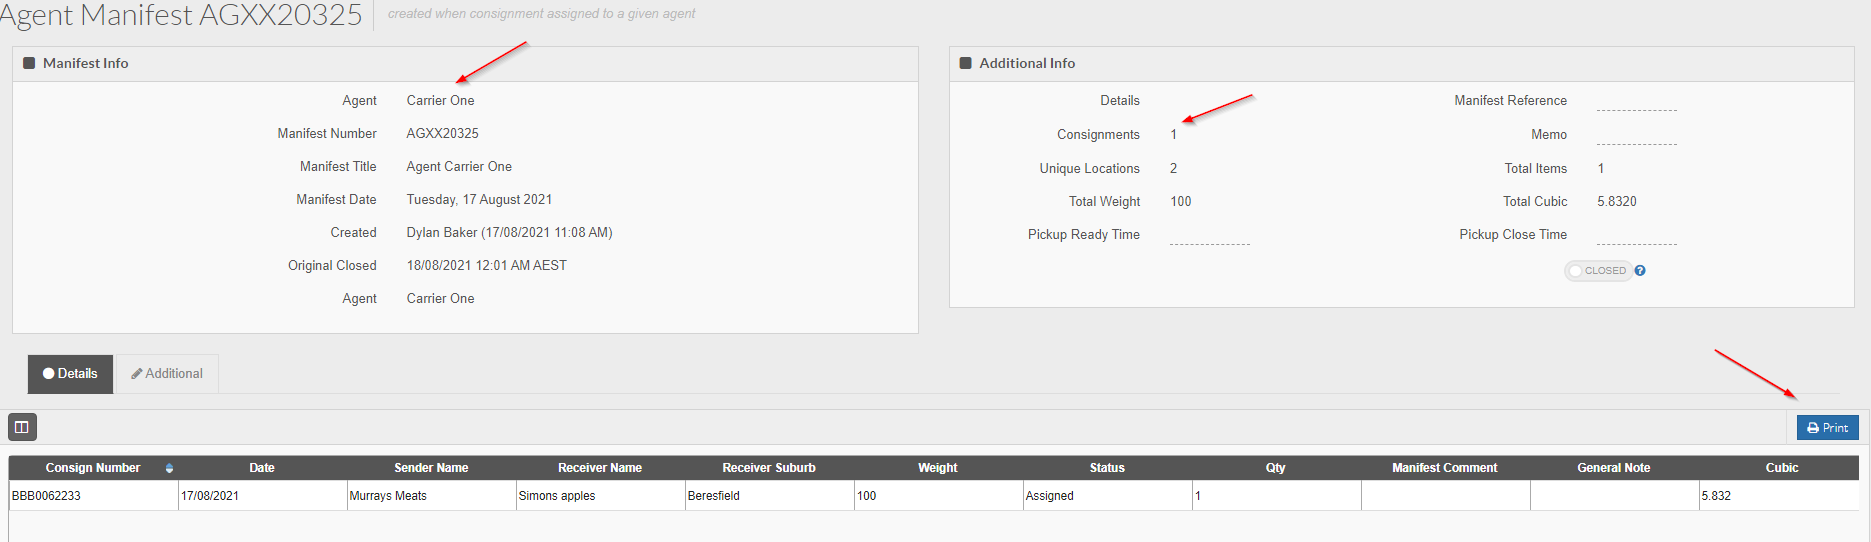
The agent name is listed at the top as is the consignment count.
A PDF can be printed for this manifest using the blue Print button and an excel or csv file can be generated using the export function located bottom-left:
This exports all the information seen in the grid into an excel/csv file.
Similarly to customer manifests, agent manifest settings can be changed in the agent card; Home > Card Files > Agent/Supplier List > Search for agent > Open agent card > Consignment Related Rules at the bottom:
Here you have the ability to have daily agent manifests and auto-close an agent manifest at a certain time each day.
You can also group these agent manifests by sender or customer which may come in handy if you wish to know how many consignments for a particular customer have been assigned to this agent.
The customization is up to you, but typically the standard is daily manifests with an auto-close time each day so that a new agent manifest is created daily.
You can either assign a connote to an agent by manually doing so in the history tab of a connote itself:
Or by setting up Auto-Assignment rules. Click here for instructions on how to set these up.
Agent Manifests can be found under Home > Manifests > Agent (Onforwarder) Manifest:
You can change the date range top-right to view older manifests and add or remove columns using the column selector top-left.
Opening an agent manifest brings you to a screen similar to the below:
The agent name is listed at the top as is the consignment count.
A PDF can be printed for this manifest using the blue Print button and an excel or csv file can be generated using the export function located bottom-left:
This exports all the information seen in the grid into an excel/csv file.
Similarly to customer manifests, agent manifest settings can be changed in the agent card; Home > Card Files > Agent/Supplier List > Search for agent > Open agent card > Consignment Related Rules at the bottom:
Here you have the ability to have daily agent manifests and auto-close an agent manifest at a certain time each day.
You can also group these agent manifests by sender or customer which may come in handy if you wish to know how many consignments for a particular customer have been assigned to this agent.
The customization is up to you, but typically the standard is daily manifests with an auto-close time each day so that a new agent manifest is created daily.
General Manifests
General Manifests are created using a mobile device.
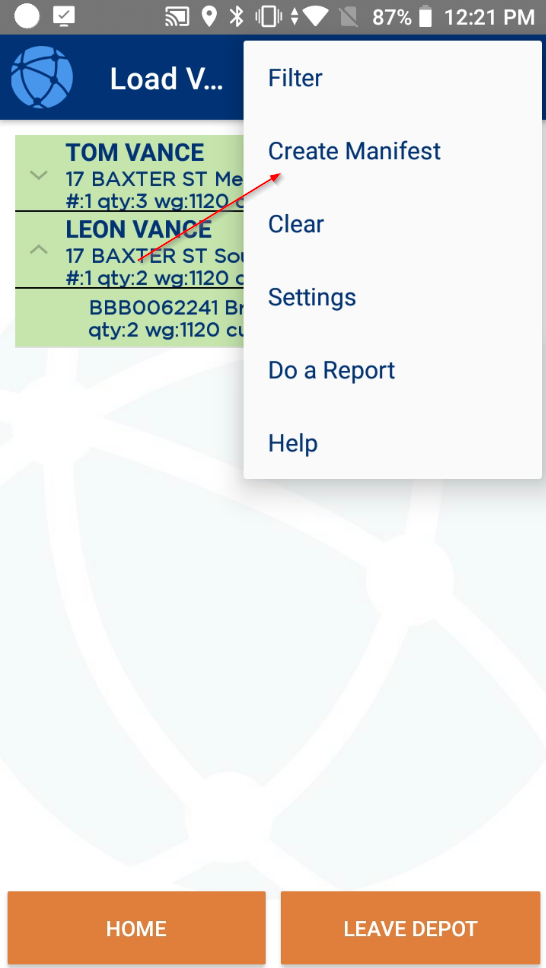
To create a general manifest go to the load page of your app:
Simply scan and load freight as you normally would:
Once you have finished scanning the freight, click the 3 dots top-right and click create manifest:
Click Yes to confirm:
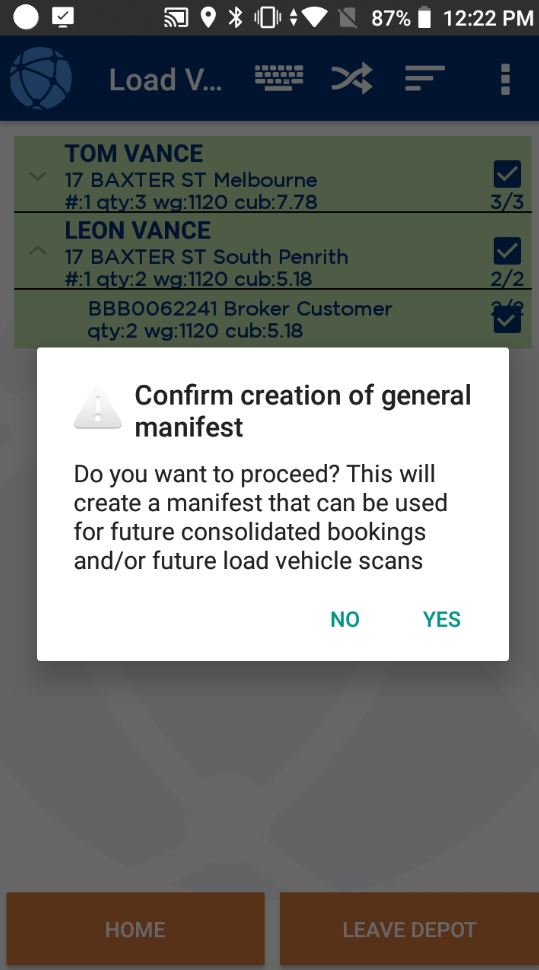
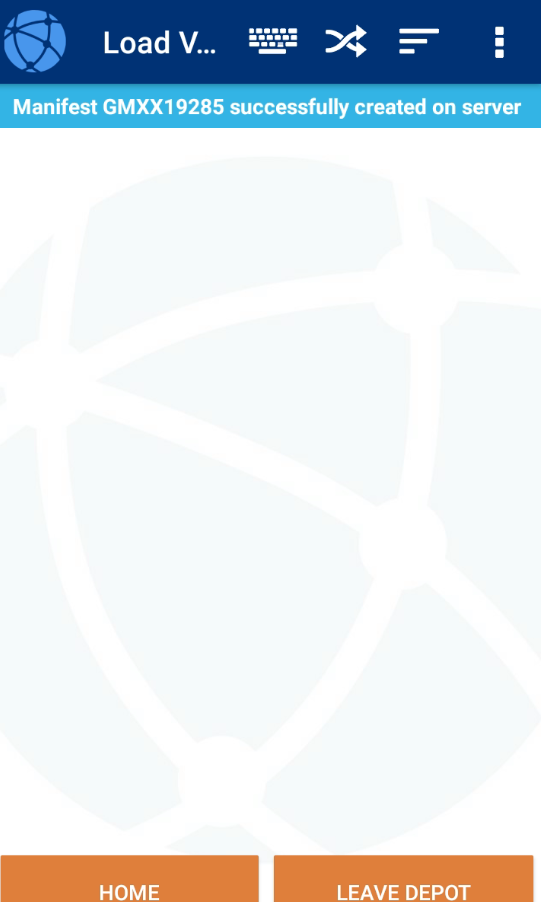
A blue banner then appears telling you a general manifest has been created.
To view this manifest go to Home > Manifests > General Manifests:

Open up the manifest and you will see a screen similar to the below:
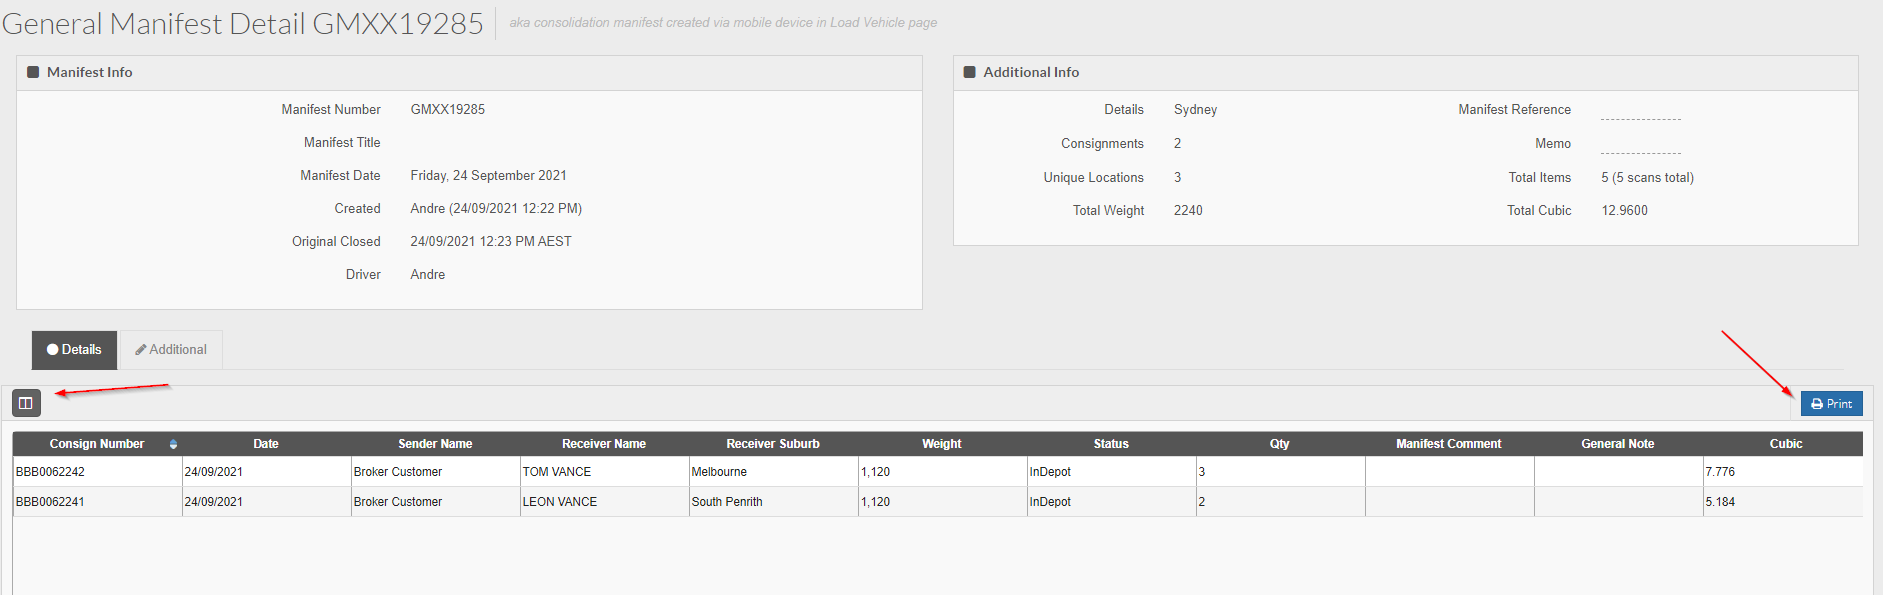
Use the column selector on the left to add or remove columns.
General manifests are mainly used to save time.
Once a general manifest has been created, a driver can simply scan the barcode from the PDF printout of it (on their load screen of their device) and this will populate all of the jobs onto their device:
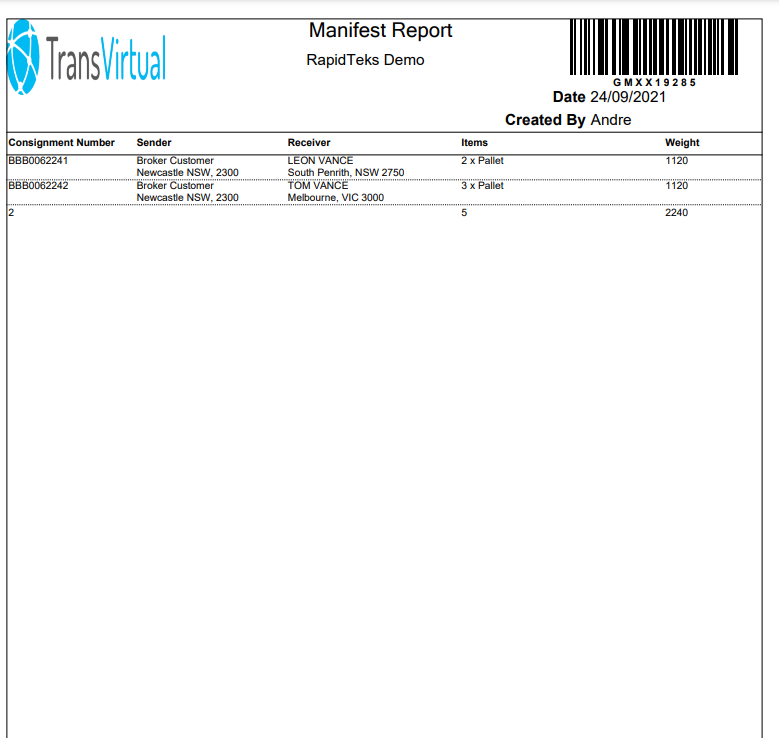
Scanning the barcode top-right will allow another user to have all of the consignment and items populated onto the load screen of their device.
This is particularly useful if your driver is out and about - you could do the load scanning for them so all they need to do when they come back is scan the manifest barcode and once the physical freight is loaded, they can go. This would also be useful for getting freight sorted before a driver starts their shift as you can pre-load the physical freight and also have the freight scanned and ready to go on the app for them.
Click Yes to confirm:
A blue banner then appears telling you a general manifest has been created.
To view this manifest go to Home > Manifests > General Manifests:
Open up the manifest and you will see a screen similar to the below:
Use the column selector on the left to add or remove columns.
General manifests are mainly used to save time.
Once a general manifest has been created, a driver can simply scan the barcode from the PDF printout of it (on their load screen of their device) and this will populate all of the jobs onto their device:
Scanning the barcode top-right will allow another user to have all of the consignment and items populated onto the load screen of their device.
This is particularly useful if your driver is out and about - you could do the load scanning for them so all they need to do when they come back is scan the manifest barcode and once the physical freight is loaded, they can go. This would also be useful for getting freight sorted before a driver starts their shift as you can pre-load the physical freight and also have the freight scanned and ready to go on the app for them.
Import Manifest
Import manifests are simply listings of successful consignment EDI imports.
Simply another way to check what consignments have been imported into your system.
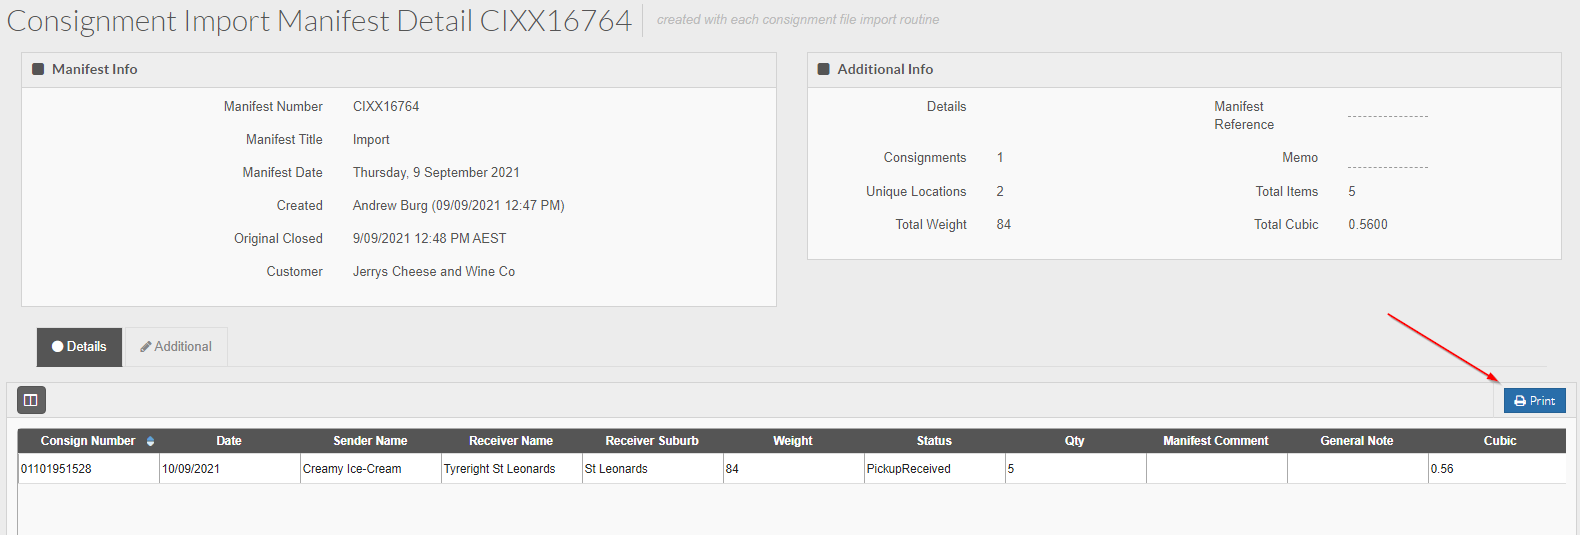
Import Manifests can be found under Home > Manifests > Import Manifest:

Simply another way to check what consignments have been imported into your system.
Import Manifests can be found under Home > Manifests > Import Manifest:
Again, you can open them up and print or export:
Linehaul Manifest
Linehaul Manifests are used to track freight loaded onto a linehaul vehicle.
Step by Step Guide
Linehaul Manifests can be created in 2 ways outlined below and can be used as a record of what is loaded for the driver etc
Mobile Device
1. Go to the scan page of the Mobile App
2. Select a scan type of Linehaul Out
3. Select the destination of the linehaul (Headports as setup within your account)
4. Select the vehicle to be used on this route
5. Scan the freight to be loaded on the linehaul
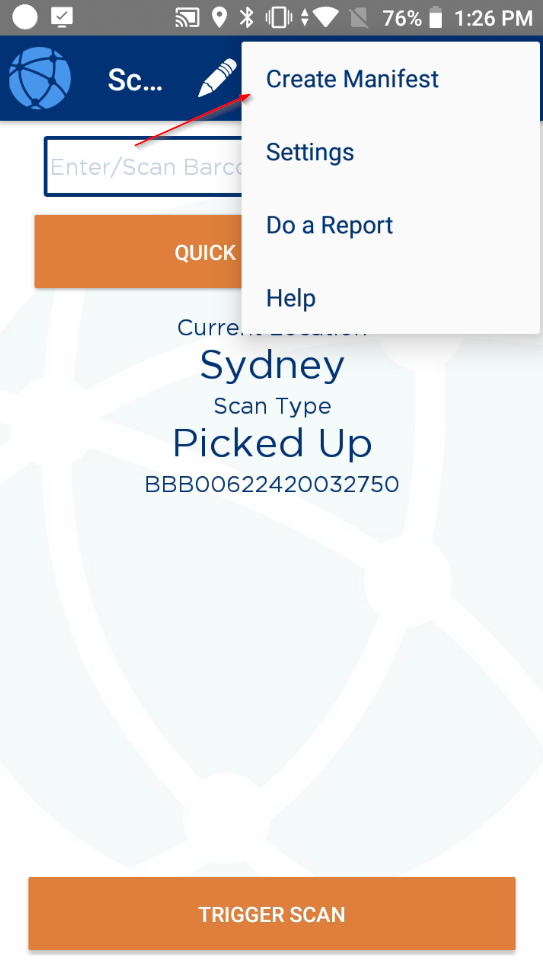
6. Once completed scanning select the menu icon from the top right of your device
7. Select Create Manifest from the menu
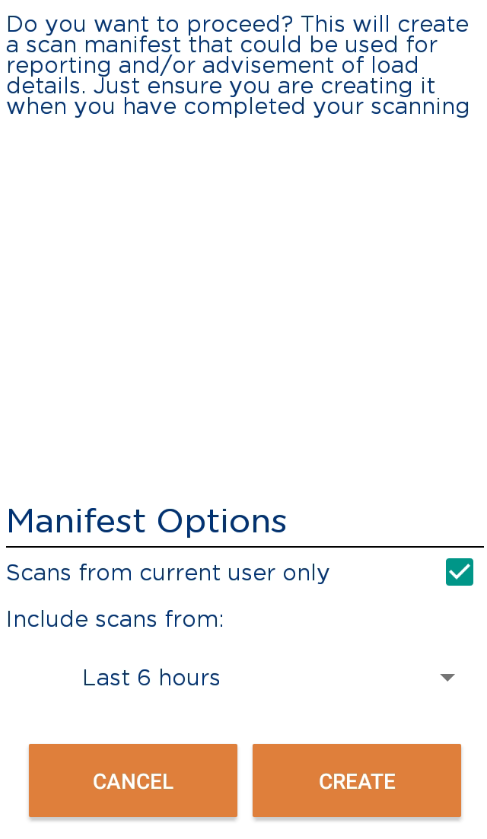
8. Select the time period over which the scans have been performed and then Create the manifest
You can limit scans to be those only performed by you if you wish by cchecking the 'Scans from current user only' option at the bottom of this page (shown above).
Linehaul Controller
1. Navigate to the Linehaul Controller (Home > Manifests > Linehaul Controller)
2. Select Create Route
3. Select the Headports the linehaul is From and To
4. Select the Vehicle and Trailers as required
5. Select the Agent if applicable and select Create
6. Select the applicable Route from the list of Todays Linehaul Routes
7. Type or if available on your computer scan the relevant consignment numbers to travel on the linehaul and click Add
8. Once you have added all the relevant consignments to your linehaul select Close/Depart
Linehaul Manifests
1. Navigate to Linehaul Manifests (Home > Manifests > Linehaul Manifest)
2. You will now see all linehaul manifests created within the selected timeframe, Default is last 7 days
3. Double-click on the relevant manifest you wish to view
4. Manifests can be printed as required by selecting Print or exported using the export function at the bottom-left.
Extra Information - Linehaul Manifesting
Linehaul manifesting via a mobile device (performing Linehaul scans) can be used in conjunction with the Linehaul Controller page in the web portal if required.
The reason why this may suit some users is that Linehaul scans can be performed on a device, and these can then be reflected within the Linehaul Controller page in TransVirtual, which would allow a staff member (Linehaul Controller) to manage the Linehauls required by the business - perhaps you wish for an approved person to be creating these manifests.
Using this method also allows you the ability to remove incorrectly scanned consignments from a Linehaul route/manifest because the scan is applied to the route before the manifest is actually created.
How to
To have Linehaul Scans done on a device show in the Linehaul Controller page is quite simple.
To start with, you would need to perform the applicable Linehaul scans on a device, the below as an example:
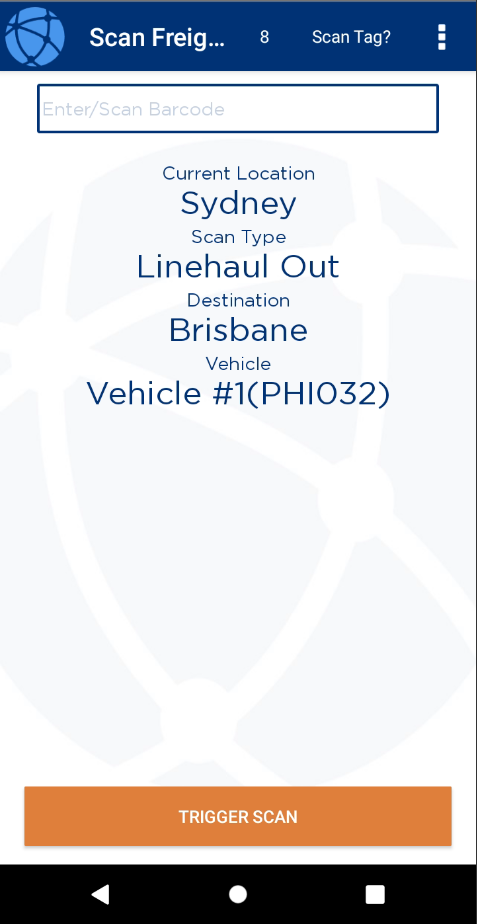
To start with, you would need to perform the applicable Linehaul scans on a device, the below as an example:
In the above you can see that the origin (Current Location) is set as Sydney and the destination is set as Brisbane.
A vehicle has been selected and the scans have been performed as indicated by the '8' at the top of this scan page.
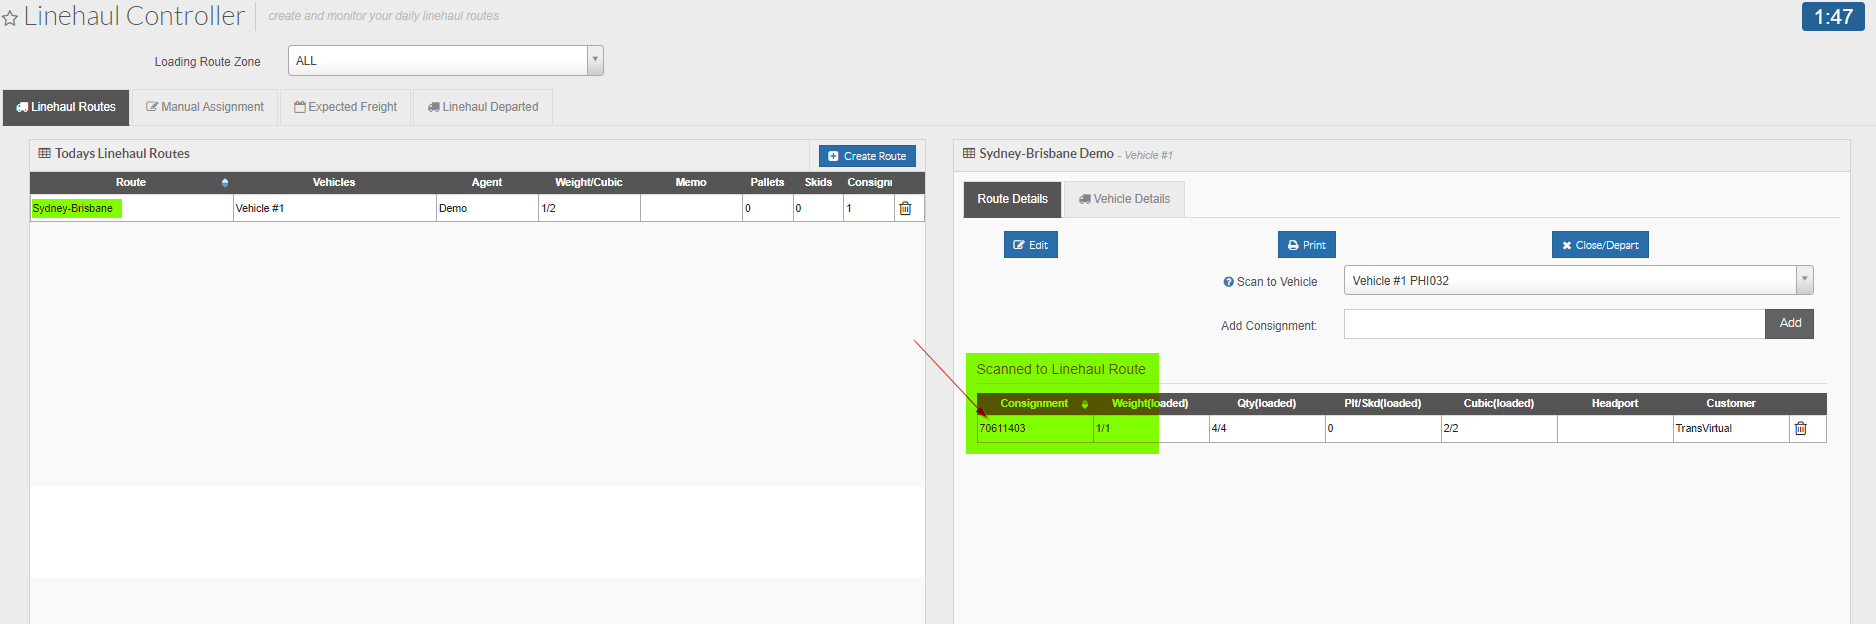
In the Linehaul Controller page, all that is required is that you have a route created that reflects that applied to the scans on the device and that the same vehicle/primary vehicle is specified:
A vehicle has been selected and the scans have been performed as indicated by the '8' at the top of this scan page.
In the Linehaul Controller page, all that is required is that you have a route created that reflects that applied to the scans on the device and that the same vehicle/primary vehicle is specified:
In the above you can see that there has been a Sydney to Brisbane route setup which matches that of the scans performed on the device.
The scans on the device have also been assigned the same vehicle matching the primary vehicle displayed in the Linehaul Controller.
Any applicable scans will show in the Scanned to Linehaul Route under this route.
The scans on the device have also been assigned the same vehicle matching the primary vehicle displayed in the Linehaul Controller.
Any applicable scans will show in the Scanned to Linehaul Route under this route.

The requirement for Linehaul Scans to match to a route in the Linehaul Controller is that the route (From and To) and Primary Vehicle details match. If there is no match, scanned consignments will not appear in Linehaul Controller.
If required, you are able to remove a consignment from the route which in turn would remove it from the Linehaul manifest when you close/depart to create the manifest. To do so, click on the bin icon against the incorrectly scanned consignment:

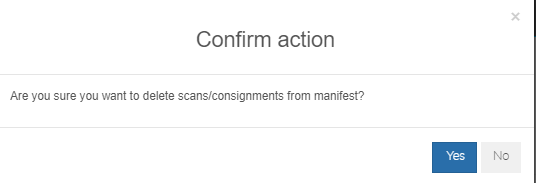
Clicking this icon will present a prompt asking you to confirm you wish to delete the consignment from the in-progress manifest:
 Note: The Color Legend located bottom-left of the Linehaul Controller can be used to identify what any colors or flashing means:
Things to keep in mind
When using Linehaul scans in conjunction with the Linehaul controller, the scanned Qty of a consignment will reflect within the same route within the Linehaul Controller - provided that the locations and vehicle assigned match between the app and web portal.
For example, the below consignment has 2 total items and only 1 has been Linehaul scanned using the mobile app:
For example, the below consignment has 2 total items and only 1 has been Linehaul scanned using the mobile app:
The route within the Linehaul Controller appears like the below:

Scanned Qty will show in the Linehaul controller, however, you are not able to remove/delete consignments at an item level if added incorrectly to a route - the Linehaul Controller works at a consignment level.
Rating/Pricing using Linehaul Manifesting
The Linehaul manifest concept in TransVirtual allows you the ability to 'charge' for Linehaul manifests (pay an agent doing the Linehaul leg/work) or display a reportable cost against a consignment - so that you can easily identify costs associated with consignments. This then allows you to more accurately work out profit/loss for each consignment.
The below will explain further how this can be achieved.
The below will explain further how this can be achieved.
Linehaul pricing using Linehaul linked consignments
The first method of pricing using Linehaul manifests is to create a consignment linked to a Linehaul manifest - this consignment is a summary of all original consignments added to the manifest.
This method allows you to pay an agent via the linked Linehaul consignment and display a reportable cost against the original consignment attached to the manifest!
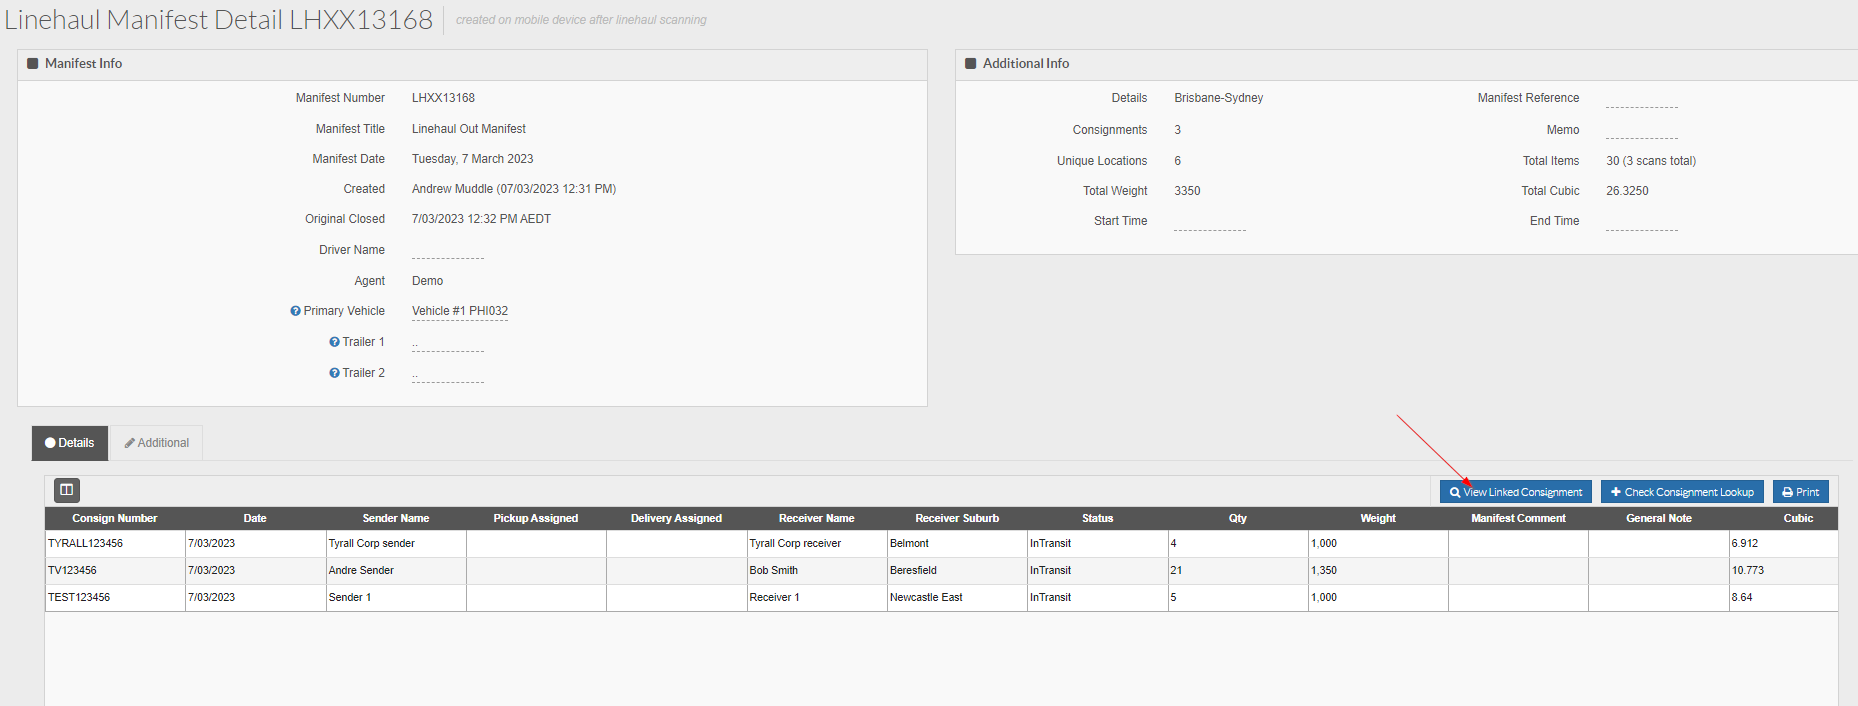
To create this linked consignment, you can manually do so within a Linehaul manifest by clicking the below button that appears:
There is also the ability to have these linked manifest consignments automatically generate by enabling the below setting found in the Global Setup page:
When the Linehaul linked consignment has been created, you will notice that the below button is now worded differently as the linked consignment has been created:
When clicking on the above button you will be taken to the Linehaul linked consignment:

Here you will notice that the created consignment number is exactly the same as the Linehaul Manifest number it was created from - which allows you to easily identify the manifest it stems from (this connote number is also searchable in the consignment search filter page).
The total item qty listed on this connote is the sum of all items from all original consignments added to the Linehaul manifest.
Note: If your linked consignment is created with sender and receiver details stating 'empty empty' or something to that effect, this is because there are no address details listed against the relevant zones for which the manifest is travelling between.
In the above example, the sending location is Brisbane and the receiving location is Sydney:
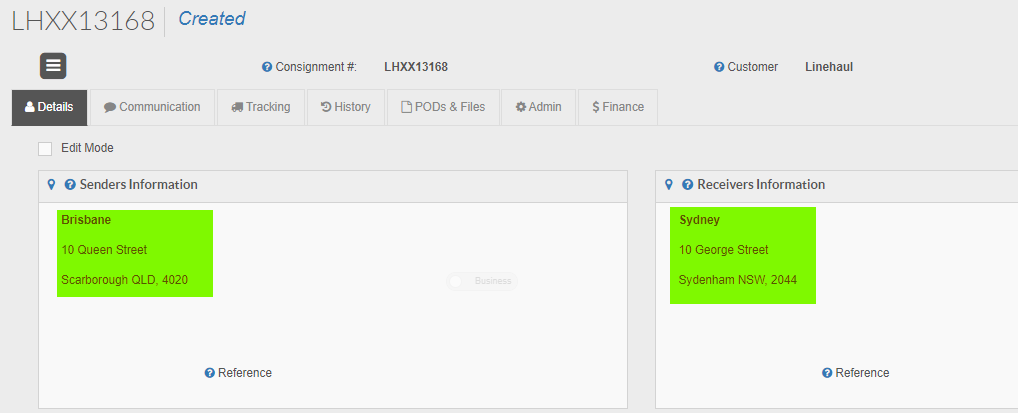
This is a Linehaul going from Birsbane to Sydney.
The total item qty listed on this connote is the sum of all items from all original consignments added to the Linehaul manifest.
Note: If your linked consignment is created with sender and receiver details stating 'empty empty' or something to that effect, this is because there are no address details listed against the relevant zones for which the manifest is travelling between.
In the above example, the sending location is Brisbane and the receiving location is Sydney:
This is a Linehaul going from Birsbane to Sydney.
These address details have been derived from the zones found in the below zone listing:
The above can be seen in the Global setup page under the General tab!
The route/scan/agent zone list is the one used to display the zones on the mobile device and is where the address details for Linehaul linked consignments are drawn from.
To amend and add in address details for each of these zones, open up and enter the relevant zone listing and click on the edit button:
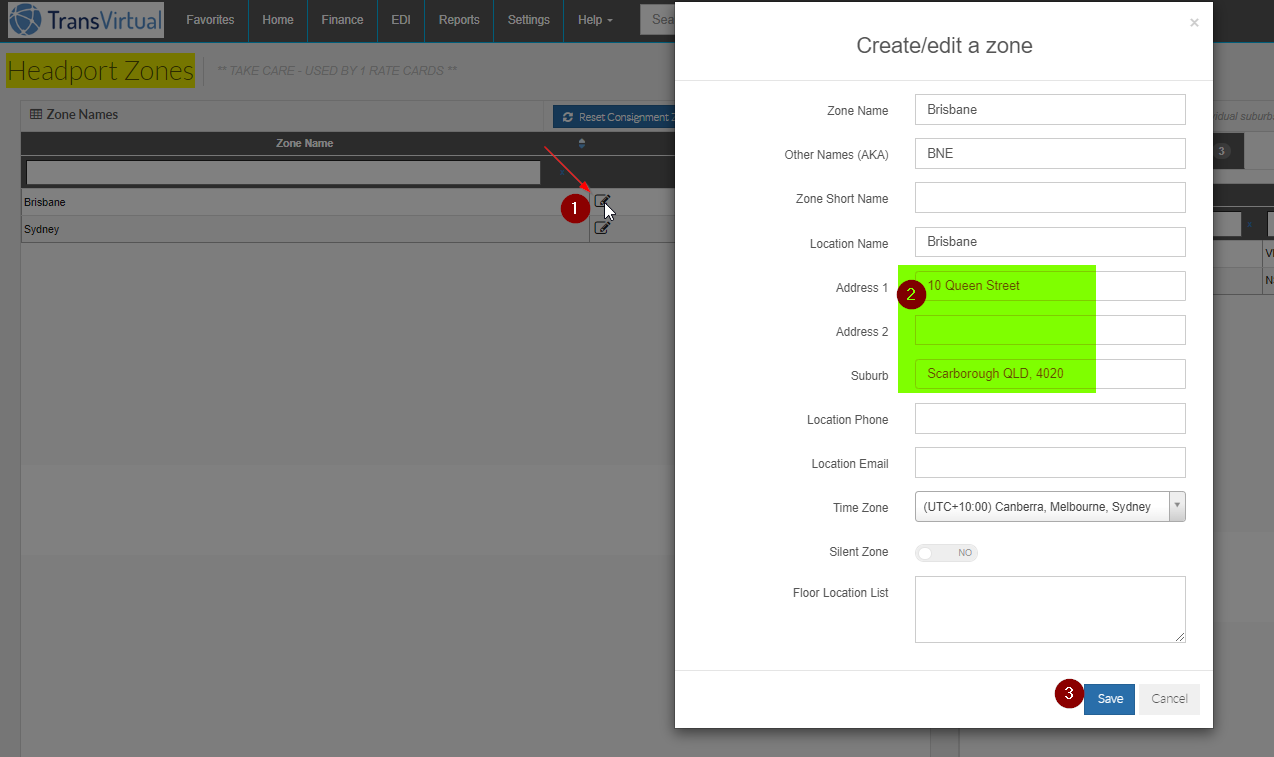
To amend and add in address details for each of these zones, open up and enter the relevant zone listing and click on the edit button:
It is advisable to add in address details for each zone you have within this zone listing.
Zone list changes can take around 10-15 minutes to implement due to caching.
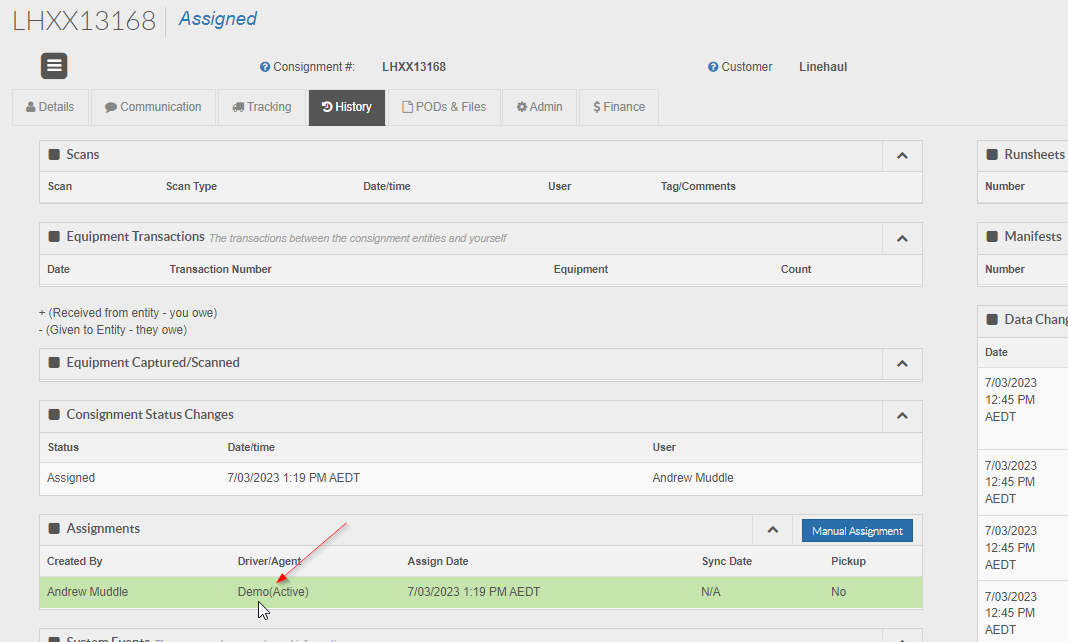
Once the Linehaul linked consignment has been created, you have the ability to assign this new connote to an agent if an agent will be doing the Linehaul leg for you and you need to record a charge for this work against the original consignment:
The assignment process for this linked consignment is the same as with 'standard' consignments.
Once assigned, if the assigned agent has a rate card, the system will use that to try and price the linked consignment:
In the above you can see that there is a cost listed against the connote based on the relevant agent rate card.
Note: This linked manifest consignment is the way in which you are able to pay your agents for doing the Linehaul leg for you - it acts as its own standalone consignment that can list an agent cost and be added to an agent invoice if needed (RCTI) if required.
From here, the system will use this cost as the total price for the Linehaul manifest.
This total price amount will then be split up and portions allocated to the original consignments on the manifest as a Reportable cost - which allows you to identify costs associated with each connote that travels via this Linehaul.
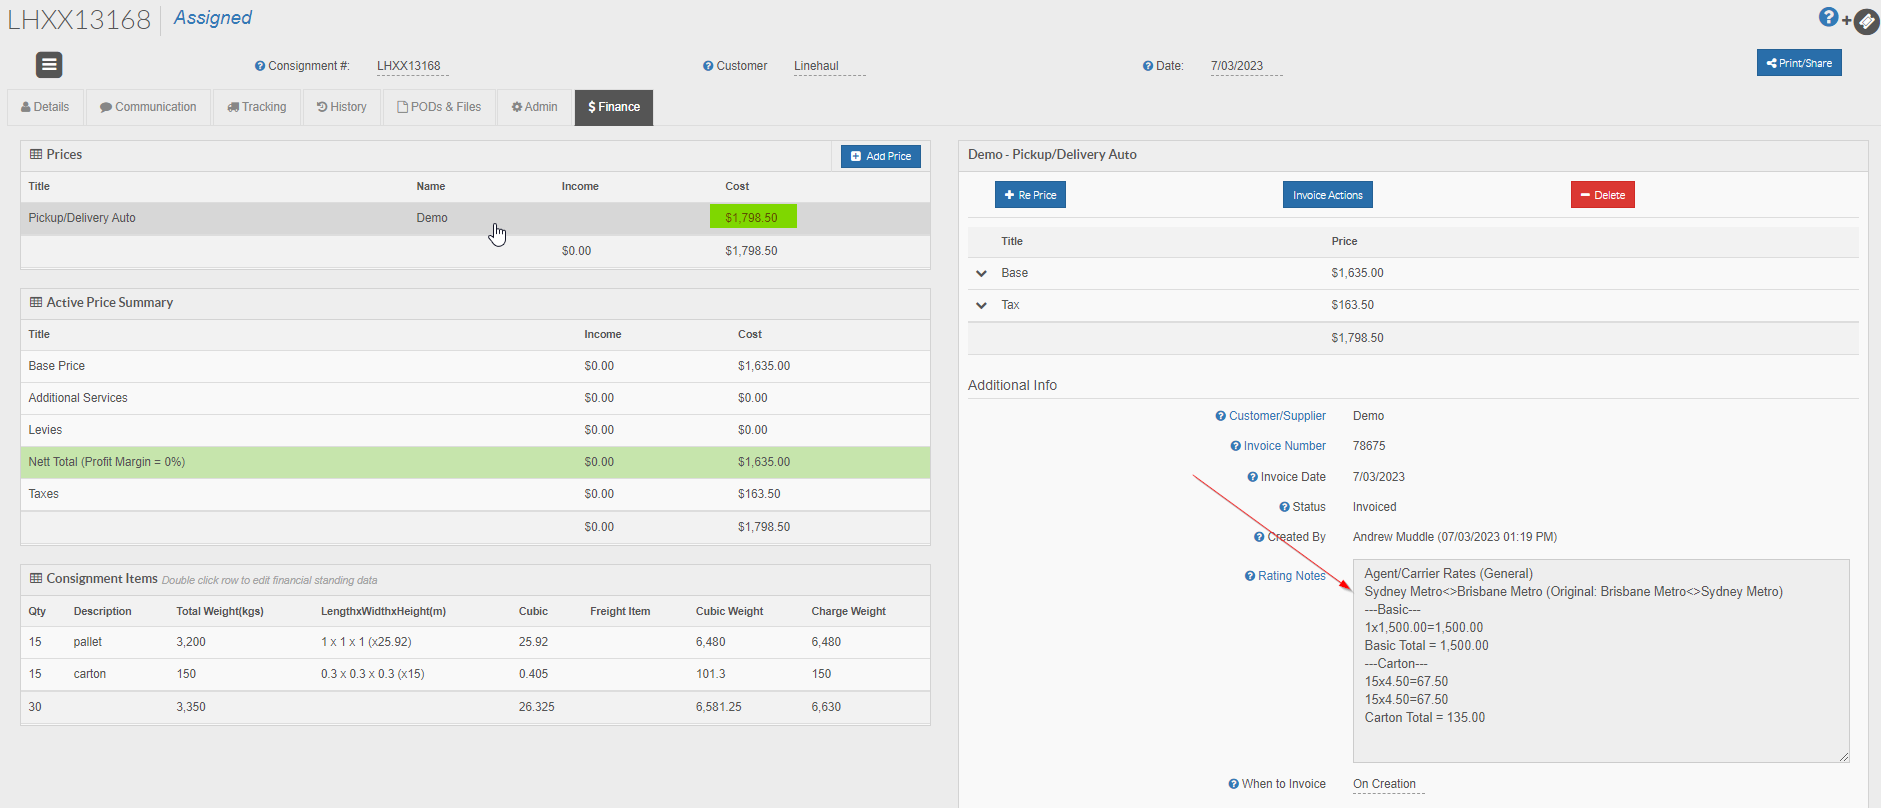
For example, Linehaul Manifest LHXX13168 has 3 consignments added to it - total qty is 30 items across these 3 connotes with a total cubic of 26.3250 and total weight of 3350kgs:
The formula for how TransVirtual works out what price (reportable cost amount) to allocate to each of the original consignments is cubic then weight then customer base price - which means for each connote present, how much of the total manifest cubic did that connote take up? If no cubic information available for a connote, the system then defaults to weight and does the same thing (how much of the total manifest weight did the connote make up). If both cubic and weight information are not available, the system then uses the customer base price of the original connote to try and acquire (work out) what % a connote makes up in the total cost for the Linehaul.
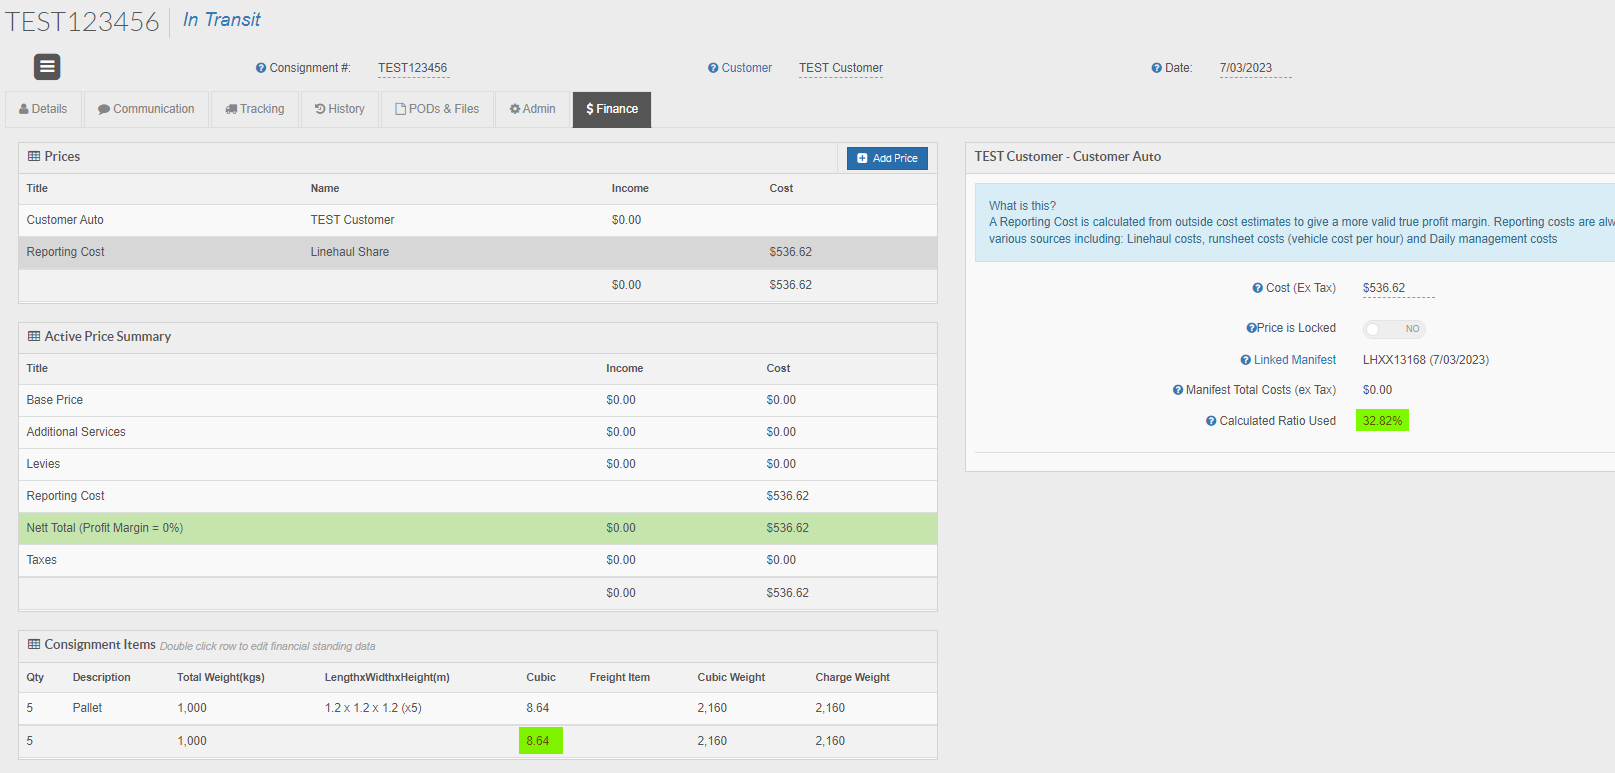
In the above example, the manifest has a total cubic of 26.350. Consignment TEST123456 which is part of this manifest has a total cubic of 8.64 which makes up 32.82% of the total cubic associated with this manifest:
In the above example, the manifest has a total cubic of 26.350. Consignment TEST123456 which is part of this manifest has a total cubic of 8.64 which makes up 32.82% of the total cubic associated with this manifest:
This is because 8.64 / 26.3250 x 100 = 32.82%
Keep in mind, cubic is used first, then weight (if no cubic), then customer base price (if no weight or cubic present).
For accuracy, it is important (where possible) to ensure consignments have dimension and weight data entered.
For accuracy, it is important (where possible) to ensure consignments have dimension and weight data entered.
Linehaul pricing using a dedicated Linehaul rate card
There is another concept (which is similar to the above) that allows you the ability to record Linehaul costs and list them against consignments in your account - this method uses a dedicated Linehaul rate card.
In order to achieve this, you will need to create a dedicated zone list and rate card for this function - in much the same way you'd create standard rate cards (click here for further information on rate cards)
You can create the zone listing for this however you wish but it should include all of the areas that you send Linehaul trucks/vehicles between.
Your rate card must be created as an agent/supplier rate card and could look similar to the below:
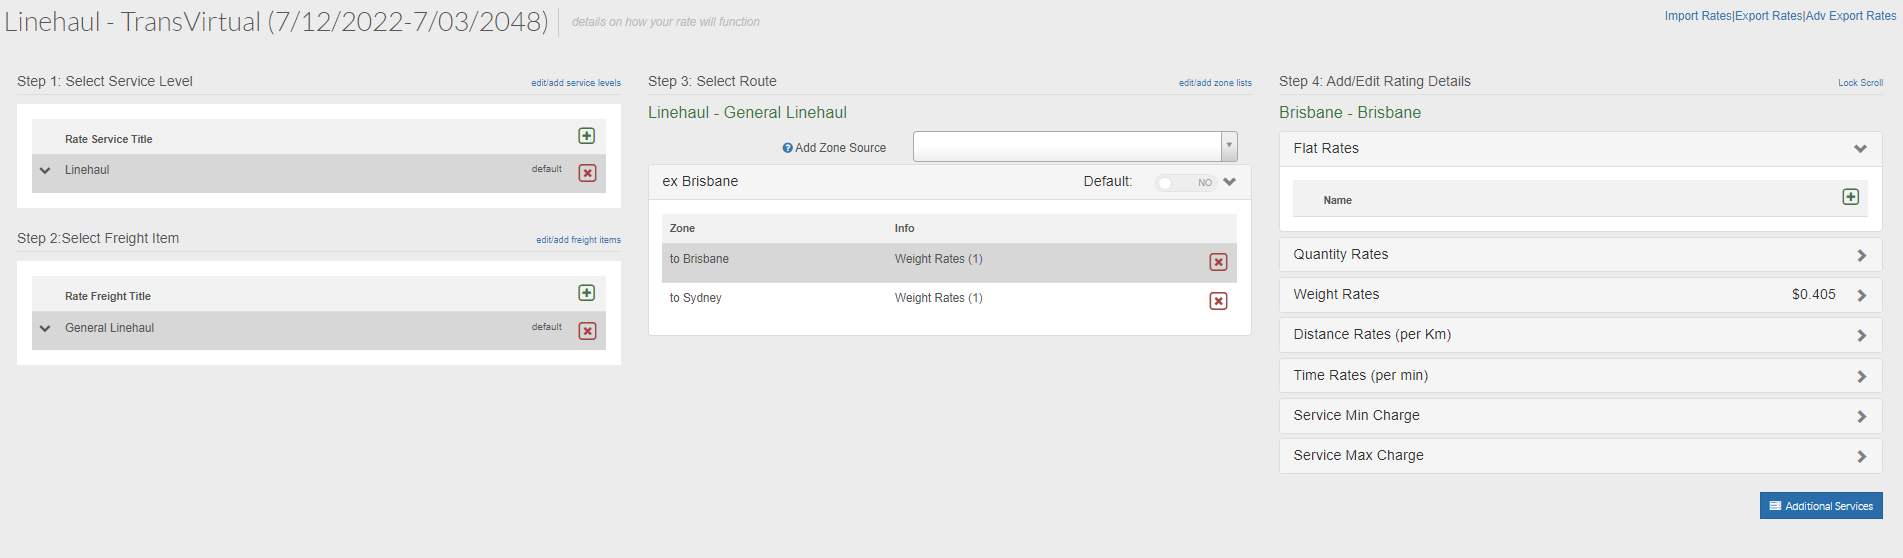
In the above, a default Linehaul service level has been implemented along with a default General Linehaul freight item. Step 3 of the rate card will list the Linehaul legs your company undertakes - in the above, the only Linehaul legs that are created go from Brisbane to Brisbane or Brisbane to Sydney.
Step 4 will list how you charge for each connote on a Linehaul - this can be any pricing method available, but typically, a weight rate in conjunction with a step 2 cubic multiplier is the standard pricing method as charging is normally based on cubic/weight a connote takesup on a Linehaul truck.
In order to achieve this, you will need to create a dedicated zone list and rate card for this function - in much the same way you'd create standard rate cards (click here for further information on rate cards)
You can create the zone listing for this however you wish but it should include all of the areas that you send Linehaul trucks/vehicles between.
Your rate card must be created as an agent/supplier rate card and could look similar to the below:
In the above, a default Linehaul service level has been implemented along with a default General Linehaul freight item. Step 3 of the rate card will list the Linehaul legs your company undertakes - in the above, the only Linehaul legs that are created go from Brisbane to Brisbane or Brisbane to Sydney.
Step 4 will list how you charge for each connote on a Linehaul - this can be any pricing method available, but typically, a weight rate in conjunction with a step 2 cubic multiplier is the standard pricing method as charging is normally based on cubic/weight a connote takesup on a Linehaul truck.
It is not advisable to set any routes as defaults in Step 3 of the rate card! The reason for this is that there should always be a direct route match for Linehaul pricing.
Once this rate card has been setup, enable it and also remove any agents attached to it as they will not be required (this is a general card not associated to one particular agent):
From here, go to Global Setup page under the Settings menu and then locate the below field found under the General tab:
Double-click the field and select the rate card to be used for Linehaul reportable costs, then click save to implement.
Once configured, the system will then use this rate card to add a reportable cost to any applicable connotes.
For example:
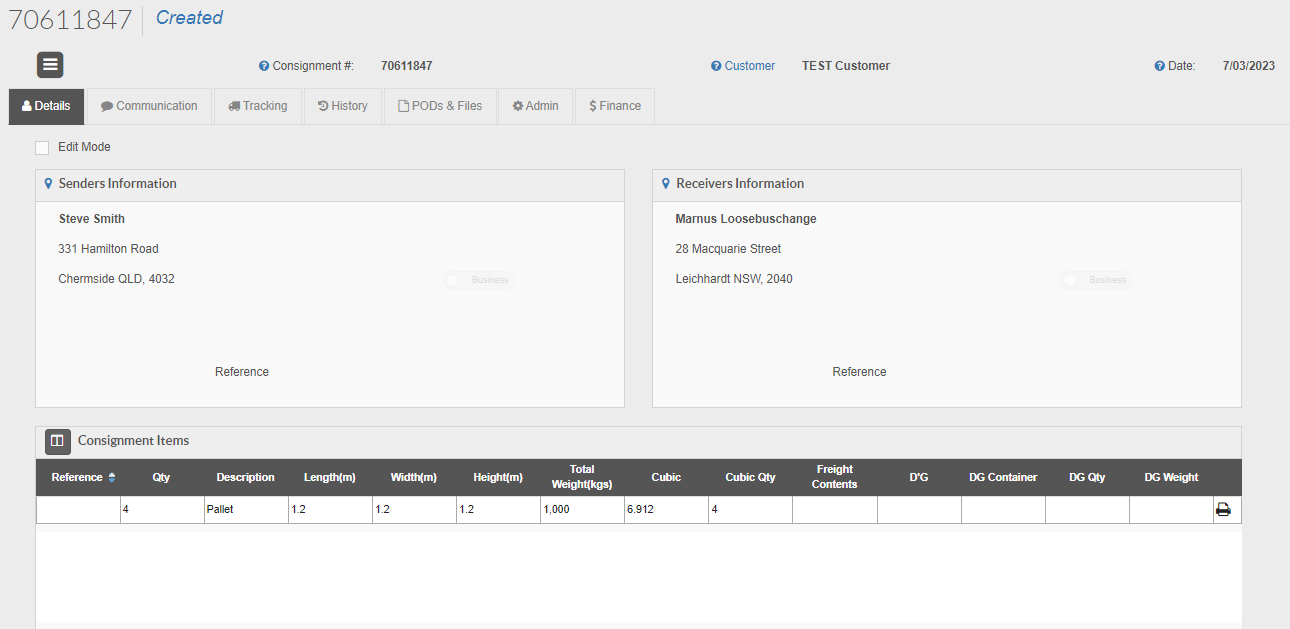
The above consignment is going from Chermside QLD to Leichhardt NSW which per the zone listing being used for the dedicated Linehaul rate card means this connote is being Linehauled from Brisbane zone to Sydney zone.
The Linehaul rate card has the below price setup for Brisbane to Sydney:
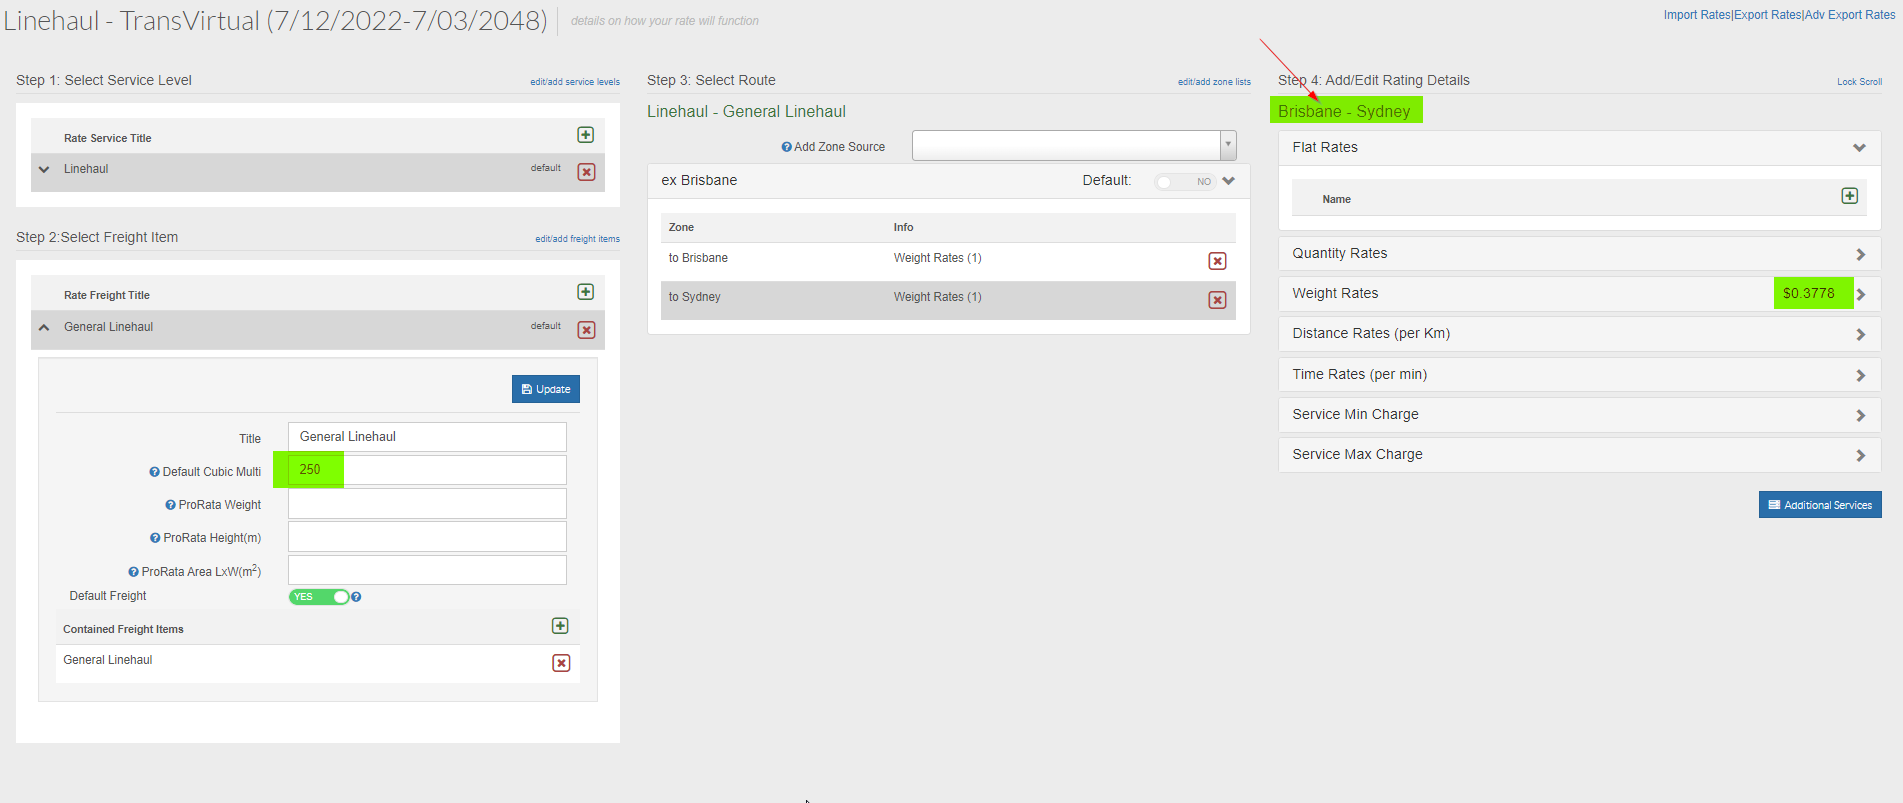
The price is $0.3778 per kg but there is also a 250 cubic multiplier applied to this to be used when the cubic weight exceeds the dead weight.
The consignment in question has had the below Reporting Cost added based on the above rate card information:
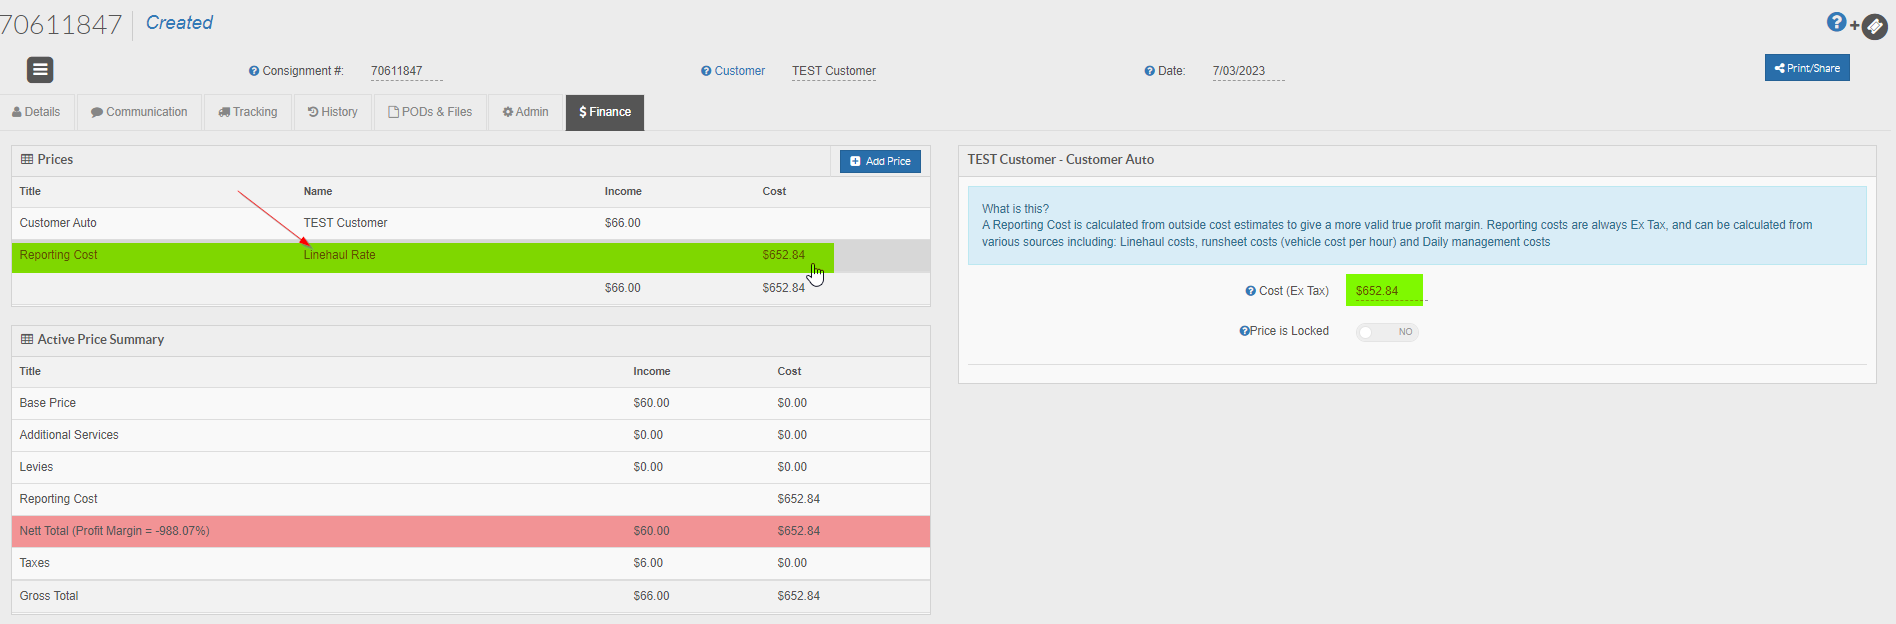
The cubic weight is being used here as the cubic weight value exceeds the dead weight value.
For example:
The above consignment is going from Chermside QLD to Leichhardt NSW which per the zone listing being used for the dedicated Linehaul rate card means this connote is being Linehauled from Brisbane zone to Sydney zone.
The Linehaul rate card has the below price setup for Brisbane to Sydney:
The price is $0.3778 per kg but there is also a 250 cubic multiplier applied to this to be used when the cubic weight exceeds the dead weight.
The consignment in question has had the below Reporting Cost added based on the above rate card information:
The cubic weight is being used here as the cubic weight value exceeds the dead weight value.
Note: This reporting cost will not display on relevant consignments immediately. This calculation is performed by a task in the background so you will find that it will take some time before any Linehaul Reporting Costs can be seen on applicable consignments.
Also, please keep in mind that for this Linehaul Reporting Cost to appear on a consignment, the route that the consignment is taking must exist within the dedicated Linehaul rate card - for example, if a consignment is going from Perth to Brisbane there must be a Perth to Brisbane route and price within the dedicated Linehaul rate card. It is for this reason also that it is not advisable to set Step 3 of this rate card to have any defaults as doing so may cause pricing issues.
Always ensure to check and test any new rate card setups to ensure they work as expected.
Runsheet Manifest
A Runsheet is typically created when a driver clicks the leave depot option on their device:
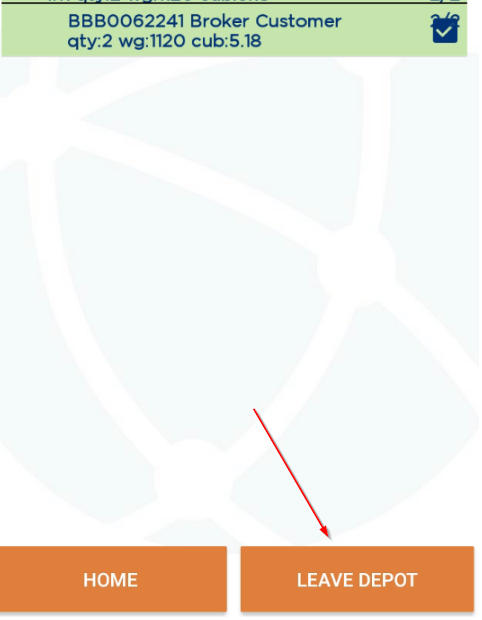
Runsheets are essentially what a driver has on their delivery page and what they intend to deliver for a given day or run.
The Runsheet Manifest page simply shows Runsheets created for your selected date range:
This page can be found under Home > Manifests > Runsheet Manifest.
It is important to note that pickups do not display on Runsheets - only deliveries will be added to a Runsheet because Runsheets are what is being delivered.
You can open a Runsheet and print or export if required.
Scan Manifest
Scan Manifests are created by mobile devices when doing scans on freight.
It is important to note that Linehaul scanning is a type of scan available but Linehaul scanning is separate to this and Linehaul Manifests will not display in this section:

This page can be found under Home > Manifests > Scan Manifest.
To create a scan manifest, go to the scan page of the mobile app:

It is important to note that Linehaul scanning is a type of scan available but Linehaul scanning is separate to this and Linehaul Manifests will not display in this section:
This page can be found under Home > Manifests > Scan Manifest.
To create a scan manifest, go to the scan page of the mobile app:
Open this page up:
Tap and hold the scan type to change to the type of scan you wish to apply.
You may also wish to add a scan tag at the top. Tap and hold to select from available scan tags.
Click here for instructions on Scan Tag setup if required.
Once you have the right scan type and scan tag, simply scan the freight needed.
Once the scanning has been done click the 3 dots at the top-right and click create manifest:
It is usually a good idea to limit current user using the checkbox at the bottom and you can also specify to include scans from a certain time period as well if required. Click create to generate the manifest. The manifest then appears in the manifest page and you can print or export if required from within the manifest itself.
Scan manifests can come in many different types depending on the scan type selected.
You may want a record of connotes that come into depot at a certain point. If so, when depot scanning simply click create manifest after depot scanning has been completed.
Another useful type of manifest is a floor manifest. Floor manifests are generated by selecting floor scan as your scan type.
Floor manifests are typically used to provide records of what is still on the depot floor at certain points throughout the day, which means selecting a scan tag when doing floor scans is a good idea because scan tags are essentially just comments as to why something was scanned the way it was.
Extra Information
In addition to the above, it is possible to have manifests be sent to email addresses or have them print out automatically upon creation.
This is done via EDI rules.
This is done via EDI rules.