Advanced Mobile Equipment
Located under Configuration > General > Global Setup > General tab there is the below setting:
Enabling this setting allows for increased equipment monitoring functionality including equipment endorsement on freight arriving at depot, equipment checks on driver pickup and driver load, as well as the ability to nominate equipment transfers/exchanges on delivery completion.
This article will run through how to make use of this setting to enable more out of your equipment monitoring process.

Note: To begin, you must ensure the above setting is enabled and that you have configured your equipment types. Click here for further information on setting up Equipment Types (ensure a data filter is present against each Equipment type as the logic in the data filters is what prompts the app to ask the mobile user to record Equipment counts on load scan).
Equipment Endorsement
When enabled, the Advanced Mobile Equipment setting allows you the ability to 'endorse' freight arriving at your depot - which essentially means you are able to scan the freight and specify how many equipment types are present (how many Chep, Loscam, etc. pallets are on the scanned consignment for example).
Example
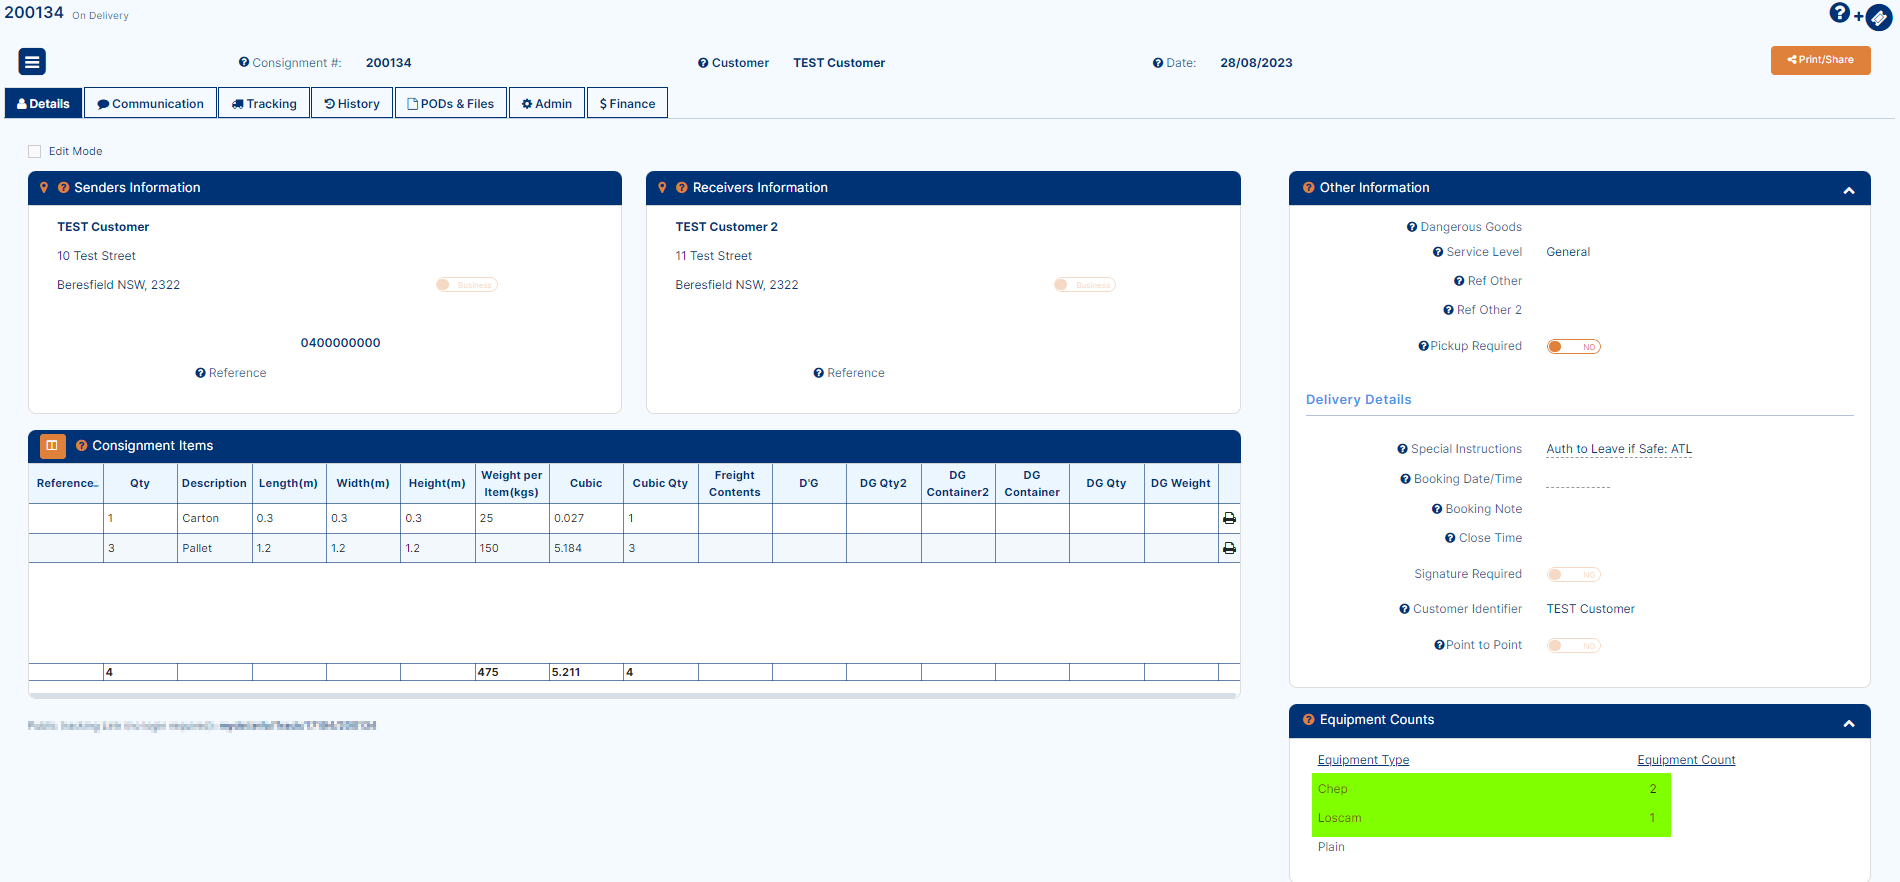
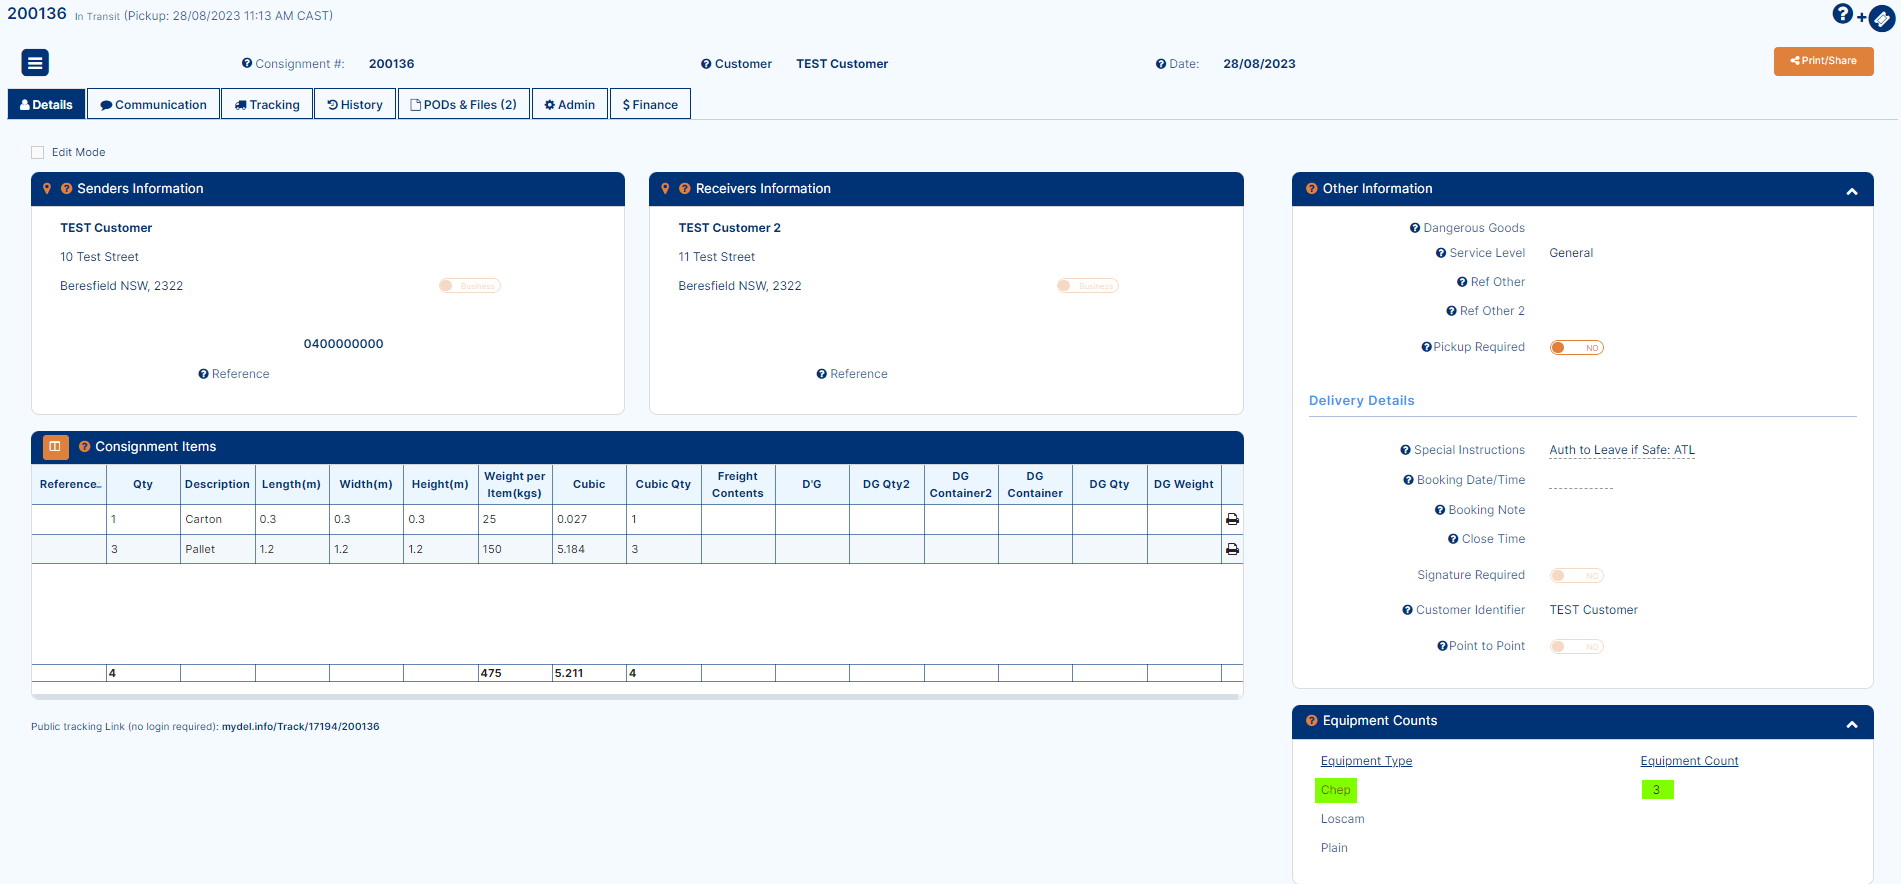
The below is an example consignment that has just arrived at your depot:
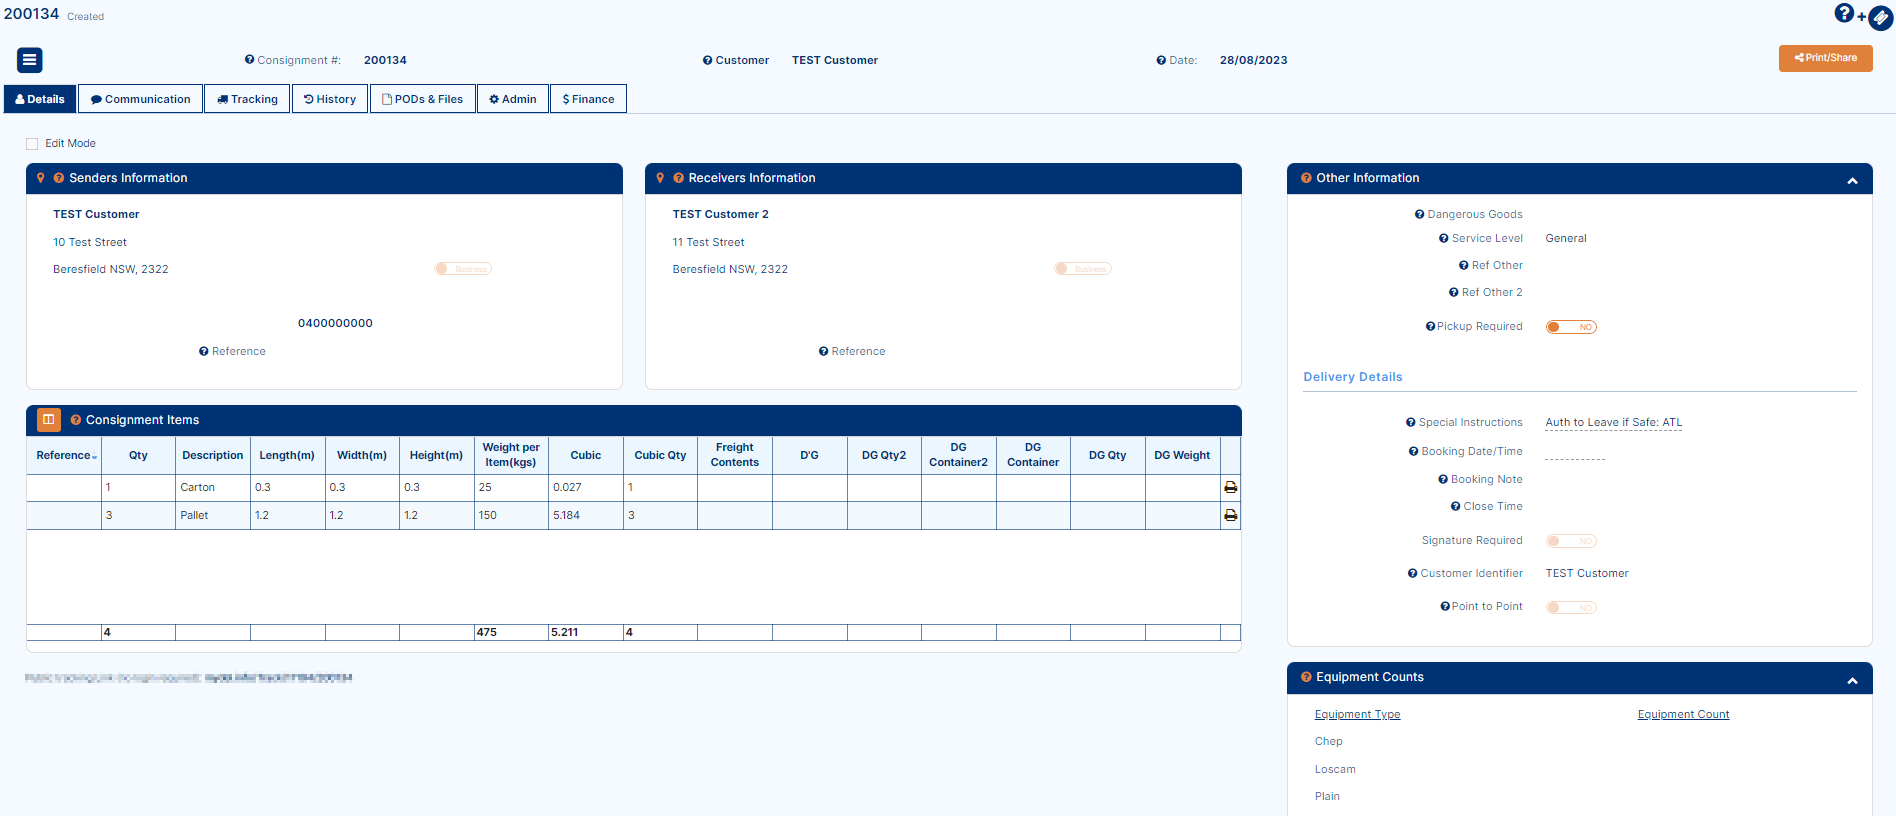
It contains 1 carton and 3 pallets.
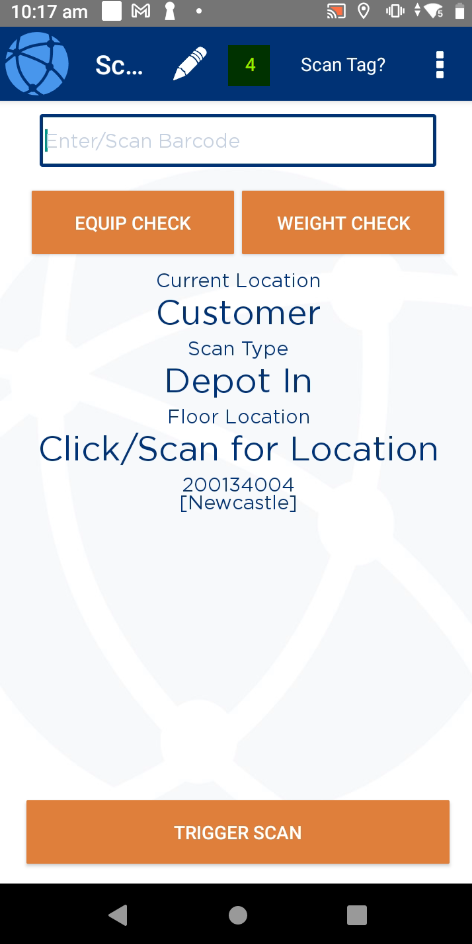
To endorse this consignment, open up the mobile application and go to the scan page.
Select scan type as Depot In:
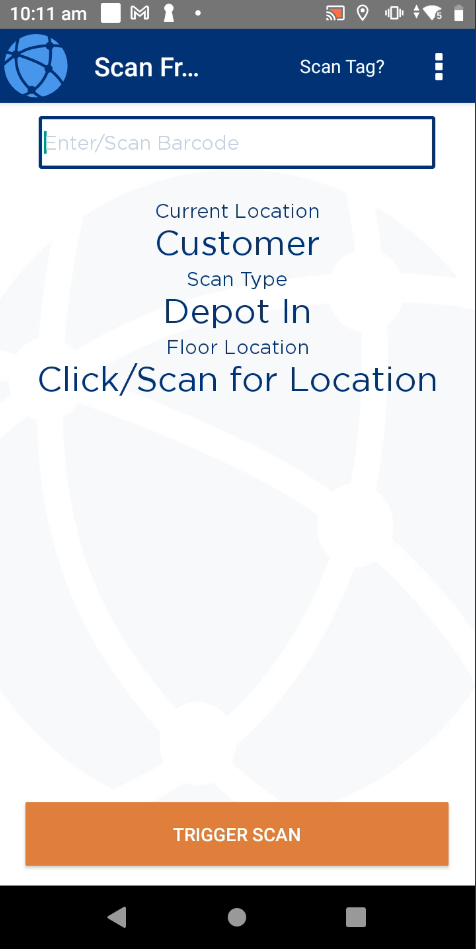
From here, scan the first item of the consignment - for this example that is a Carton:
When scanned, you will notice that a 1 appears at the top which indicates 1 item has been scanned.
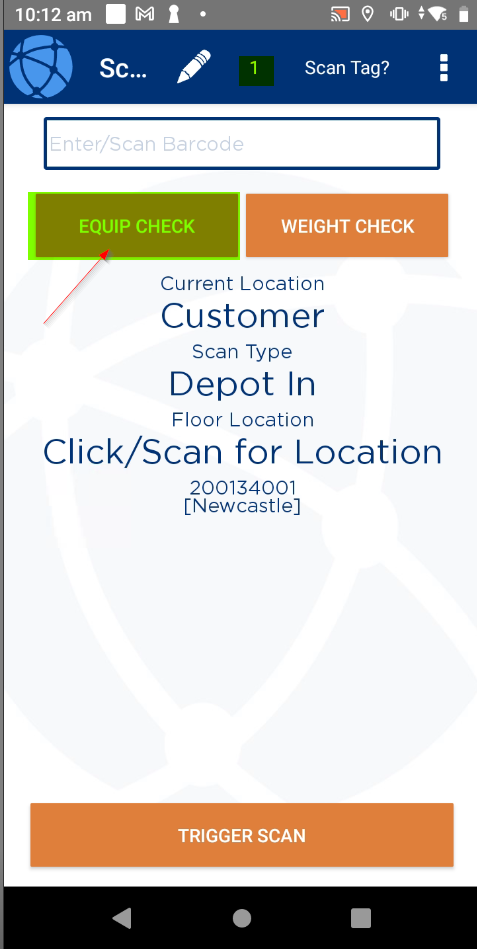
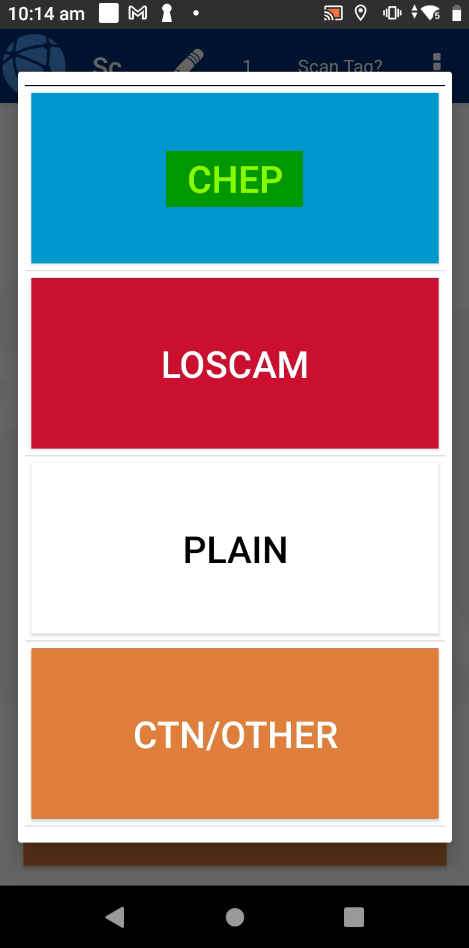
You will also notice that an option for 'Equip Check' appears. Click on this and you will be prompted to confirm what type of Equipment the last scanned item was for:
You will also notice that an option for 'Equip Check' appears. Click on this and you will be prompted to confirm what type of Equipment the last scanned item was for:
The scanned item here was for a Carton so we will select the Ctn/Other option at the bottom.
Repeat the process for each of the remaining 3 items - in this example, they are all pallets and are all CHEP types:
Once all scanning has been completed for the consignment, you will notice that the count at the top of the scan page will reflect the number of items you have scanned:

Once all depot scanning has been completed, you may wish to create a scan manifest for historical purposes; so, you can see what was scanned in at that time/date.
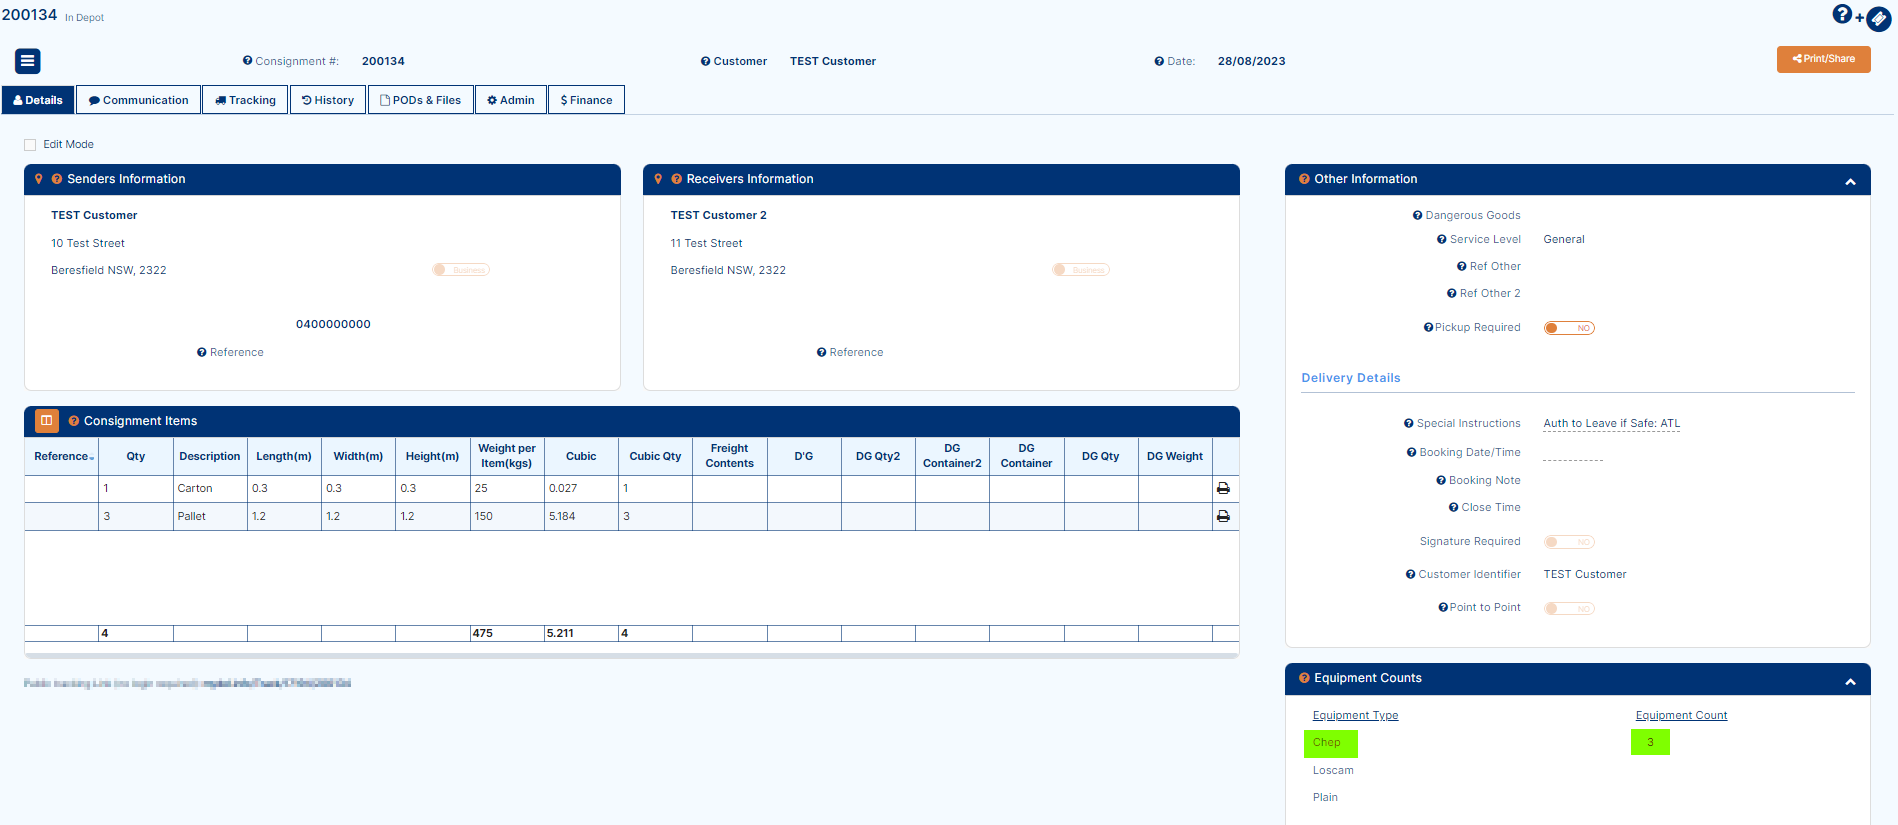
The scanned consignment will then reflect the Equipment counts entered during the endorsement:
Load Scanning after endorsement
After an endorsement has occurred, a driver/mobile user is able to verify or 'dispute' a previously endorsed consignment by load scanning.
To do this, go to the Load page of the mobile application and scan the first item on the consignment:
You will see the same Equipment prompt that was present during the initial endorsement - the first item in this example is a Carton so the bottom option for Ctn/Other will be selected.
Scan the next item and you will see a different prompt appear because, for this example, the first item was not marked against any equipment type (carton is not a valid equipment type, generally speaking), and the second item was originally marked as being a Chep pallet:
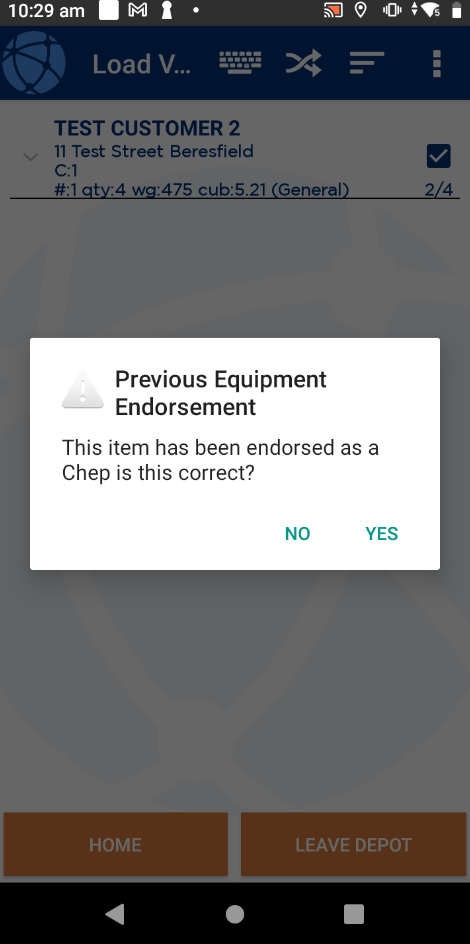

Selecting Ctn/Other is a way to tell the system there is no Equipment type present for the scanned item.
Items marked in this way during depot scan endorsement will flag again on load scan to prompt the user to check the Equipment type once more.
If the previous endorsement is correct, select YES.
Continue scanning.
If an item has been incorrectly endorsed, select the NO option:
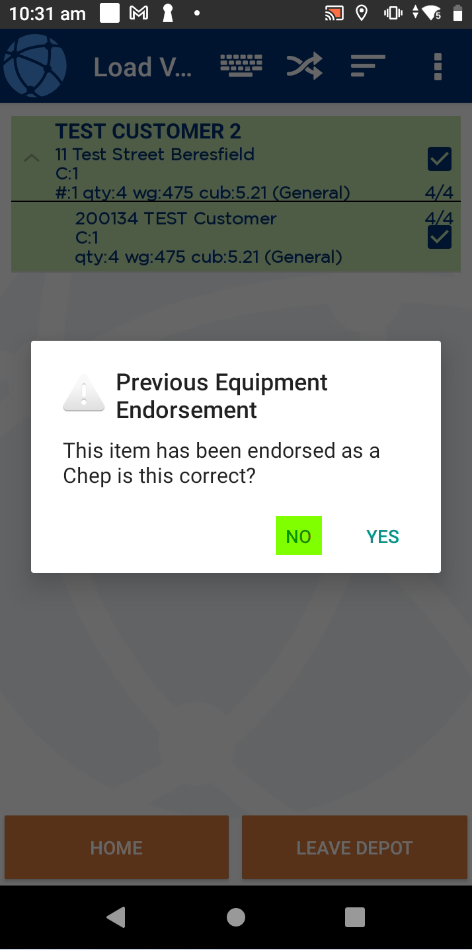
When selecting NO, you may see this popup then appear:
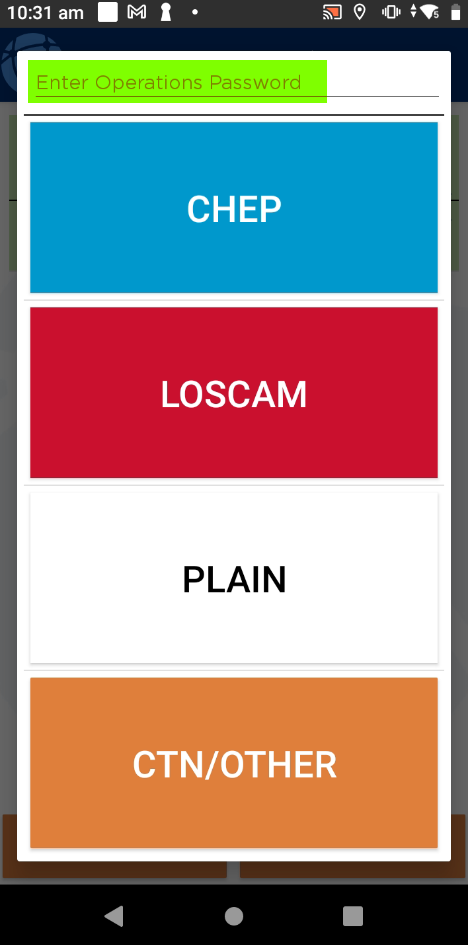
Your account may have been setup with an Operations Password - if so, when 'disputing' an item endorsement, you will need to enter the current Operations Password and then select the correct Equipment Type to proceed.
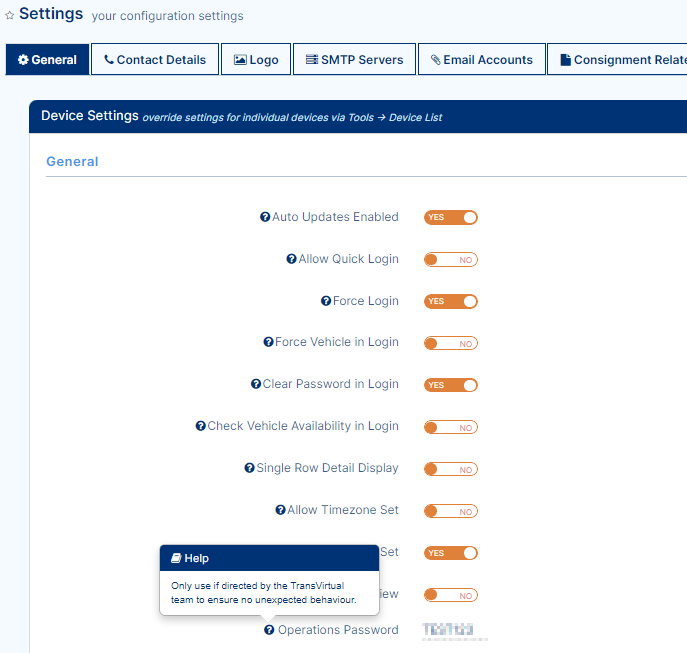
The Operations Password can be found (and changed) under Configuration > General > Global Setup > General Tab:
Once item loading has been completed, the mobile user can proceed with their run by clicking Leave Depot at the bottom of the Load page.
Once the mobile user has Left Depot on their device, the relevant consignment will show any updated Equipment information (if mobile user has 'changed' any of the Equipment types):
Equipment tracking on delivery completion
Part of the functionality of this setting also includes the ability to specify equipment transfers or exchanges when signing off/completing a delivery via the mobile app. This allows increased visibility and tracking of your equipment movements.
Example
This example will make use of the same consignment from the above, numbered 200134.
To begin, ensure that the consignment has been endorsed and then loaded - doing this will populate the relevant Equipment count against the consignment.
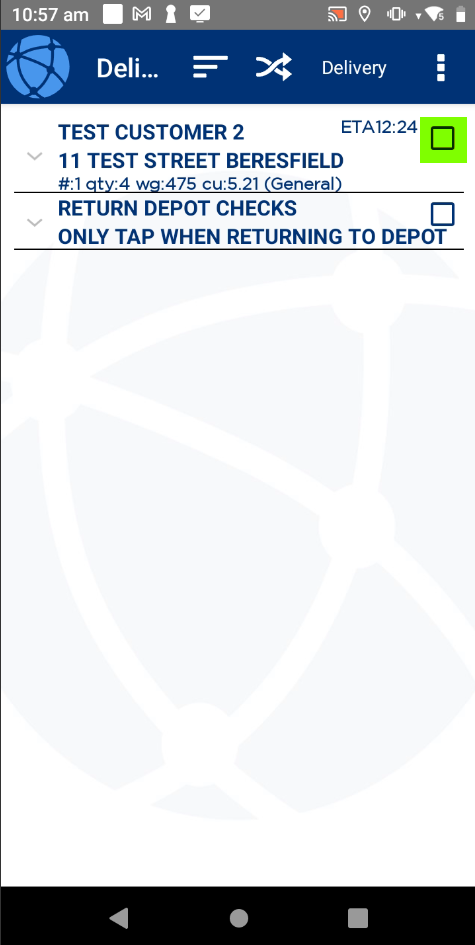
From here, enter the delivery page and select the consignment when arriving at the delivery location:
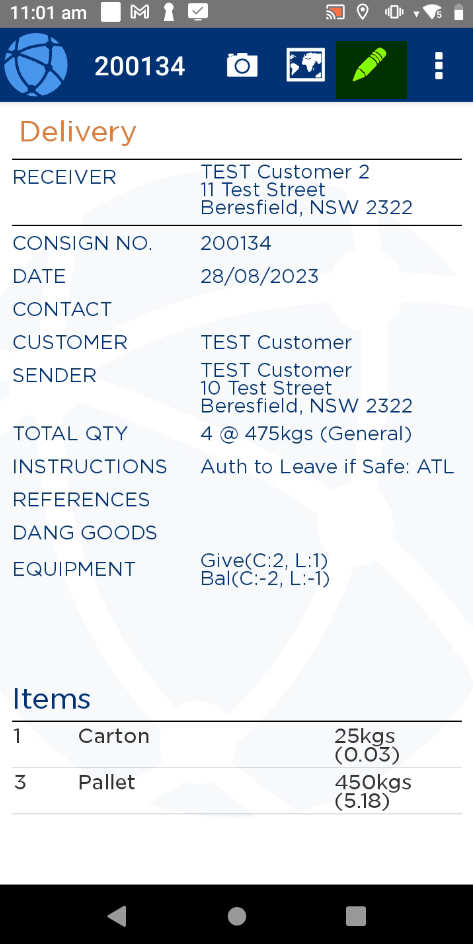
Clicking on the consignment will bring up the consignment details:
Select the pen icon at the top of the page where you may be asked to confirm you are onsite, click YES, ONSITE NOW to proceed:
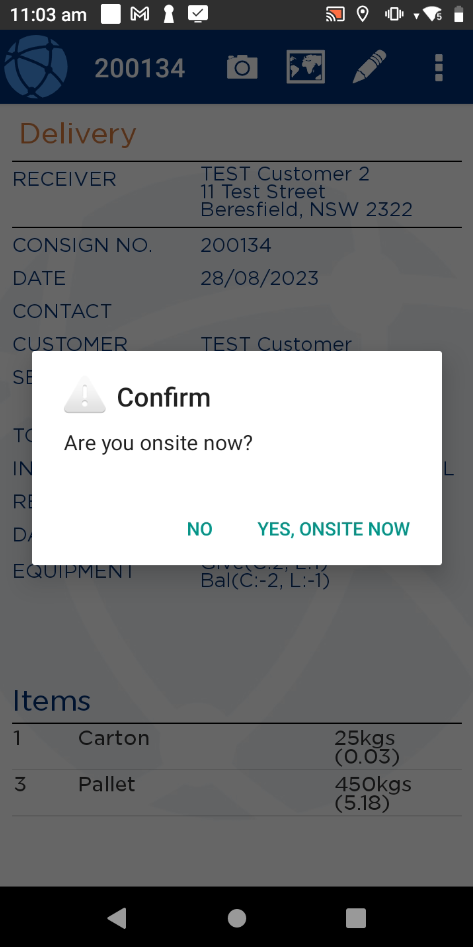
The prompt to confirm a driver is onsite is driven by this setting in Global Setup page:
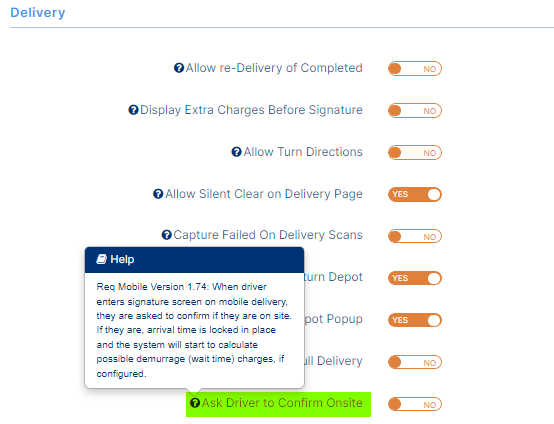
You will then see a popup like the below appear where you need to confirm what is happening with each of the Equipment types:
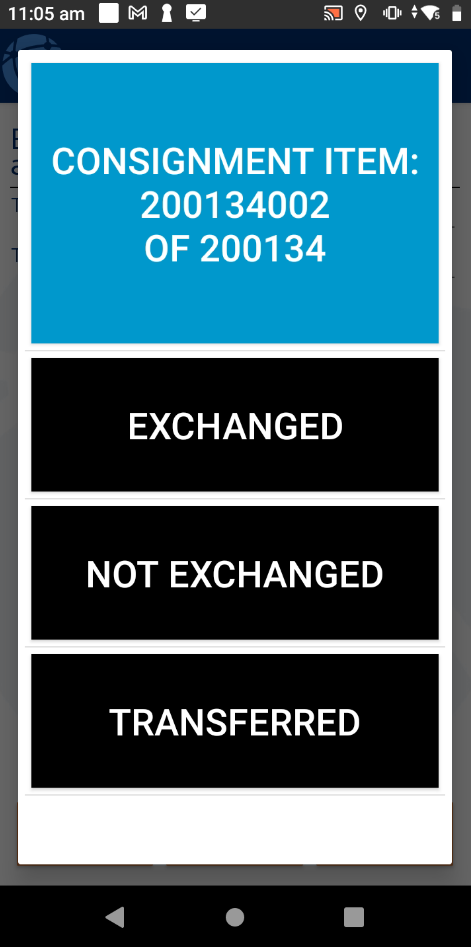
You have 3 options to select from; Exchanged means you are giving the receiver this Equipment piece and they are giving you back another Equipment piece of the same type (a straight swap); Not Exchanged means you are giving the receiver the freight on the Equipment but taking back the Equipment piece (likely unloading the freight off a pallet for example); Transferred means you are giving the receiver the Equipment piece where they may then 'owe' you for this Equipment.
For this example, we are going to select Exchanged for all relevant items.
After completing this part of the process, you will see a screen like the below appear:
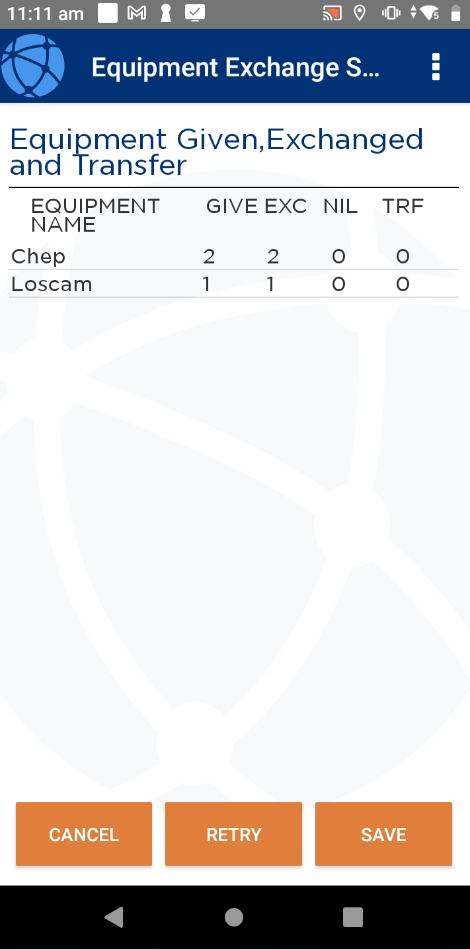
This is a summary of what is being Exchanged, Not Exchanged and Transferred.
Click Save to progress or Retry again if you got something wrong.
Click Save to progress or Retry again if you got something wrong.
From here, acquire a receiver signature to complete the delivery as per normal.
The consignment will then display an Equipment Transaction under the history tab, per what was recorded during the delivery completion on the app:

Equipment Tracking on pickup
Another function of this setting is the ability to assign pickups to drivers and have them confirm the equipment types/counts that are present for the assigned pickup.
Example
The below consignment is a pickup and has been assigned to a driver - it has 4 items total:
The assigned driver will be able to see this consignment on their device:
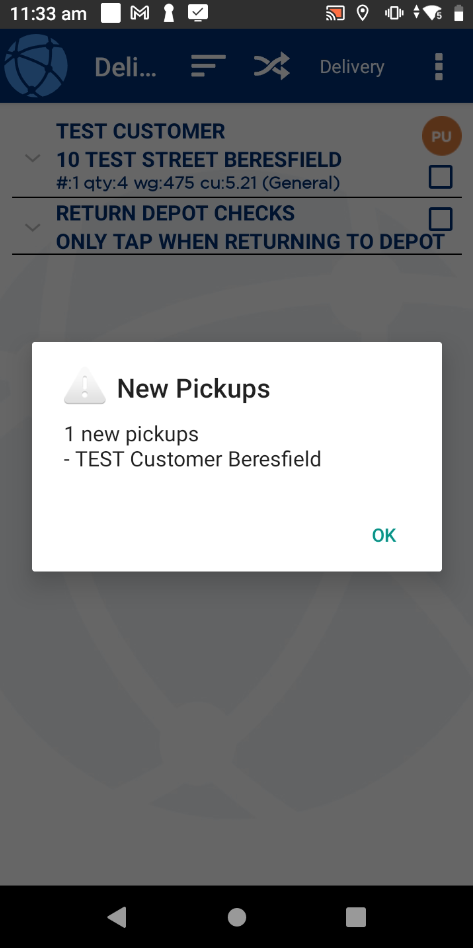
As with any other pickup, the driver should click OK to confirm pickup acknowledgement.
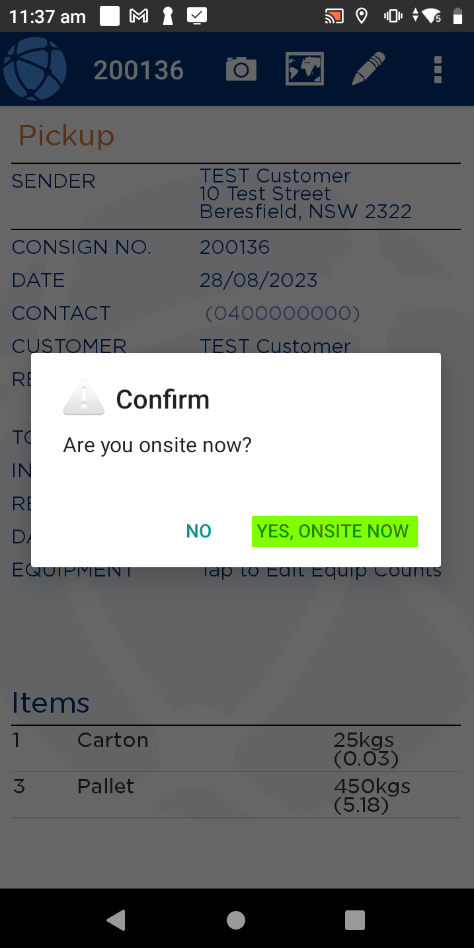
When the driver arrives at the pickup location, they should click on the pickup to open up the details for it:

Click the pen icon, and confirm onsite (if applicable):
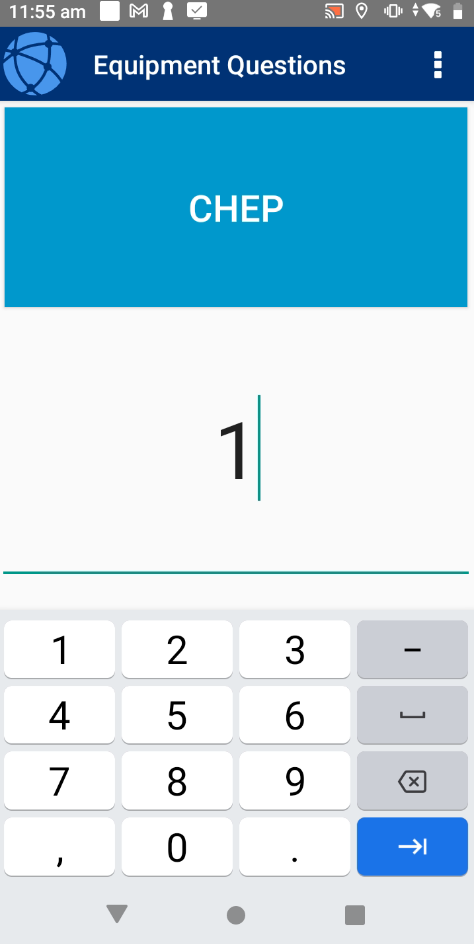
The driver will then see a prompt like the below appear:
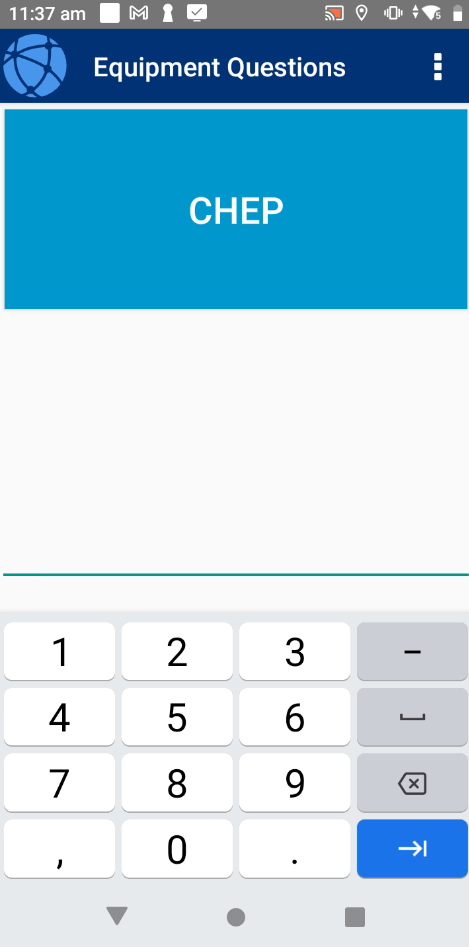
The app is now asking the driver to input how many of each Equipment type is being picked up.
This example has 4 items total, one of which is a Carton - the other 3 are pallets.
For our example, we are going to enter a 3 into the Chep box as each of the pallets is a Chep type:
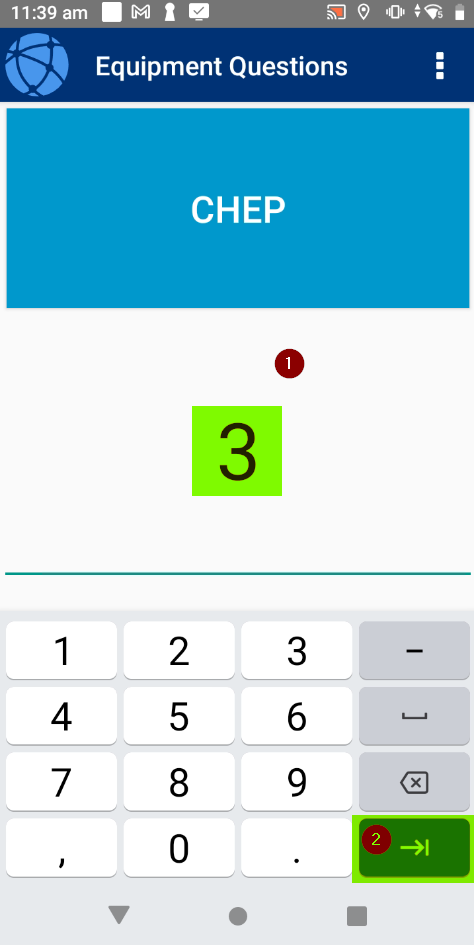
Enter the value for the Equipment type then click the blue arrow button at the bottom to proceed to the next Equipment type.
For any Equipment types that are not present, the driver should input a 0:

For any Equipment types that are not present, the driver should input a 0:
Continue until all Equipment types have been entered with the correct count.
The driver will then be taken to the signature page to obtain a pickup signature and proof of pickup, which will complete the pickup.
This process will mark the Equipment counts against the relevant consignment:
Extra information
In the above pickup example, the driver has identified that they are picking up 3 Chep pallets for a consignment containing 3 pallets.
For this process, the driver performing the pickup should enter the Equipment counts they are actually picking up from the sending location, not the original amounts listed on the consignment they were assigned.
For this process, the driver performing the pickup should enter the Equipment counts they are actually picking up from the sending location, not the original amounts listed on the consignment they were assigned.
The reason for this is that the Equipment counts entered on the mobile app by the driver, will in some cases, update the line item rows on the consignment within TransVirtual.
Example 1 - Driver has been assigned a pickup containing 3 pallets but arriving at the pickup location, there is only 1 pallet available for collection
Repeat the process as per the above example but instead of marking 3 against the CHEP type, only enter 1 and then ensure all remaining Equipment types are set to 0:
Go through to the signature page and obtain a signature to complete the pickup.
The consignment in TransVirtual will then be updated to show