Account Packages

This feature requires the Finance Module to be active in Transvirtual.
This is a 3-step process:
- Link Transvirtual and your accounting software.
A. MYOB
B. Xero
C. Reckon
D. QuickBooks - Setup an EDI Export invoice rule to send your invoice data across to your accounting software = Invoice EDI Export (transvirtual.com)
- Link customers/agents cards in Transvirtual with those in your accounting software
Linking to MYOB AccountRight (Cloud)
This integration allows for financial data to transfer to MYOB for accounting purposes and bank reconciliation.
You MUST have an AccountRight MYOB account for this setup - MYOB Essentials does not support integration and can't be linked to Transvirtual.
There are two broad steps:
1. Link Transvirtual to your MYOB account
2. Export your invoices (EDI) to MYOB.
1. To set this up, navigate to Finance > Configuration and Setup > 3rd Party Account Links, the package list page will show as below.
2. On account package list page, you can add/create a new account package. To create/add new account page, click on New Account Package, create new account package will be available, here manually enter the account package title and then click on the Create button.
3. Click on the newly created package and the settings for it will appear on the right-hand side as shown below.
4. On account package info section, select the package type with the help of drop-down button (here we choose MYOB) and then click on the Refresh MYOB Link as shown above.
5. Once you click on the Refresh MYOB Link, you will be redirected to the MYOB login page, here you will need to enter the online user login details of an admin user for your account package and be presented with a page giving Transvirtual permission to transfer data to your MYOB account.
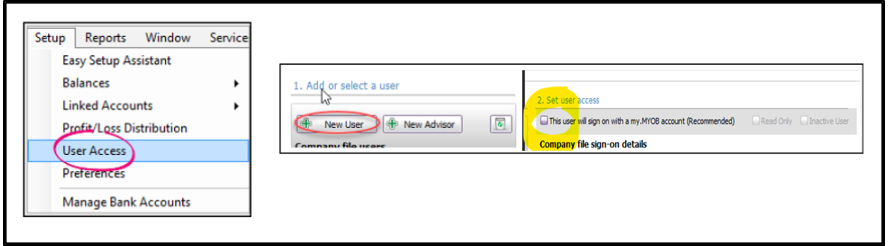
6. You will also need to create an offline admin user for Transvirtual to access your company file. You can do this in your MYOB software, go to your MYOB page and then to Setup > User Access as shown below.
7. Now, click on 'New User'. You'll need to create a username and password, which you will later enter into Transvirtual, so Transvirtual can access your company file.
 Make sure you de-select the checkbox (Step 2) below for the user to sign on with a my.MYOB account as this will need to be a login just to your company file.
Make sure you de-select the checkbox (Step 2) below for the user to sign on with a my.MYOB account as this will need to be a login just to your company file.
Make sure the new user has been given Administrator access.
8. Once completed, you can now return to Transvirtual and enter username and password as below.
9. Now, you can select the relevant GL Accounts in MYOB for the invoices to Transfer against. As per above screenshot, select Link Income Code and Link Expense Code and you will see a list of accounts from your account package. Select the relevant code for Customer Invoices/Income and Supplier/Agent Invoices/Expenses.
10. Once done, enable the account package by clicking on the toggle button and then click on Update button to save the changes.
11. Now, navigate to Export Invoices page, where we will need to setup conditions surrounding the use of the Link to MYOB. To know more about how to setup the EDI rule for Account Package, click here.
This account package link provides an example for Xero, but to setup EDI rule for MYOB is exactly same, you would need to change your EDI rule name to reflect MYOB instead.
Linking to Xero
The Xero integration allows for financial data to transfer to Xero for accounting purposes and bank reconciliation.
There are two broad steps:
1. Link Transvirtual to your account package
2. Export your invoices (EDI) to the account package.
Link Transvirtual to your account
1. Navigate to Account Packages, go to Finance > Configuration and setup > 3rd Party Links, account package list page will display. Here click on the Add new account package.
2. Give your new account package a name, this may just be Xero if you only run one account package. However Transvirtual has the ability to split your invoices across multiple account packages and companies. Click on the Create button
Your Account package will start as disabled (highlighted orange) until setup is completed.
3. Select your new account package from the list on the left, the details of the selected account package will display on the right side.
4. On selected account package detail section, select the package type with the help of drop-down button (here we choose Xero) and then click on the Refresh XERO Link as shown above.
5. Once you click on the Refresh XERO Link, you will be redirected to the Xero login page, here enter the login details of an admin user for your account package and then click on Log in button. You will then be presented with a page giving Transvirtual permission to transfer data to your Xero account as shown below.
6. Once completed, you can now return to Transvirtual where we can select the relevant GL Accounts in Xero for the invoices to Transfer against. As per below, select Link Income Code and Link Expense Code and you will see a list of accounts from your account package. Select the relevant code for Customer Invoices/Income and Supplier/Agent Invoices/Expenses as shown above.
7. You are now able to toggle the Enable Package to Yes then click the Update button
8. Now, navigate to Export Invoices page, where we will need to setup conditions surrounding the use of the Link to XERO. To know more how to setup the EDI rule for Account Package, click here.
Xero does not accept future dated invoices.
Linking to Reckon (Local Host)
Requires the use of Zed Axis installed on your own FTP server and Reckon to be hosted in your local server (not online/cloud) https://www.zed-systems.com/axis-buy.html

Requires a few hours of support from Transvirtual to setup exports - ask us for help on this if needed
Requires setup from Zed Axis/3rd Party for configuration
Linking to Quickbooks
1. To set this up, navigate to Finance > Configuration and Setup > 3rd Party Account Links. The package list page will appear as shown below.
2. On the account package list page, you can add/create a new account package. To create/add new account page, click on New Account Package, create new account package will appear, here manually enter the account package title and then click on the Create button.
3. Click on the newly created package and the settings for it will appear on the right-hand side as shown below.
4. On the account package info section, select the package type with the help of the drop-down button and then click on the Refresh Intuit Link as shown above.
5. One you click on the Refresh Intuit Link; you will be redirected to the Intuit login page where you should enter your login details for QuickBooks as shown below.
6. Once done, click on Sign In. You will then be presented with a confirmation screen as shown above. Here click on Connect to link your Transvirtual account to your QuickBooks account.
7. Once done, you will then be taken back to Transvirtual where you can then link your Sales, Expense, Income and Expense codes as required as shown below.
8. Once the link is successfully linked, you will see the Intuit Link says Link complete on account package info page,
Like with other platforms such as MYOB and Xero, once you have linked to your Accounts Package you need to setup an EDI export rule to send invoice data across to QuickBooks, to know more click here. This link provides an example for Xero, but QuickBooks is exactly same, you would need to change your EDI rule name to reflect QuickBooks instead.
9. The last part of this setup (Description Row Override) is detailed in the below section (Extra Information) of this article.
Linking Agents/Customers to Accounts Package
In this article we will show you how to link agents and customers to your accounts package such as MYOB or Xero. This is useful if you wish to have your Transvirtual generated invoices for your customers/agents appear in your accounting software.
1. To setup this, open the card file. To open rate card file, navigate to Transport > Configuration and Setup > Card Files (Customer/Suppliers/Staff), click on the applicable card tab (Customer/agent/supplier) and then double click on the applicable card file to open the detail.
2. Once the card file is open, click on the Finance tab, the finance tab will open for selected card file as shown above.
3. To link the card file, on finance tab you can see the Accounts System Links section. Here simply click on the Link to find the corresponding agent or customer name from within your accounts package.
3. To link the card file, on finance tab you can see the Accounts System Links section. Here simply click on the Link to find the corresponding agent or customer name from within your accounts package.
Extra Information
1. If needed, there is the ability in Transvirtual to modify the invoice data descriptions sent across to your linked Accounts Package.
2. To do this and for further information on the fields available, click on the helper icon listed against the below setting:
2. To do this and for further information on the fields available, click on the helper icon listed against the below setting:
3. Now, manually enter the fields required and/or any free text you wish to, like the below as an example.
4. When an invoice sends across to your linked Accounts Package now (below image is for Xero), the Invoice would look like as below.
5. As you can see the invoice is split up with separate lines per consignment on the invoice.
6. This same concept (splitting up consignments uniquely per line) also works with MYOB, and below is what it would look like if done to MYOB:
6. This same concept (splitting up consignments uniquely per line) also works with MYOB, and below is what it would look like if done to MYOB:
Multiple Company Files/Organisations in an Accounting Package
In MYOB and Xero (for example), you are able to setup multiple Company Files/Organisations which are basically just the different businesses that you own or run. The purpose of this is to allow you to control all of your finances across all divisions of your business within the one accounting package account (one Xero account or one MYOB account).
1. Transvirtual allows you the ability to connect to all of your different Company Files/Organisations. To do this, simply create a new Account Package for each Company File/Organisation you wish to send data to as shown below.
1. Transvirtual allows you the ability to connect to all of your different Company Files/Organisations. To do this, simply create a new Account Package for each Company File/Organisation you wish to send data to as shown below.
2. Once created, if doing for Xero for example, simply click the Refresh Xero link button against each account package and choose the organisation that applies to that account package:
3. Each account package should have a unique selection. Once done, you then have the ability to attach customers/agents to a code across all available account package company files/organisations.
Related Articles
Account Package - Reckon
This article provides a step-by-step guide to help you understand how the Reckon Account Package works within the system, and how to properly set it up for your customer/agent accounts. When you choose Reckon as your account package, the system ...Account Setup
Get ready for your onboarding/implementation project 1. Standing Data Get your key data ready. The import files attached below are a guide to the type of fields available for import. You do not need to use these templates, although the data you're ...Finance/Invoice Setup Process
Transvirtual has an optional add-on Finance module that allows you to add pricing to consignments and invoice out consignments to customers; as well as send these invoices across to your accounting software (Myob or Xero) so that you can keep track ...Invoice Export
In Transvirtual you can setup an EDI (Electronic Data Interchange) that automatically sends PDF, Excel, CSV (etc.) Invoice files to a Customer or Agent, based on specific situations. So, when an Invoice is Approved and Locked you can have an email ...GST Rounding
The invoice tax total isn’t exactly 10% of the invoice base total. Why? This isn’t a mistake of the software but a common misconception between what users expect to see on an invoice and what software systems prefer to do when exchanging data. ...