The Staff Card File stores comprehensive information about each staff member who uses the system. It includes personal details such as name, email address, phone number, login credentials etc. This file is also used to assign specific roles, permissions, and access levels based on the responsibilities of each staff member.
Create a New Staff Card
1. To create a new staff card, log in to your FMS web portal and navigate to Account > General Config > Staff. The Staff (Users) page will display, as shown below.
2. On the Staff (Users) page, click the New User button. A pop-up Create a new user will appear, as shown below.
3. Manually enter a username, ensure it ends with a @yourcompanyname (no need to include a ".com") e.g., tom@yourcompanyname and then enter a password as shown above.
The password must be at least 6 characters long.
4. Once complete the above step, click the Add button, the newly added user will display in the staff list as shown below.
5. To add more information and advanced user settings, refer to Edit/Modify User details section of this article.
To Add/Update User Detail
1. To edit a user's details, go to the Staff List page and double-click on the applicable user. The View/Edit Card File page will appear, as shown below.
2. On the View/Edit Card File page, you will find several tabs, including Details, Completed Forms, Files/Images, and Notes.
Details
1. First, double-click on the field you want to update, manually enter the new information, and then click the Save button to apply the changes.
2. To enable or disable a specific feature, click the corresponding toggle button to switch the field ON or OFF.
By default, the Details tab of the selected user is displayed. This tab includes multiple sections, described below.
General Information
1. This section contains basic user details and assignment settings within Transvirtual. You can update the following fields
- First Name: Users First name.
- Last Name: User's Last name.
- Email Address: User's email address.
- Mobile Number: User's Mobile Number.
- Time Zone: User’s time zone, used throughout Transvirtual to display timestamps relative to the user and across different time zones.
- Headport Assigned: User's default Headport.
- Employee Code: Optional code that can be used when sending data via EDI instead of using a name.
Auto Login Settings
These three fields must be used together. They allow a user to automatically log in and be redirected to a specific page—commonly used for device-specific or display setups.
- Auto Login URL: Auto-generated upon user creation.
- Auto Login Location IP: You must set your public IP address if you require auto login to function. This ensures your auto login is bound to your single location. To obtain your IP, website such as www.whatismyipaddress.com can assist you.
- Auto Login Redirect To: Enter the full TransVirtual URL for the page to open automatically upon login.
- Enable Google Authenticator: Enables 2-step authentication for additional security, important for protecting sensitive financial and customer data.
Enable this option and follow the prompts to complete the setup process.
This section allows you to change the user's password, as shown below.
2. To change the password, click on Change Password. A "Change User Password" pop-up will be displayed.
3. Manually enter the New Password and Confirm Password in the respective fields, then click the Save button to update the password.
This section allows you to assign security or permission groups to a user, defining what parts of the system they can access and what actions they are allowed to perform.
1. To assign a permission group, simply click the checkbox next to the desired group. The selected group(s) will then be assigned to the user.
You can assign multiple permission groups to a single user, enabling flexible role-based access.
2. These group permissions are managed under Account > General Config > Security Groups. On the security groups list page, you can view all existing security group, create new permission groups tailored to specific roles and define detailed access controls, such as read-only or full edit access to various modules.
3. Proper configuration of permission groups ensures that users only see and interact with the data and tools relevant to their role in the organization.
Visible Alerts
General Information
This section allows you to enable visible system alerts for a user. These alerts appear as red notifications in the top-right corner of the header, helping users stay informed of important updates and actions. To enable any alert, simply click the corresponding checkbox. Once enabled, the user will receive notifications for the selected events.
Field Information:
When Customer has Requested Transvirtual Link: Receive a notification when one of your customers (who is also using Transvirtual) requests to link accounts. Linking provides seamless access to their consignments and status updates for freight they assign to you.
When Agent has Requested Transvirtual Link: Get alerted when an agent (also using Transvirtual) requests a link. Once linked, they gain limited access to consignment information you assign to them, and you gain visibility into the assigned freight.
When customer (or agent) adds comment to a consignment: Be notified when a customer or agent adds a comment under the "Communications" tab of a consignment. This helps ensure timely responses to updates or queries.
Customer Export Rule Requires Approval: Alerts you when a customer submits an export rule to your Transvirtual account that needs your review and approval.
Authority to Leave entered by Receiver: Notifies you when a receiver submits an Authority To Leave (ATL) request before the delivery driver arrives. This requires the "Allow Authority to Leave in Tracking" setting to be enabled in your system Settings.
Additional Service Requires Approval: Receive an alert when a delivery requires an additional service (e.g., redelivery or special handling) that needs your approval.
User Edit/Modify - Printer Settings
This feature allows you to send specific print jobs—such as labels or connote documents—directly to a designated printer, bypassing the print dialog window. It eliminates the need to open PDFs in a separate tab or window, providing a one-click printing solution. This streamlines the process and significantly improves printing efficiency within Transvirtual.
Files/Images
1. To upload image/files, first click on Files/Images tab, the images/files page will open as shown below.
2. There are two ways upload images/files in this tab.
a. Drag the file and drop it into the relevant section
b. Click on the box and select the appropriate file from your device.
3. If needed you can view the file history where you can see the file type, Username (Who uploaded the file), Date and Title.
4. To update any existing file, first select the file. The details of the selected file will appear on the right side of the screen.
5. In the file detail section, you can Download or Delete the file by clicking the respective button.
6. If needed, you can manually add Notes in the Notes field or update the Title by entering a new name.
7. Once changes have been made, click on the Update button to save the changes.
Notes
This section allows you to add internal notes related to the vehicle.
1. To add a note, go to the Notes tab and click the Add button. The Add Comment pop-up will appear as shown below.
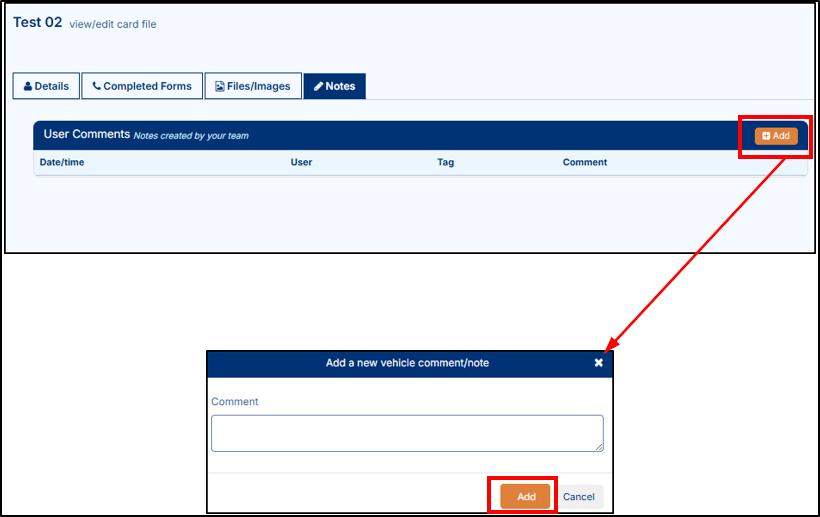
2. Enter your comment in the Comment section, then click the Add button. The newly added comment will appear on the User Comments screen.
1. To delete a user, first select the user from the list and then double-click on it to view the user's details, as shown below.
2. Now, click on the Delete User as shown above, a confirmation pop-up will be displayed as shown above.
 3. Click on Yes, to delete the user details from the database.
Re-Adding a Deleted User
Users deleted through the Web Portal are only disabled and not shown in the active user list. Follow the steps below to locate and re-enable a deleted user:
1. To open the Staff List page, navigate to Account > General Config > Staff, the Staff page will be displayed. In the top right corner, there is a checkbox labelled "Show Deleted". Select this checkbox to refresh the user list. Any deleted users will be highlighted in Orange, as shown below.
2. Double-click on the deleted user. The User details will be displayed as shown below.
3. Click the Enable User button. The user will be re-added and will appear in the active user list.
How to Search or Find a User
1. On the Staff List page, use the inline filter fields located at the top of each column to search for staff members based on criteria such as Name, Email Address, Login Name, or Role.
2. For example, in the "Login Name" column, type part of the user’s login name into the search box and press the Enter key. The list will automatically update to display users that match your search, making it easy to locate specific staff quickly.
Staff List Import
This import can only be done by a Transvirtual staff member! Please contact us to assist you with this process.
1. This process uses a CSV/Excel file to create staff users in bulk. If required, contact Transvirtual and we will send you two files: an Import file and a Values file.
2. The Import file is the one you’ll need to fill out and send back to us. The Values file contains valid data options that can be used to populate the Import file, ensuring all entered data is formatted correctly. The Import file will look like the example shown below:
3. You will need to populate this file with the appropriate details for each new user. For example:
Timezone: This is the timezone the user will operate out of. Common examples are Brisbane timezone users need to be set as E. Australia Standard Time (from the Values file) and Sydney timezone users need to be set as AUS Eastern Standard Time (from the Values file).
Employee Code: A unique code you can assign to each user if you wish but not required.
Customer Name: This column allows you the ability to link a user to a customer - in this case you would actually be creating a customer login for that customer.
Agent Name: This column allows you the ability to link a user to an agent - in this case you would actually be creating an agent login for that agent.
Permission Group: The level of access you wish the user to have to your Transvirtual account. Most of your users may be drivers or operations. If so, ensure they are in the relevant Security Group.
If this field is left blank in the Import file, the user will default to the group specified here:
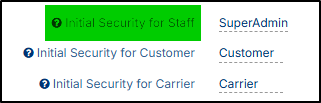
You can update this setting by navigating to Account > General Config > Global Setup, then go to the General tab and scroll to the Other section located at the bottom-right of the page.
If creating customer or agent logins, they also default to the specified group as above, if the Permission Group field is left blank.
Force Password Reset: Typing YES means that the user will be forced to create their own custom password after they login (recommended).
Mobile Enabled: Typing YES means the user will have access to use the same login on the mobile app. Recommended for drivers or operational staff that require device usage (scanning/deliveries through Sign on Glass, etc).
The rest of the columns are self-explanatory but let us know if we can assist with these.
4. Each row in the file represents a unique user. At a minimum, you must enter a Username and First Name for each new user.
However, we recommend including Headport, Security Group, Email Address and Password as well.
5. The Values file provided will contain predefined options for certain fields in the Import file. These ensure compatibility and prevent formatting errors. It will look like this (example shown below).
The highlighted text in the above image represents column names in the Import file.
For Example: If the Values file shows "YES" and "NO" under the ForcePwdResetList column, these are the only acceptable entries for that field in the Import file.
6. If you type “YES” under the ForcePwdReset column, it means each of those users will be prompted to reset and define their own password upon first login. This is recommended for security purposes.
7. The Values file must be followed exactly. For the import to work correctly, the column data in each row must match the available options listed in the Values file—this applies to fields like Headport, Time Zone, Security Group, etc. Fields like Username, Name, and Password can be unique and do not need to match existing data.
Any columns listed in the Values file MUST be used to populate the corresponding column in the Import file.
8. Once you've completed the Import file, send it back to Transvirtual. We will validate it for any errors. If everything is correct, we’ll proceed with the import. If not, we will return the file to you for necessary corrections.
How to Setup the Printer
When enabled in your browser this utility automatically prints labels and consignment notes without requiring any user interaction. Each time a consignment is created, the labels and connote will be printed automatically. This feature is particularly useful for users who frequently create a large number of consignments.
Step-by-step Guide
It may take 10-20 seconds for the options to display. If you have already installed the utility and you are prompted to reinstall it, reload/refresh the page from your browser and wait for the utility to reload.
For additional help you can contact support@transvirtual.com.au.
Printing from your browser will normally require a number of mouse clicks:
Click 'Print' from the menu to open the 'Print Dialog Box'.
Select your desired printer.
Click 'Print' button again to trigger print job.
To assist users that are creating large numbers of consignments each day, we have implemented the Browser Print Processor. This utility allows the browser to send print jobs directly to your local printers without any user interaction required. Different printers can be nominated for consignment notes and labels. With this option enabled, as soon as a consignment is created and saved the connote/label will be sent to the appropriate printer.
Step 1 - Install the Browser Print Service Utility
1. Go to the Printer Settings section of your profile page. The quickest way to get there is to click on your login name to the right of the header bar and click on the Profile as shown below.
2. On your profile page, scroll down and go to printer setting, select and download the utility that corresponds to the platform you're using. You may be presented with a warning message. Ensure you allow the utility to run and remember your settings.
If you wish to download the printer for Linux or Mac then click on applicable download link as shown above.
Step 2 - Run the Application
You may need to refresh your page when completed. You will then have the opportunity to nominate which printers you would like to assign to print both consignment notes and labels, as shown below.
Step 3 - Turn Consignment and Label Printing Settings ON/OFF
From the consignment creation page, you can use the sliders in the bottom right box to turn the printing options ON or OFF.
If using this function, it is recommended that Adobe Acrobat is installed on your computer and set as the default PDF application (the app that will open any PDFs that you generate). The reason for this is that this printer app is designed to use this app as the default. Other applications may work for this but, if possible, installing Adobe Acrobat and setting as the default is advised. Setting Adobe Acrobat as the default app to open PDFs is usually straight-forward - often you will be prompted to do so; if not you can open Adobe Acrobat and set as a default from within the app itself.


 You can also download the printer by clicking on this link. https://portal.transvirtual.com/Resource/DownloadThirdPartyApp/wcpp_windows but this link is applicable for Windows only.