Security Groups
In TransVirtual there is the ability to create Security Groups that can be used to control and monitor what each user has access to in your account.
The page to create these groups can be found under Settings > General > Security.
This article will detail how to create and edit Security Groups as well as how to assign users to a Security Group.

Note: This article will only be relevant for Management or SuperAdmin users of an account as only these users have the required access to make these changes.
Navigating to the above page (Settings > General > Security) you will see a screen like the below:
By default, your account will likely have SuperAdmin, Customer and Agent Security Groups.
SuperAdmin users have access to everything in an account and this security level should only be provided to staff who are management/owners/directors/etc of a company.
Customer type users only have access to their own customer specific information such as any consignments they have in your account. By default, they are only limited to being able to search for and open any consignments where they are the customer or consignments that they have created.
Agent type users typically do not have access to anything in the web portal in your account except the Help menu. Agent logins are normally only used when your agent will login to your account and load and scan freight via a device; they don't typically need access to anything in your account.
Creating New Security Groups (optional)
If required, you can create new Security Groups using the Add Security Group button at the top of the page:
When creating a new Security Group ensure you name the new group appropriately. The name should be reflective of the type of user that will be in this group.
Default General Security = This means of the pages this group has access to in TransVirtual, what can they do with those pages? Can they make changes (Read/Write) or are they only able to view (Read) the page content? Typically, we would recommend leaving this as RW (Read Write) because each user will only have access to the pages they are approved to view.
Default Menu Security (recommend NONE) = Similar to the above setting just at a menu level; for example, if a security group gets access to the Manifest column under the Home menu, if new pages are added to this section, will this group have access to these new pages by default (Read Write = YES means they would)? This setting also means if a group has been setup as RW here, then they will have access to ALL pages under that menu without you needing to provide access to the pages within that menu - for example, if you set a group to be RW access and give that group access to the Manifest menu, the group will have default access to all pages under the Manifest menu (Agent (Onforwarder) Manifest, Customer Manifest, General Manifest, etc).
We STRONGLY recommend leaving as NONE for all security groups; typically, the pages each user is able to view have been setup and approved and this should not be subject to change without approval first.
We STRONGLY recommend leaving as NONE for all security groups; typically, the pages each user is able to view have been setup and approved and this should not be subject to change without approval first.
Copy Security From = This can be used to assist with setting up a new security group. If you are creating a security group that is modified version of the default customer security group, you could set this field to copy settings from the default Customer group. When you do this the new group will be created exactly as the group it has been copied from making setup quicker and easier.
Once you have created a new group you can modify that group by entering the Security Mode.

Security Mode can be enabled/disabled by clicking on the drop-down arrow at the top-right of the page near your login name and clicking the option that says Enter/Exit Security Mode.
Once in Security Mode the current page will refresh, and you will see a series of padlocks appear next to each field and menu:
These padlocks allow you to edit the access a Security Group has to a certain page or to menus etc.

You do not have to create new security groups if you do not wish. The above simply explains how you can create new groups if you require - you may wish to create a new group that is a variation of an existing group - if so, the above is what you would need to start with.
Example Security Group setup
In this example we are going to give the Customer Security Group access to the Customer Manifest page so that they can view their own Customer Manifests.
To do this, first enter Security Mode (click the drop-down arrow at the top-right next to your login name and click the enter Security Mode option):

Once the page refreshes and the padlocks appear, hover over the padlock next to the Home menu at the top of the page:
As per the above, you'll see a series of configuration columns appear:
- Set Security = Used to define who has access to the field this padlock relates to
- Security Groups = To define the general security for each group in relation to this field
- Impersonate = Allows you to replicate what the group can and can't see within your login
This example will make use of the Set Security - most of the time this will be what you will use to make changes to a Security Group.
Click Set Security, then select Customer, then give them RW (Read Write) access:
Click Set Security, then select Customer, then give them RW (Read Write) access:
When you click the Read Write option you will see this message appear on your screen indicating the settings have been successfully updated - the Customer Security Group has now had these settings applied:
From here, you then need to give the Customer group access to the Manifest column heading as the Customer Manifest page sits under this menu:
Give the Customer group RW access to the Manifests column/section.
Remember, if wanting to give access to a particular page, you'll need to ensure that the Security Group you are modifying has been given access to each menu down, starting with the menus at the very top of the page (Home, Finance, EDI, etc) - for example, in our example the Customer Security Group will not be able to access to Customer Manifest page unless they have been given access to the Home menu and then the Manifest menu.
From here give the Customer group access to the Customer Manifest page:
The next step is to enter the Customer Manifest page and ensure that there isn't anything in this page that you don't want customers seeing:
This page is simply a list of available Customer Manifests. Keep in mind that customers will only be able to see manifests where they are the customer, which will be different to what you can see (which is everything for all customers).
Typically, there isn't anything of too much concern to hide from the customer in this page, but please review to ensure so.

Each time changes are made to a security group it is advised that you check and ensure that changes are as expected.
If you need to restrict access for a particular field (or page), simply hover over the field/heading click Set Security, Customer, then click None to remove access for this security group:
The setup for our example is now complete as we were simply adding the Customer Manifest page to the access this group already had.
Checking the setup once configuration has been completed
Once you have finished setting up/configuring a Security Group, you can impersonate their access to see what a user of this group can and can't see.
To do this, hover over any padlock, click impersonate, then select the group you want to impersonate and then click enable impersonation:
The page will then refresh, and you'll see what a user of that group would see if they logged into TransVirtual through your account:
As you can see, the Menus at the top will display like the above if they only have access to a few pages.
The Customer group in our example does not have access to the EDI, Finance menu etc.
Note: In the above image, when a customer logs in they would only see their own consignments and own manifests - this function applies by default where customer users can only see their own data.
To disable the impersonation simply hover over any padlock, click impersonation, then click disable impersonation.
If setup is complete, you can exit Security Mode via the drop-down menu top-right next to your login name.
Note: Impersonation is a good way to see what each Security Group has access to. However, the best way to test and confirm all settings are as expected is to login as a user with that security access!
Adding/Changing a User's Security Group
The last thing to do after the Security Group has been configured is to put users into the new group (optional and only required if transitioning them to a new group).
If you are wanting to add a new staff member to a particular Security Group, you'd need to do so from their staff card; Home > Card Files > Staff List > Double-Click appropriate user and enter their card:
Simply tick the group that this user should be part of, then 'un-tick' to remove the user from the previous group.
Note: Users can be added to multiple groups if required but this can cause conflicts and possibly unexpected results as, for example, one group may have access to something and the other doesn't. We recommend only allocating a user to ONE Security Group where possible as this can assist in ensuring all access is as expected.
When adding customer or agent logins via an agent or customer card, the type of login that user is assigned will be the default agent or customer login.
If you wish to add an agent or customer user to a different Security group, go to the Customer Card they are part of, click the logins tab and double-click the user login you wish to change:
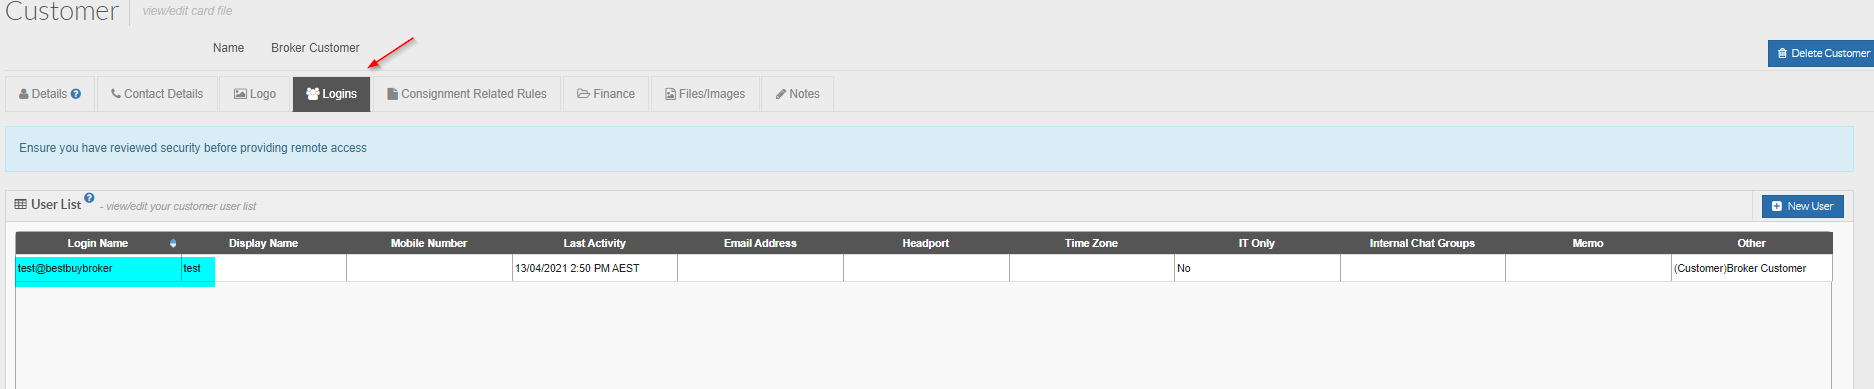
If you wish to add an agent or customer user to a different Security group, go to the Customer Card they are part of, click the logins tab and double-click the user login you wish to change:
Note: It is not advised to provide a customer/agent login with staff-level type Security access.
If for any reason this is required, it is recommended that the user acquires a second, or new login, with the appropriate access.
Ensure thorough testing is carried out and all is as expected - before providing a user with access to you account.
If for any reason this is required, it is recommended that the user acquires a second, or new login, with the appropriate access.
Ensure thorough testing is carried out and all is as expected - before providing a user with access to you account.
Extra Information
- When creating new logins, be that staff, customer or agent, they will acquire a default security group on creation as determined via the below settings in your account:
These settings can be found under Settings > General > Global Setup > General Tab > Scroll down and near the bottom-right within the 'Other' section.
If needed, you can double-click and change the initial group for each of these to be another group - please ensure to take care when changing these values.
Keep in mind that the question mark icons help explain what each setting does! - Changes to Security settings will take some time to reflect. Typically, it takes around 20 minutes for any changes to be seen. Keep this in mind when testing the setup of a new Security Group.