Pickup Process
Standard Pickup Process
This article will detail the standard pickup process for Consignments in TransVirtual - a pickup being any consignment where you have to go to a location and collect freight from a customer or sender.
Please keep in mind that this is 'best practice' which means you do not necessarily have to follow this process; however, it is advisable to do so as there are numerous benefits - most important of which is that you get appropriate Proof of Pickups (POP) and you have scans that show tracking data etc.
Please see the below on what is considered best practice for Pickups in TransVirtual.
How To
The first thing that happens with any Pickup consignment in TransVirtual is that the connote is generated in the system with a status of 'Pickup Received'. This tells you that this consignment is one that the sender or customer has requested that someone comes to pickup the freight from their location.
When this happens, consignments that are flagged as pickups will display in the Pickup Allocation page of TransVirtual:
Home > Consignment Actions > Pickup Allocation

Note: The Blue/White question mark icons next to each setting/field explains the function.
There is also a colour legend chart down the bottom of the page that explains what each colour represents in this allocation screen:
This page should be monitored regularly so that new pickups can be appropriately assigned to a driver to action.
When a new pickup arrives, the allocator should assign this pickup to the most suitable driver available-based on booking time and date, as well as where the pickup is required. This may be an internal staff member or one of your agent drivers. Either way, the process of allocation is much the same.
To allocate, start by clicking on the consignment you wish to allocate:
Then, simply select a driver or agent to assign to (most of the time you will be assigning to a driver/user as you will be giving them the job so that they can complete the pickup), click that user and select "Yes, assign job":
Once the job has been assigned, you will notice that it now appears in Orange - this is because it is awaiting Driver Acknowledgement (refer to the colour legend at the bottom of the Pickup Allocation page, or the screenshot a bit further up in this article):
From here, the job will now appear on the user's device - in the Delivery Page.
The standard procedure from here is much the same as doing a delivery.
The user clicks and selects the check box in the delivery page for the relevant connote they wish to pickup:
They then go through to the signature page and acquire a signature from the customer or sender:
Doing this then completes the pickup aspect of the job and changes the status to In Transit - the reason being that the connote is heading back to a depot (usually) or other location for processing.
This is what the connote will now look like in TransVirtual:
You will also see a POP in the POD/Files tab.
From here, the next advised step is to ensure that this connote gets Depot In scanned upon arriving back at the depot. The reason for this is that Depot Scanning allows everyone to see where the freight is currently at. It is always a good idea to perform scanning on a connote. The reason for this is simply that scanning tells a story. A user can jump into TransVirtual and check where a connote is up to in its life cycle - scanning keeps this information accurate. It also saves having to field phone calls from customers asking where their freight is - they can simply login using their customer login and see that the freight is currently at this depot etc.
To perform a Depot In scan, simply go the scan page on your mobile app (bottom-left) and select Depot In as the scan type. Then simply scan the barcodes for all required freight:
Tap and hold the scan type field to change to Depot In.
If available, you may want to apply a scan tag with this Depot In scan - however, this is not required. Scan tags are simply a way of adding 'comments' or extra information to a scan, e.g. a Depot In scan tag may be something like 'Freight has arrived'.
You may also want to create a manifest after you have finished scanning. This can be done using the 3 dots at the top-right and clicking create manifest.
No Access to a device to perform the pickup? See below for how to perform the same process using paper
The above process so far covers what to do for sign on glass. But what happens if sign on glass (devices) are not available?
This is where a sign on paper process would be used instead.
This process is much the same but instead of using a device to acquire a signature via the mobile app, the driver would need to print a paper copy of the connote and then get the sender/customer to sign; confirming they agree that the pickup has been completed.
If a Proof of Pickup is required (advised), then you can simply upload the paper Proof of Pickup (POP) in TransVirtual using the POP/POD upload process. Click here for how to do that.
Again, after the pickup has been completed it is a good idea to Depot In scan the consignment when it reaches the Depot.
What next?
Once the freight has arrived in depot, what you do next depends on the type of work you are doing. This can be classified as two separate categories; agent work where you are simply doing the pickup part of a connote for one of your customers, and the other type of work is simply where you do both the pickup and the delivery.
The below will detail the best process for each type of work.
Agent Work
The below will detail the best process for each type of work.
Agent Work
A good example of this type of work can be seen where agents do work for Allied Express.
What normally happens in this scenario is that your customer, for example, Allied Express, sends you consignments and requests that you please do the pickups for them.
From here you allocate one of your drivers to do the pickup as per the above.
Once the pickup is completed the freight needs to be brought to the customer (Linehauled) - as they take care of the delivery side of things.
So far no issues with doing this, however, when a pickup consignment gets Linehauled to a destination, this in itself is not enough to complete the consignment in your account - the simple reason being is that by default, TransVirtual expects a delivery to be performed. Linehauling freight will change a connote's status to 'In Transit' which means that the connote will sit there in an incomplete state until it gets manually completed or automatically completed.
TransVirtual has the ability to setup what we call Loop rules. Loop rules are essentially a way of automatically changing a connote in some way, via our EDI rules.
TransVirtual has the ability to setup what we call Loop rules. Loop rules are essentially a way of automatically changing a connote in some way, via our EDI rules.
For this scenario where freight is being Linehauled back to your customer, the best way to complete these connotes (you are not required to do anything further so completion is required) is to utilize a Manifest Loop rule in conjunction with Linehaul scanning.
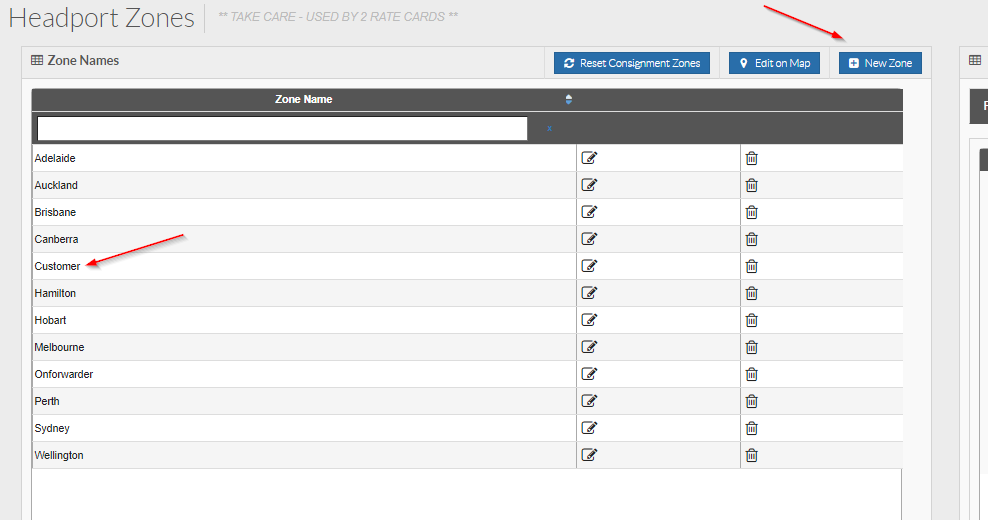
To set this up, you will need to firstly ensure that 'Customer' is an available option as a destination in your Linehaul scan page. This can be done by ensuring the zone list listed in the below, has the Customer zone:
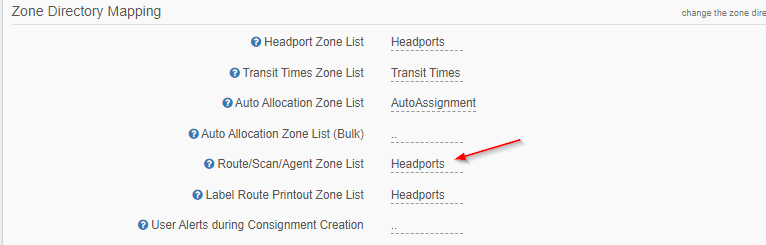
The above is found under Settings > General > Global Setup.
The above is found under Settings > Lists and Zones > Zone List Directory.
When 'Customer' has been added to the Route Scan Zone list (this is the zone list that determines what zones are displayed on the mobile device) the next step is to add a scan tag. Scan tags can be added via Settings > Lists and Zones > Freight Scan Types:
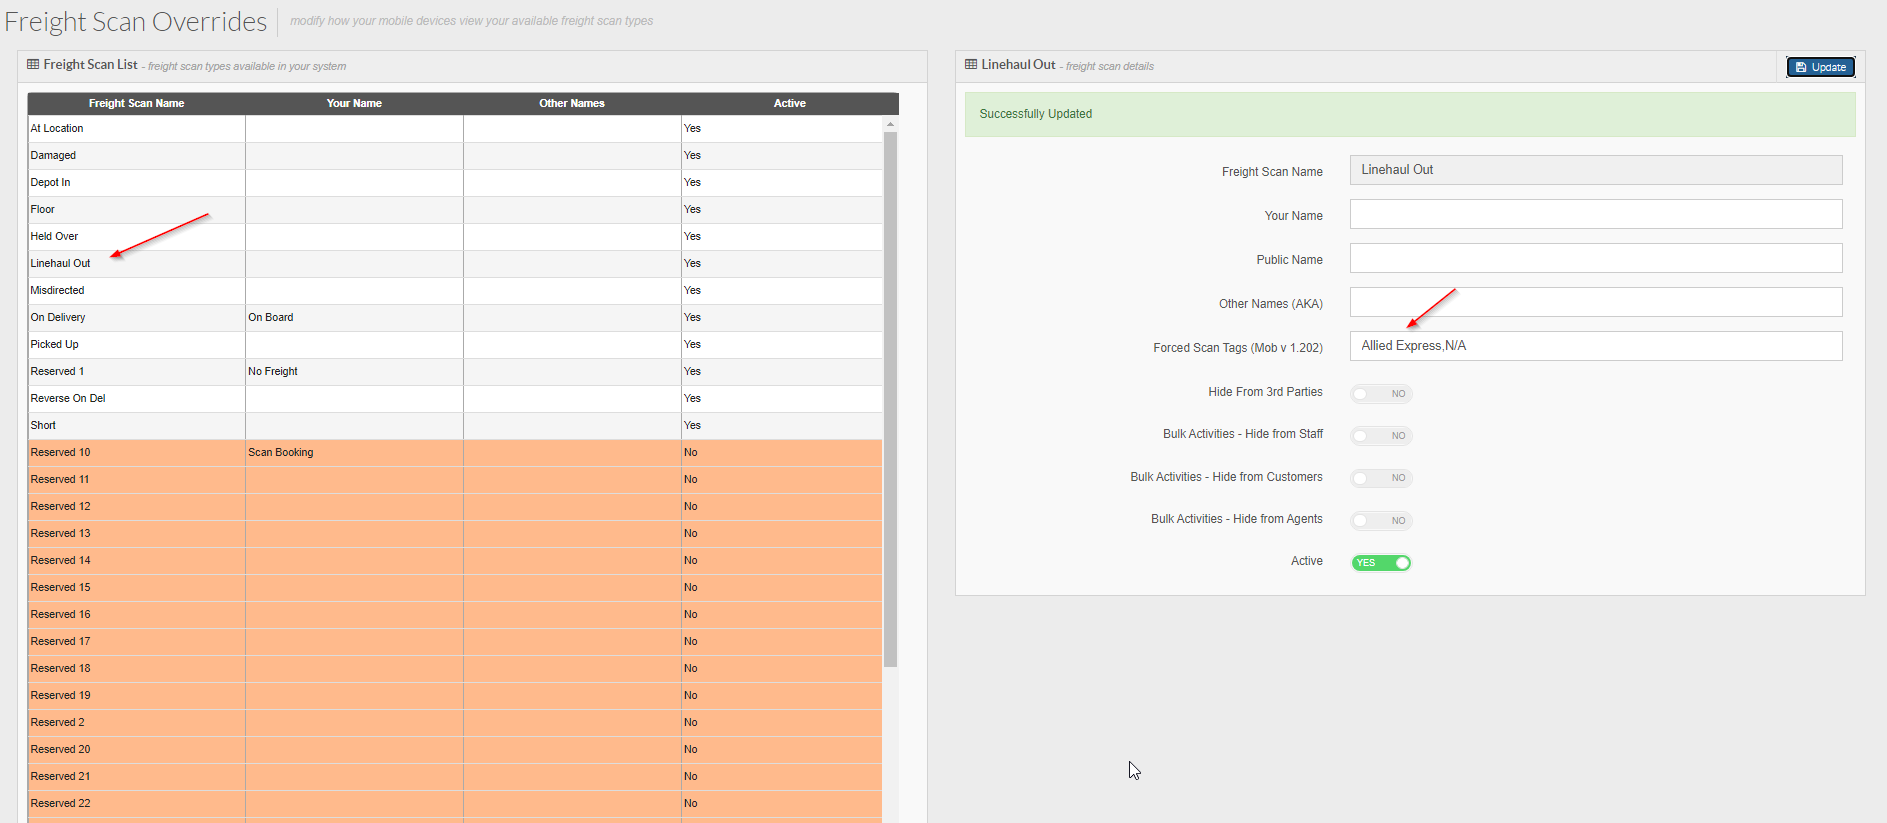
Adding Scan Tags here means that the user MUST select a scan tag when Linehaul scanning. You can also add scan tags via the dictionary list (under Settings > Lists and Zones) but doing so from here does not force a scan tag - they are optional if added to the dictionary list.
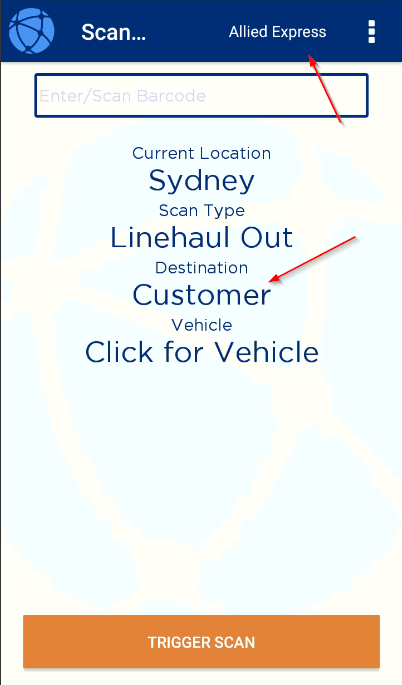
Scan tags are important as you should select one when doing Linehaul scanning in this scenario, so you know who the customer is - for our example, it is Allied Express:
From here, the next step is to setup an EDI manifest export rule in TransVirtual that Fully Completes consignments that you are Linehauling back to a customer; consignments that after that, require no further action on your part. As mentioned above we do this via a loop rule. These can be tricky to setup, so best to contact the support staff at TransVirtual when you reach this stage as they will happily assist with setup and provide you with any further assistance you need.
This process keeps everyone happy as you have successfully performed the pickup and obtained a POP and by simply Linehaul scanning the consignment we are able to (in conjunction with our loop rule) able to complete the connote in your account, saving you time not having to manually complete the consignment.
To set this up, you will need to firstly ensure that 'Customer' is an available option as a destination in your Linehaul scan page. This can be done by ensuring the zone list listed in the below, has the Customer zone:
The above is found under Settings > General > Global Setup.
The above is found under Settings > Lists and Zones > Zone List Directory.
When 'Customer' has been added to the Route Scan Zone list (this is the zone list that determines what zones are displayed on the mobile device) the next step is to add a scan tag. Scan tags can be added via Settings > Lists and Zones > Freight Scan Types:
Adding Scan Tags here means that the user MUST select a scan tag when Linehaul scanning. You can also add scan tags via the dictionary list (under Settings > Lists and Zones) but doing so from here does not force a scan tag - they are optional if added to the dictionary list.
Scan tags are important as you should select one when doing Linehaul scanning in this scenario, so you know who the customer is - for our example, it is Allied Express:
From here, the next step is to setup an EDI manifest export rule in TransVirtual that Fully Completes consignments that you are Linehauling back to a customer; consignments that after that, require no further action on your part. As mentioned above we do this via a loop rule. These can be tricky to setup, so best to contact the support staff at TransVirtual when you reach this stage as they will happily assist with setup and provide you with any further assistance you need.
This process keeps everyone happy as you have successfully performed the pickup and obtained a POP and by simply Linehaul scanning the consignment we are able to (in conjunction with our loop rule) able to complete the connote in your account, saving you time not having to manually complete the consignment.

Note the below
When you have completed your Linehaul Scanning it is highly recommended that you create a Linehaul Manifest as you can then print this our to give to agents or drivers. This is also a requirement for some integrations. See below images of how to create manifest:
Follow the prompts and create a Linehaul Manifest. Linehaul manifests can be seen under Home > Manifests > Linehaul Manifests.
Standard Pickup/Delivery Work
This is 'option 2' of the pickup process - the first being the above Agent Work.
This type of work is simply where you do both the pickup and the delivery of the connote - typically very straightforward.
Process is the same as above, but after completing the pickup and returning to depot, the delivery will then remain in the depot until it is sorted and loaded onto a driver's run - at which point it will go out for delivery and be delivered.
All that is required is to simply LOAD scan the freight and then deliver the connote as you normally would any standard 'delivery' connote; so LOAD connote, leave depot, go to delivery page, click on the consignment, go to signature page and get consignment signed for which gives you a POD and completes the job.
Optional Extras
This completes what is referred to as the standard pickup process.
However, some integration setups require that you do extra processes.
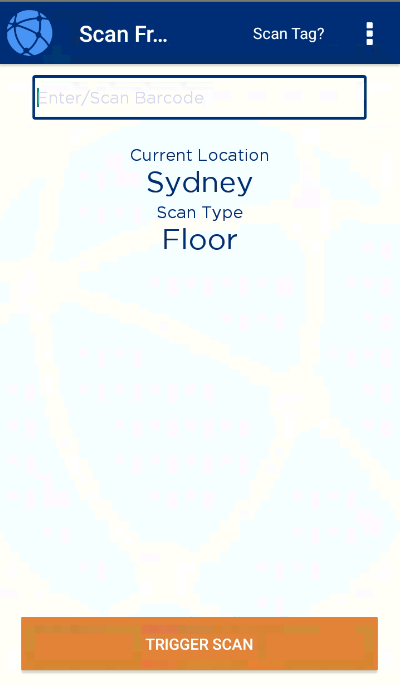
Floor Scan Manifests:
Floor scanning is simply done so that you can scan all freight at the end of the day that is still left on the floor of your depot.
To do a Floor scan go to the scan page on your app and select the scan type as Floor:
Again, it is recommended that you create specific scan tags for floor scans (under Settings > Lists and Zones > Freight Scan Type > Floor Scans > Forced Scan Tags).
The reason scan tags are a good idea is that they are a good way of identifying why a consignment is still on your floor and hasn't been delivered or actioned.
Scan all applicable items with a floor scan and then, when finished, create a manifest using the 3 dots at the top-right of this page.
Floor scan manifests are required for certain integrations, a good example being Allied Express - they require floor scans to be done detailing why items are still in your depot.
Floor manifests can be sent via EDI from your account to whoever requires them. Talk to the team at TransVirtual for further information on the setup of this.
Linehaul Manifests:
The how to on creating Linehaul Manifests can be seen further up in this article. Again, certain integrations require these to be created and it is advisable anyway - so that you can print the manifest out and give to the driver doing the run.
Linehaul manifests can be sent via EDI from your account to whoever requires them. Talk to the team at TransVirtual for further information on the setup of this.
If you have any further queries, please email the support staff at support@transvirtual.com.au who will be happy to assist.
If you have any further queries, please email the support staff at support@transvirtual.com.au who will be happy to assist.