Photos and Images EDI Import
In TransVirtual there is the ability to import photos and images and attach them to relevant consignments.
This is done by creating EDI (Electronic Data Interchange) Import rules in your account that can accept information via Email, FTP or Manual methods etc.
This is done by creating EDI (Electronic Data Interchange) Import rules in your account that can accept information via Email, FTP or Manual methods etc.
This article will detail an example setup.

Go to EDI > Data Import > Photos and Images OR Import/Export > Data Import > Photos
How to
Arriving at this page, you will see a screen similar to the below:
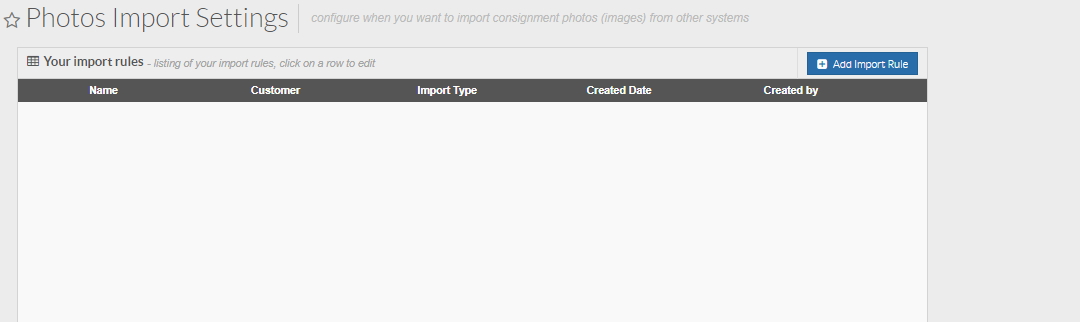
To create a new Image/Photo Import rule, click Add Import Rule.
After doing this you will then see the below pop-up appear:
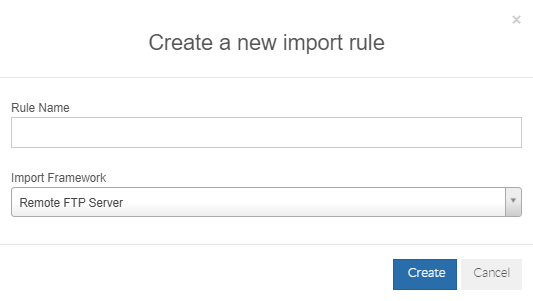
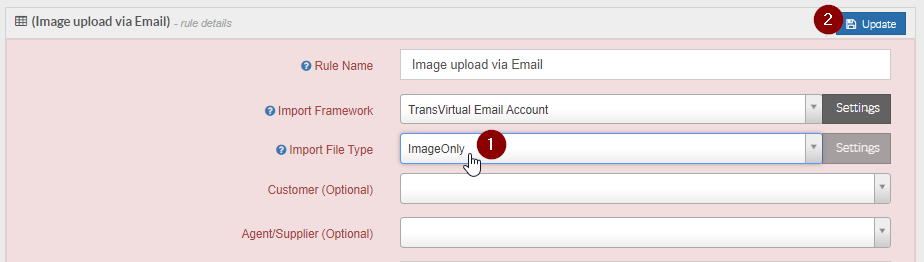
Rule Name = This is simply the name of the EDI rule. The name should be reflective of what the rule does. For this example, we are going to call the rule "Image upload via Email".
After doing this you will then see the below pop-up appear:
Rule Name = This is simply the name of the EDI rule. The name should be reflective of what the rule does. For this example, we are going to call the rule "Image upload via Email".
Import Framework = This is the method by which your images will be imported into your account. This example will use Email.
Click the Create button to create the new rule.
Your rule will now appear in orange in the list of imports.
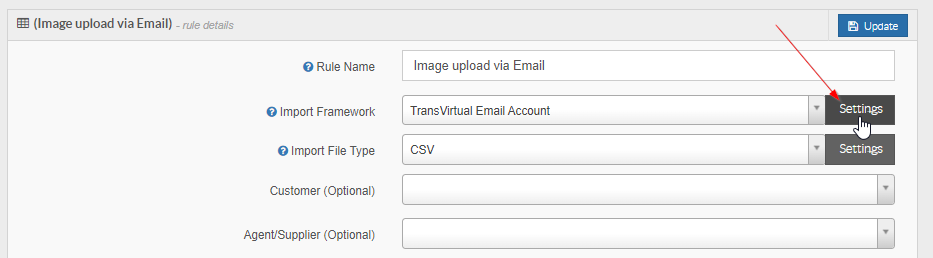
Click on the rule on the left and the settings for it will appear on the right of the page:
From here, we need to configure the settings for the rule.
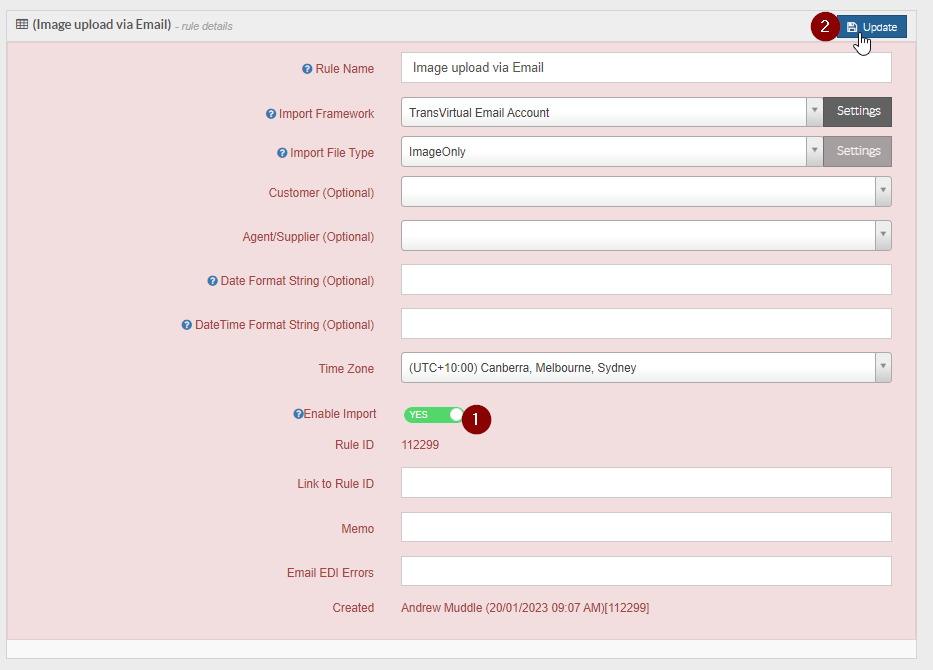
Rule Name = This will be populated already but you can change if needed. We are going to leave the rule name as is for this example.
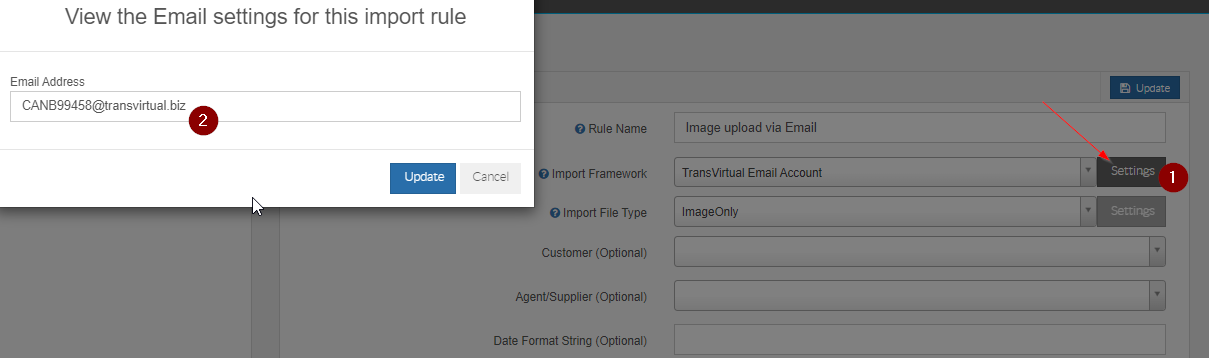
Import Framework = Chosen when creating the rule initially, however, if selecting TransVirtual Email Account as we have for this example, you will need to click the Settings button next to this line and generate a unique email to link this rule to:
Then:
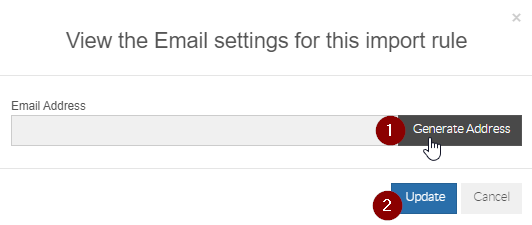
Click Generate Address and an email address will be seen. Click Update to save.
Click Generate Address and an email address will be seen. Click Update to save.
Import File Type = This is the file that will be imported to generate images and attach to connotes in your account. For this example, we will set as Image Only meaning just an image will be imported:
Select the Import File Type accordingly from the options then click Update at the top to save the changes.
Customer (Optional) = This field allows you to assign a customer meaning any imports done via this rule will have that customer listed. This field is not typically required because generally your rule would be for multiple consignments with varying customers - this field would only be used if importing images against connotes for just one customer. For this example, we will leave blank.
Agent/Supplier (Optional) = Allows you the ability to nominate an agent to assign the images to. Handy if your images are always from the same agent.
For this example, we are going to leave blank.
For this example, we are going to leave blank.
Date Format String (Optional) = Allows you the ability to nominate the Date Format that imported data will be in. For this example, we are going to leave blank.
Date Time Format String (Optional) = Allows you the ability to nominate the Date Time Format that imported data will be in. For this example, we are going to leave blank.
Time Zone = Allows you to set what time zone will be listed against the import. Typically, this is fine to leave as your current time zone but can be adjusted to suit. For this example, we are going to leave set to Sydney time.
Enable Import = Used to activate or de-activate an EDI rule.
Memo = A section you can add any notes if required.
Email EDI Errors = Entering an email address here means that email address will be sent a message if any imports done via this rule fail.
For this example, the setup would look similar to the below:

To activate the rule, click on Enable Import and then click Update at the top to save the change:
The rule is now active and can be used to import images into your account.
Note: This type of import can be used to import both image and PDF files!
When importing any file, especially PDF files, it is advised to name the file per the consignment number you wish it to attach. For example, any images you wish to attach to consignment TEST123 should be named TEST123.pdf or TEST123.png (depending on the file extension/type).
This is a requirement for PDF type files as PDF files can't be read in the same way as image files - the system will use the filename to attach to the relevant consignment.
Extra Information - What Next?
Once you have configured your Import rule, you then need to send the data to your account via this import rule.
The example above was setup using an import method of Email which means that to import any image files into your account, you will need to attach the relevant files to an email and send to the email address linked to the import rule:
Much like with PODs, images should be grayscale, 100-200 dpi and of a good quality; no shadows obstructing numbers and the image can't be too small or taken from too far away.
You can send multiple images in the one email, but each image file should only contain one image on one page (single page, single image).
If the import fails, what happens?
Much like with POD Imports, if the Image import fails the failed image will be added to an open Image Batch were ideally a staff member would manually process these and assign to the relevant consignment number (where applicable). Click here for a link to POD Import which provides further information on this.