Delivery/Pickup
The Delivery/Pickup page is used to perform Deliveries and Pickups on the mobile application. Once you have Loaded Consignments onto your device. Click here for further information on doing this.
Overview
1. Once you tap on the Delivery page you will be presented with the below screen where you will see your list of Deliveries and Pickups as shown below.
2. Deliveries are identified by the  icon, whilst pickups are denoted by the
  icon.
icon.
3. Tap on the delivery/pickup info or drop-down icon ( ) to view additional info as below.
4. Otherwise tap on the  or
or  icons to open the consignment, deliveries screen will appear as shown below.
6. The pickup(s) screen will appear as shown below.
Consignment Summary
To view the consignment summary for Pickup/Delivery, simply tap on the 3 dots icon, the consignment summary will display as shown below.
To Perform a Delivery/Pickup
1. To perform a delivery/pickup, tap on the delivery icon ( ) or Pickup Icon () icon beside the consignment, you will then be presented with the consignment details screen as shown below.
2. On Deliver/Pickup screen, you can see the few tabs i.e., Info, Photo, Maps and Scan. By default, consignment info will display. Here, you can check the consignment info, and if everything is correct then tap on the Sign button as shown above.

On Delivery/Pickup screen you can add Photo, can check Maps and Scan the included items. You can add Photo as describe in the Delivery Issue paragraph.

You can complete the pickup with similar steps as described when performing a delivery.
Sign and Deliver
1. Once you completed the above steps, now tap on the Sign button and you will be presented with the signature screen as shown below.
2. By default, you will see Extra Charges screen, here tap on the Sign tab located at the top in the signature screen to complete the delivery process.
3. Now, on signature screen, manually enter the Receiver name in Receiver field and sign in the white field as shown above and finally tap on the Complete button to finish the delivery process.
If required, you can tap on Clear button to remove the signature and try again.
If required, you can update the arrival time in the signature screen, to do this, simply tap on the clock icon and update the time as per your requirement.
Deliver/Pickup Issue
1. If you are facing any issue related to pickup/delivery then on pickup/deliver consignment summary tab, tap on the Delivery issue (Pickup Issue) button as shown below.
2. On delivery/pickup issue screen, there are three different tabs (Info, Photo and Extra Charges) as shown above, by default info tab will open where you can see Delivery Type/Pickup Type, Comment (If any) and Consignment Number as shown above.
3. If necessary, then you can add comment in the comment section.
4. You can update the delivery type with the help of drop and down button and then tap on the applicable delivery issue as shown above.
4. If needed, then you can add photo and additional charge/s for this delivery issue, to do so simply tap on the applicable tab i.e., Photo and Extra Charges button, the appropriate tab will open as shown below.
5. As shown in above screenshot, if you want to add a photo, then on Photo tab, tap on Take Photo button and capture the photo, similarly if you want to add extra charge then in Extra Charge tab, tap on the Plus Icon and add the applicable charges.
6. Once you completed above steps then go back to info tab and tap on the Complete Delivery button as shown below.
7. After step 6, you will be redirected to Signature screen, manually enter the Receiver Name in the receiver field, and then sign in the white box. Once you done it, tap on the Complete button, to complete the delivery.
You can also complete the pickup issue with the similar steps as described in this paragraph.
Extra Charges
1. On the signature or delivery issue pages, you have an ability to add Extra Charges for any delivery. To do so, simply tap on the Extra Charges tab, you will be redirected to Extra Charges screen as shown below.
2. If you want to add extra charge, tap on the Plus icon of Hand Unload/ Wait Time, a popup for Hand Unload/Wait Time has been display on screen, now manually enter the Quantity and add Note (if required) then tap on Save button to add the charges as shown below.
Photo
1. In Transvirtual, you have the ability to take picture of the consignment on Signature/Delivery Issue and for extra charges can take photos. To take picture, on Photo tab, tap on the Take Photo button and capture the image.
2. If you are OK with the Photo, then you can then save it by tap the Save icon ( ) or tap the Delete icon (
 ) to delete and try again.
3. If you take photo, then you classify this(these) image(s) as either a General or you can select by default or tap on the drop-down icon and change the image type as shown below.
Image Type Description.
- Damage: Any photos of damage on the freight.
- General: Any non-specific images related to the consignment for records.
- Left Instr: Photos relating to the location any freight is to be left.
- Paper POD: Images of paperwork where signatures for delivery have been obtained.
- Equipment Transfer: Photos of any Equipment and related paperwork.
Map
1. If you want to see the location details for the delivery address, then tap on the Map button you will be presented to the below screen.
Additionally, you can tap on Directions button, and this will load the address into your chosen app on your device for navigation.
Equipment Control - Pickup/Delivery
In Transvirtual, you can record the equipment count i.e., Given and Received from the receiver location when perform delivery/pickup.
1. To edit/add equipment count, when performing pickups/deliveries, on consignment detail page, tap on the Tap on Edit equip counts as shown below.
2. After step 1, equipment transactions screen will appear as shown below.
3. Manually enter the equipment count in the Give and Take field on the equipment transactions screen. After adding the values, tap the OK button to update/add.
The give and take fields mean the number of equipment items to be given to the recipient and any items received back/exchanged.
4. To add a note for any equipment count, tap on the Three dot icon, a new screen will display where you can manually enter the Equipment references and add notes (if required) in the related section. Once details are filled, tap OK.
a. When taking any equipment during delivery/pickup and if you add notes/references of that equipment than tap on the Three dot icon, a new section called transfer docket will appear in the equipment comment screen. Manually enter the docket number as shown below.

Transfer Docket is the mandatory field when you take any equipment and reference/note in it.
If you wish then you can make equipment comment setting automatically, enable the Equipment Force Notes/References toggle by clicking on it, as shown below.
This equipment notes/references screen will display after completing step 3.
To navigate Equipment Force Notes/Transaction toggle, go to Configuration > General > Global Setup, on General tab, go to Modules section.
5. After step 3 and/or step 4, you can see number of items being given, taken and balance for this receiving location in the Equipment field as shown below.
5. You can also see the equipment summary (how many received, how many take and balance left) in the signature page for visibility to the receiver as shown below.
This Tap to Edit Equip Counts will be visible, if you enable the Allow Equipment Control Module toggle button in Yes position.
To navigate Equipment Control Module toggle button, go to Configuration > General > Global Setup, on general tab, go to Modules section as shown above.
Advanced Equipment Control
In Transvirtual, there is a feature called Advanced Equipment Control that enhances equipment monitoring. It includes equipment check on freight arriving at depot and performing equipment checks during driver pickup and deliveries. This feature enables specifying equipment transfers or exchanges when signing off/completing a Delivery/Pickup via the mobile app. This feature significantly enhances visibility and tracking of your equipment movements.
1. This advanced equipment control feature will work if you enable the Advanced Mobile Equipment toggle as shown below.
To navigate Advanced Mobile Equipment toggle, go to Configuration > General > Global Setup, scroll down and go to Module section.
Advanced Equipment Control - Delivery
1. To begin, ensure that an equipment check has been performed during scanning and when loaded - doing this will automatically populate the relevant equipment count against the consignment. From here, go to the delivery page and select the consignment when arriving at the delivery location.
2. On delivery screen, first scan the consignment and then go to signature screen, now tap on the sign tab, you will be redirected to Equipment Exchange Status screen automatically (Screen 01) as shown above.
3. On screen 01, you can see 3 different options, i.e., Exchanged, Not Exchanged and Transferred, select the applicable option and then signature screen (Screen 02) will appear.
- Exchanged: means you are giving the receiver this Equipment piece and they are giving you back another Equipment piece of the same type (a straight swap).
- Not Exchanged: means you are giving the receiver the freight on the Equipment but not taking back the equivalent equipment piece.
- Transferred: means you are giving the receiver the Equipment piece and the ownership/rental on this equipment piece is being transferred to their account with the relevant provider.
In this example, we are going to select Exchanged for all the relevant items.
If you have multiple items in the connote, then you have to select the equipment count multiple times. For example, if you have 3 items in any connote then you have to tap the equipment count 3 times.
4. On screen 02, you can see the summary of what is being Exchanged, Not Exchanged and Transferred.
5. Now, tap on Save to save the changes or tap on Retry if you got something wrong.
6. After step 5, signature screen will display, from here, complete the receiver signature to complete the delivery.
7. Once the consignment is delivered and if you want to check the equipment transactions during the delivery then on web app, go to consignment detail and click on History tab, and go to Equipment transaction section.
Advanced Equipment Control - Pickup
Another function of this setting is the ability to assign pickups to drivers and have them confirm the equipment types/counts that are present for the assigned pickup.
1. On pickup screen, first complete the basic flow and then go to Signature page, now tap on the Sign tab, you will be redirected to the Equipment Questions screen automatically, here manually fill the equipment count as shown below.
2. The equipment questions are the driver to input how many of each Equipment type is being picked up.
In this example there is only 1 item, where three equipment were there, each one of CHEP, PALLET and SKID as shown above, once you manually enter the equipment count, on signature screen you can see the summary of the equipment count as shown above.
3. For any Equipment types that are not present, the driver should input a 0. Enter the details until all the Equipment types have been entered with the correct count.
4. After step 3, the driver will then be taken to the signature page to obtain a pickup signature and proof of pickup, which will complete the pickup. This process will mark the Equipment counts against the relevant consignment.
Grouping Consignments
Grouping of consignment helps you to deliver multiple consignment in a single signature.
1. In Transvirtual when delivering multiple consignments to the same location, then you can group these consignments together. To do the consignment grouping simply tap on the Menu icon located at top right side of the screen and tap on the Multi Select button as shown below.
2. In the event you have multiple consignment(s) and these have not linked automatically then simply tap on the Multi Select, a group address screen will display along with checkbox against each consignment, now tap on the applicable checkbox and then tap on the Group and Deliver button as shown above.
3. Now, you will be able to deliver these consignments as one delivery.
Return To Depot
1. In the delivery page, if required then you able to remove consignments from your delivery page dependent on your business processes.
2. To do so, on delivery page, first tap on the Menu icon from the top of the delivery page, and then tap on Return To Depot button, the return to depot screen will come along with checkboxes in against each consignment as shown below.
3. Now, tap on the checkbox of the applicable consignments you would like to remove and tap on the Return to Depot button, a confirmation popup will display as shown below.
4. Now, tap on the Yes button to return the consignment to depot from the delivery page.
If you are not able to perform Return to Depot then first enable the Allow Quick Return Depot from Global Setup.
To navigate Allow Quick Return button, on web go to Configuration > General > Global Setup, scroll down and go to Delivery section.
List Order (Sorting Deliveries)
1. In Transvirtual, you have also a provision to change the delivery/display order of your consignment, that process is known as Sorting.
2. To perform the sorting, first select the menu icon and then tap on the list order button, you will be presented to the Sort delivery page as shown below.
3. Now, tap and hold on the sort icon ( ) beside the consignment you wish to move and drag this up or down the list as required.
4. Additionally, you can also reverse the order of the consignments.
5. Once completed, tap on the Done button to save changes.
Menu
Within the Delivery page, you can see the delivery icon, this allows you to access available menu options within this page as shown below.
- Clear: This will clear all deliveries from the Delivery page.
- List Order: This feature helps you to change the delivery/display order of your consignment.
- Multi Select: This feature helps you to Group the consignment which helps you to deliver multiple consignment in a single signature.
- Return To Depot: This feature helps you to remove consignments from your delivery page dependent on your business processes.
Adding Consignments
Within the page depending on your Transvirtual Settings you can add further deliveries directly to the delivery page. In the Delivery page you will see similar screen as shown below.
1. Here, you can tap on the Enter/Scan Barcode field and type the consignment/barcode number or additionally tap on the camera icon ( ) to activate the camera and scan the barcode.
2. Once barcode successfully entered/scanned then the consignment will display in the delivery list.
If you add any consignment via this page, then this particular consignment does not add on the Runsheet.
To deliver a Taxi Truck Consignment
Once you create the taxi truck consignment in the web portal, assign it to a driver via the consignment history tab or via the pickup allocation screen.
If you create taxi truck consignments as pickups, they will display on the pickup allocation screen.

Click here for further information on how to assign a pickup to a driver using the pickup allocation screen.
1. After assigning the consignment to a driver, on mobile home screen, you will see an alert in the status section indicating that the pickup waiting (Refer to Screen 01) or a pop-up will appear as soon as the driver taps on the delivery screen (Refer to Screen 02).
2. Tap OK to acknowledge the pickup (Refer screen 02). You will be redirected to the delivery screen (Refer screen 03), here tap on the pickup icon, the pickup screen will display (Refer screen 04).
3. On the pickup screen, tap on I've Arrived, and then tap on Sign (Refer screen 05), the signature screen will display (Refer screen 06).
4. On the signature screen (Refer screen 06), tap on Sign tab, and then manually enter the receiver's name and sign it on the box. Once signature has been completed, tap Complete, a confirmation screen will appear here, tap on Done, the pickup process is completed, and the consignment is ready for the delivery.
4. On the signature screen (Refer screen 06), tap on Sign tab, and then manually enter the receiver's name and sign it on the box. Once signature has been completed, tap Complete, a confirmation screen will appear here, tap on Done, the pickup process is completed, and the consignment is ready for the delivery.
5. To complete the delivery, on delivery screen, the consignment will automatically appear on the delivery section (Refer screen 01).
Once pickup is completed, wait for 10 to 15 seconds, the consignment will automatically appear in the delivery section, if consignment does not appear then sync the application and again come to delivery screen.
6. Now, as you can see the legs appear as 'separate' consignments (number will be original taxi connote with an underscore and index of the leg number) straight in the delivery page (Refer screen 01), as shown below.
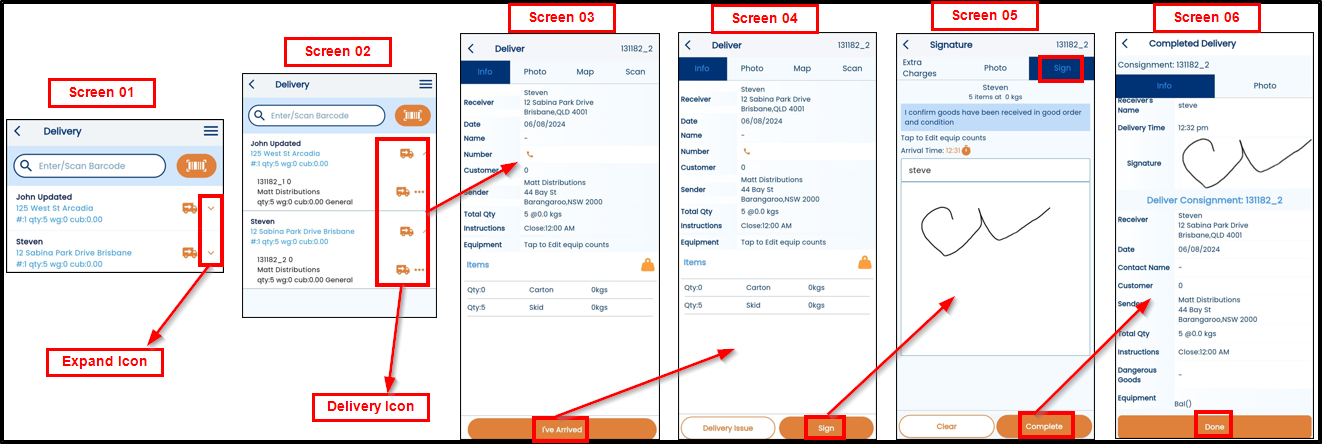
7. Tap on expand icon or directly tap on the delivery icon (Screen 01/02), you will be redirected to the delivery screen (Refer screen 03). Tap I've arrived and then tap on Sign (Refer screen 3 and 4).
8. Once you tap on sign, you will be redirected to the signature screen. Tap Sign tab and then manually enter the receiver's name and sign it on the box (Refer screen 05) and then tap Complete, a confirmation screen will appear here, tap on Done button to finish the delivery process.
Repeat this process until all legs have been delivered.
Related Articles
Multi Depot Pickup and Delivery
Multi Depot Pickup and Delivery This article helps you to provide an overview of the basic steps from creation to delivery. Quick Start Guides 1. Create a consignment via web app here. 2. Allocate pickup to driver here. 3. Complete pickup using ...Futile Pickup Review
Futile simply means the driver was unable to complete the pickup, and the Futile Pickup Review page is a means of being able to review each Futile Pickup and action accordingly. A Futile Pickup is one that has been marked as Futile by a driver ...Single Depot Pickup and Delivery Process
Single Depot Pickup and Delivery Process This article provides an overview of the basic steps from creation to delivery. Quick Start Guides 1. Create a consignment via web app here. 2. Allocate pickup to driver here. 3. Complete pickup using mobile ...Multi Depot Pickup and Delivery Process
Multi Depot Pickup and Delivery Process This article provides an overview of the basic steps from creation to delivery incorpoarating movement between depot locations. Quick Start Guides 1. Create a consignment via web app here. 2. Allocate pickup to ...Consignment Creation, Load and Delivery Process for Agents
This article will detail the standard advised process for Agent/'Last Mile' businesses to ensure that consignments are created and picked up/delivered effectively within TransVirtual. Step 1 - Consignment Creation The first step is consignment ...