Customer Levies/Surcharges
Customer Levies/Surcharges
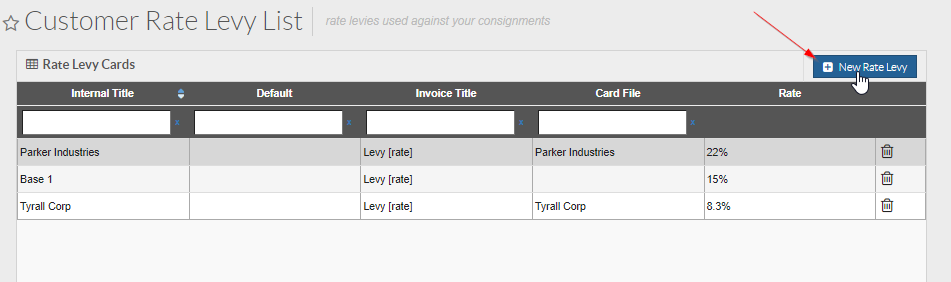
This section of TransVirtual allows users to have the ability to setup levies or surcharges such as Fuel levies etc. Found in Finance > Levies and Surcharges > Customer Levies/Surcharges.

This requires that the Finance module is enabled.
Setting up a levy
1. The most common type of levy used is a fuel levy. To set one up, navigate to the above page and click on the New Rate Levy button.
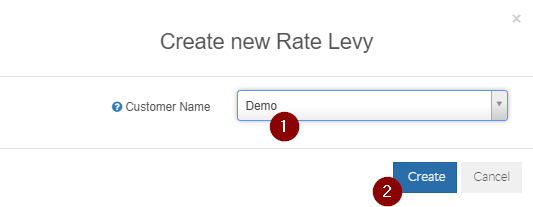
2. Select a Customer to apply this rate to from the list that appears, and then hit update.
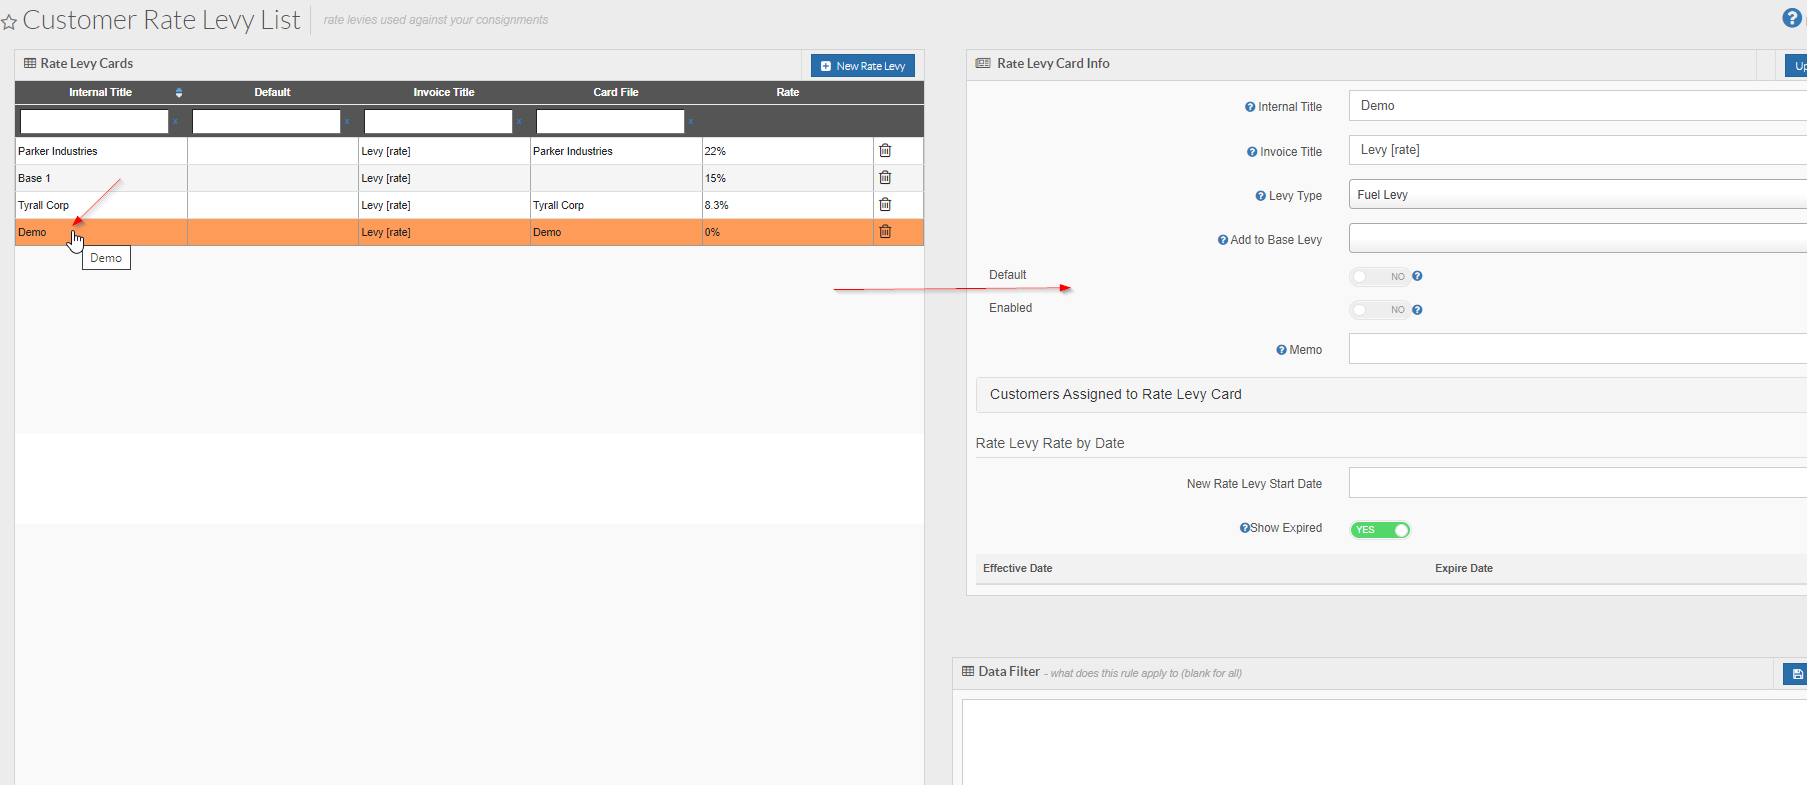
3. You will see a similar screen to this, which is your newly created levy.
4. You will see its related settings appear on the right.

Note: Clicking the blue/white question mark icons brings up an explanation about what that field does/is used for.
5. You can change the name of the levy through the Internal Title field. You can also make this levy the default levy. This means that when no valid levy is found on a consignment, this levy will be applied. If this levy is to be a fuel levy, make sure you set the levy type to be Fuel Levy.
6. Set the effective date-when you want this levy to start applying from. Ensure that the rate-what this levy will charge at is also entered; set as either a flat rate or as a percentage.
7. Ensure you click Update if there are any unsaved changes that you have made.
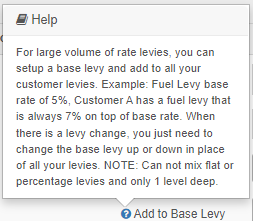
8. At the very bottom of the page there is a data filter which you can use to input logic that can have this levy only apply in specific situations. For example, you may only want to apply this charge to a customer when the service level of a consignment is Urgent. To do this you use the data filter drop-down list to add this logic:
Now when there are consignments for this customer that have a service level matching Urgent, this levy will apply. It will not apply otherwise.
Note: There is a section for Agents Levies/Surcharges (Finance > Levies and Surcharges > Agents(RCTI) Levies/Surcharges) which is essentially the same thing but for Agents and the setup is very much the same as listed above.
It is also important to note that fuel levies will not apply to consignments that pre-date the start/effective date of a levy. They will not be captured in this levy.
'Merging' two levies together - How to
If needed, there is the ability in TransVirtual to 'merge' two levies together so that they essentially form one levy.
One reason why you may choose to use this function is that it allows you to setup and apply two levies to the one customer, but have them show as if the customer is only being charged the one levy - you may have an agreement with your customer that their fuel levy is always 7% PLUS a base levy that accounts for fluctuations in fuel prices:
One reason why you may choose to use this function is that it allows you to setup and apply two levies to the one customer, but have them show as if the customer is only being charged the one levy - you may have an agreement with your customer that their fuel levy is always 7% PLUS a base levy that accounts for fluctuations in fuel prices:
Example Setup
To set this up, you would need to first ensure that there is both a customer specific fuel levy setup (see above section at top of this page for how to) AND a base levy setup, like the below:
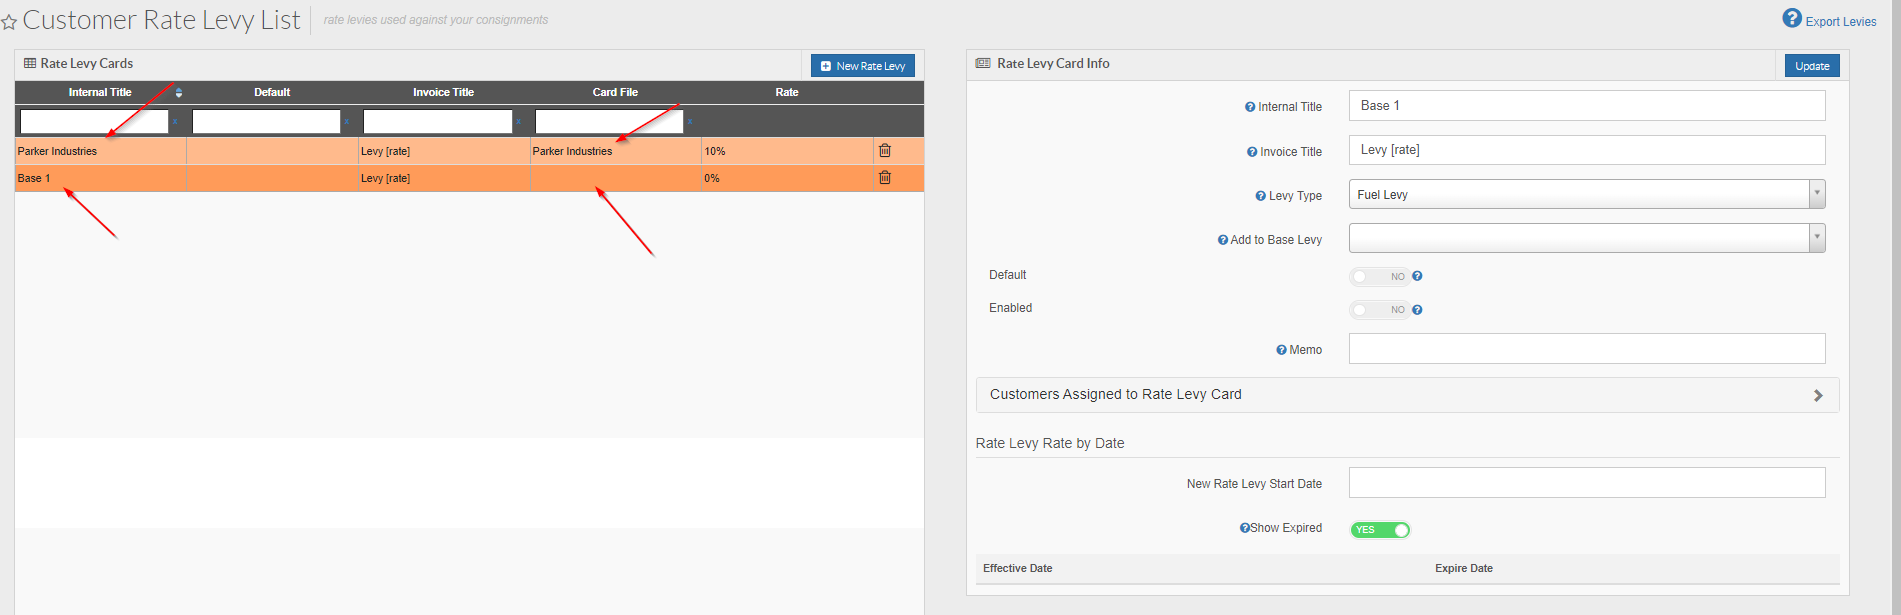
In the above, there are 2 levies:
- The top line is the customer specific fuel levy as denoted by the Card File column being populated (the levy the customer is actually being added to - this is for customer Parker Industries).
- The bottom line is the base levy that will be what the customer specific levy is added to (to create this levy, simply create as per normal and then just remove all customers from it - click Customers Assigned to Rate Levy Card and then use the red x to remove all customers from this base levy).
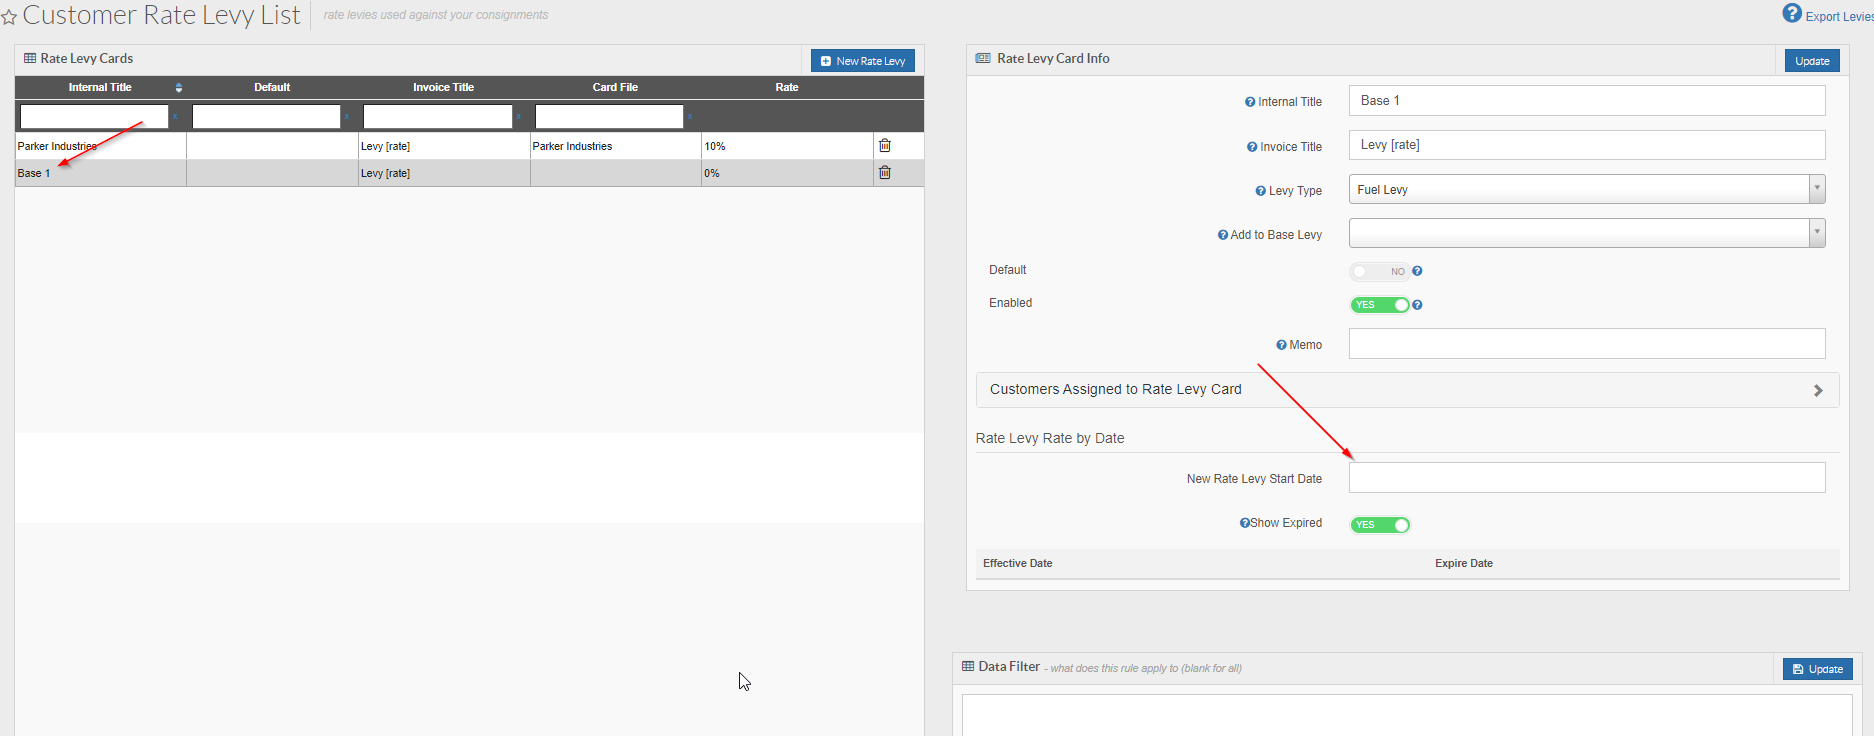
Once the levies have been setup, click and open the customer specific fuel-levy, you'll then see the settings for this levy appear on the right-side of the page:
Click on the field that says Add to Base Levy and choose the applicable levy you want to add this customer specific levy to; this then 'merges' the two levies together.
Make sure you click Update top-right to ensure the changes have been saved.
Make sure you click Update top-right to ensure the changes have been saved.
Note: You'll need to ensure that the levies have been enabled, otherwise you won't get the option to add a Base levy as per the above. Use the Enabled toggle and slide to YES, then click Update to ensure that the levy is now active. Active levies appear white in colour.
Once the Base levy has been added to the customer specific levy, you then need to ensure that dates and % are setup correctly for both of the levies.
Typically what you would do in this scenario, is setup the levy for the customer specific levy to be the same % for a very long time as it will likely never change or if it does, it won't be very often potentially (default is 25 years in TransVirtual).
Go to the customer specific levy and then create a new schedule:
Create a new schedule using the correct starting date. You will notice that when created the default end date is 25 years in the future - unless you add another later schedule at which point the end date will be the day before the start of the new schedule.
Add in the correct % (in this case will be 7% as per above).
From here, the next step is to configure the base levy.
Click on the base levy from the list on the left, then create a new schedule:
Add in the correct % (in this case will be 7% as per above).
From here, the next step is to configure the base levy.
Click on the base levy from the list on the left, then create a new schedule:
Create a new schedule with the appropriate start date - in this example it will also be the 18th April 2022.
Apply the correct % and then ensure to update the schedule to save it:
The result of this setup is that any consignments created with a customer of Parker Industries where the consignment date is either the 18th of April 2022 or later, the fuel levy applied will be 7% + 15% = 22% total.
The benefit of setting the levies up this way is that you only have to maintain the base levies to ensure each customer gets the correct fuel levy %.
For example, you may have a list of 30 customers, each with their own unique (customer specific fuel levy) fuel levy and you might have 3 base levies that each of these customers fall into.
Adding each customer to a base levy means that as the fuel prices changes/fluctuate, you will only need to create a new schedule against the base levy rather than applying a new levy start to every customer specific levy in your account.
This method saves you time and also ensures pricing accuracy when setup correctly.
This method also means that if a connote pre-dates the start date for the added base levy, it will only get the existing customer specific fuel levy - this is handy for situations where you may have already setup customer specific fuel levies but now want to transition to a streamlined fuel levy setup by reducing the number of rate levies you need to maintain.

It is always advised to test any new setups that you implement to ensure all is working as expected!
Setting a Customer Fuel Levy to mirror an Agent Fuel levy
There may be times when you simply want to 'on-forward' the agent/carrier fuel levy to the consignment customer.
The setup for this is very easy.
All that is required is to setup each agent/carrier with their respective fuel levy and ensure that NO customer specific fuel levies are in place AND to ensure that each customer rate card shadows any applicable agent rate cards.
This process relies on each customer rate card shadowing an agent rate card(s) and that the consignments are being priced using the shadow rates rather than the customer detailed rates - that is where the system finds any applicable agent fuel levies.
This process WILL NOT work unless shadow rates are implemented for each applicable customer.
This process WILL NOT work unless shadow rates are implemented for each applicable customer.
Click here for further information rate card setup.
Fuel Levies when shadowing rate cards.

When shadowing rate cards the fuel levy applied will be as applied to the shadow rate card and not that of the customer
Extra Information on this
There is a slight extension to this setup that you can implement if you wish to setup customer specific fuel levies and have them apply when the rate card being used is the customer detailed rate, rather than a Shadow Rate.
In the customer fuel levy page, create or enter an existing fuel levy by clicking it from the list on the left.
The settings for that fuel levy will then appear on the right of the page.
Go down to the bottom of the page to the Data Filter:
Select Rate Card Title in Step 1 of the builder and then click next.
In Step 2 click Equal and then click next:
In Step 3 enter the appropriate rate card title and then click add rule:
You will then see text appear in the Data Filter, similar to the below:
The customer levy we are setting this up for in this example is Unified Logistics:
Now, this customer specific fuel levy will only apply when the customer detailed rate card is being used to price the consignment, NOT when the rate card being used is a shadow/agent rate card.
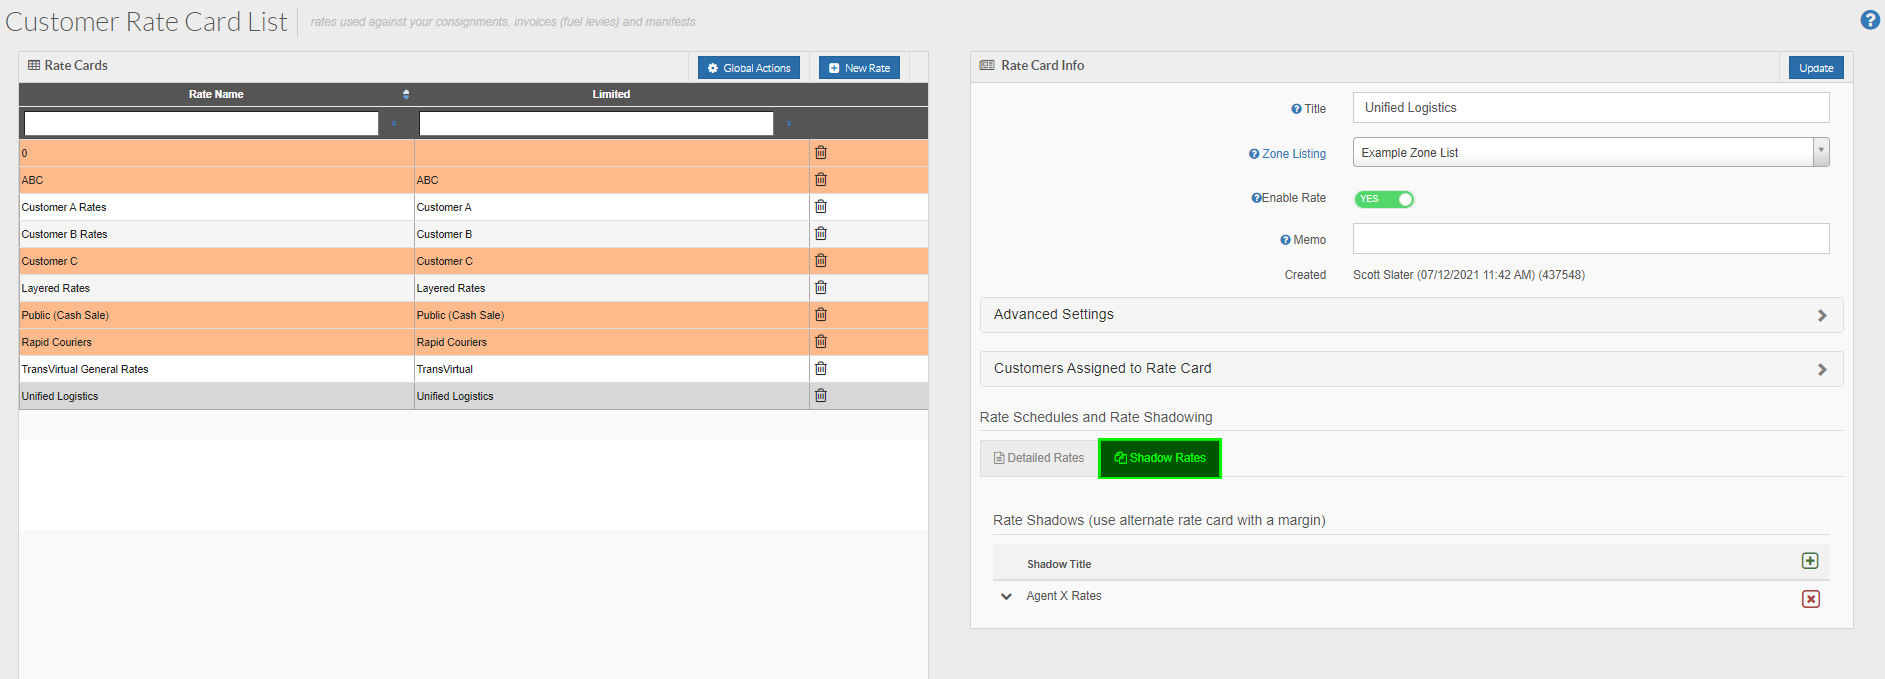
This example customer has the below implemented as their detailed rates:
The rate card title field in the Data Filter requires the title of each rate card and must match exactly what is listed against the relevant rate card.
This example customer also has the below shadow rate setup:
Now that the customer fuel levy has been limited to only apply when the customer detailed rates are being used, if a consignment acquires a price from a shadow rate, you will see the customer fuel levy mirror what has been setup for that selected agent:
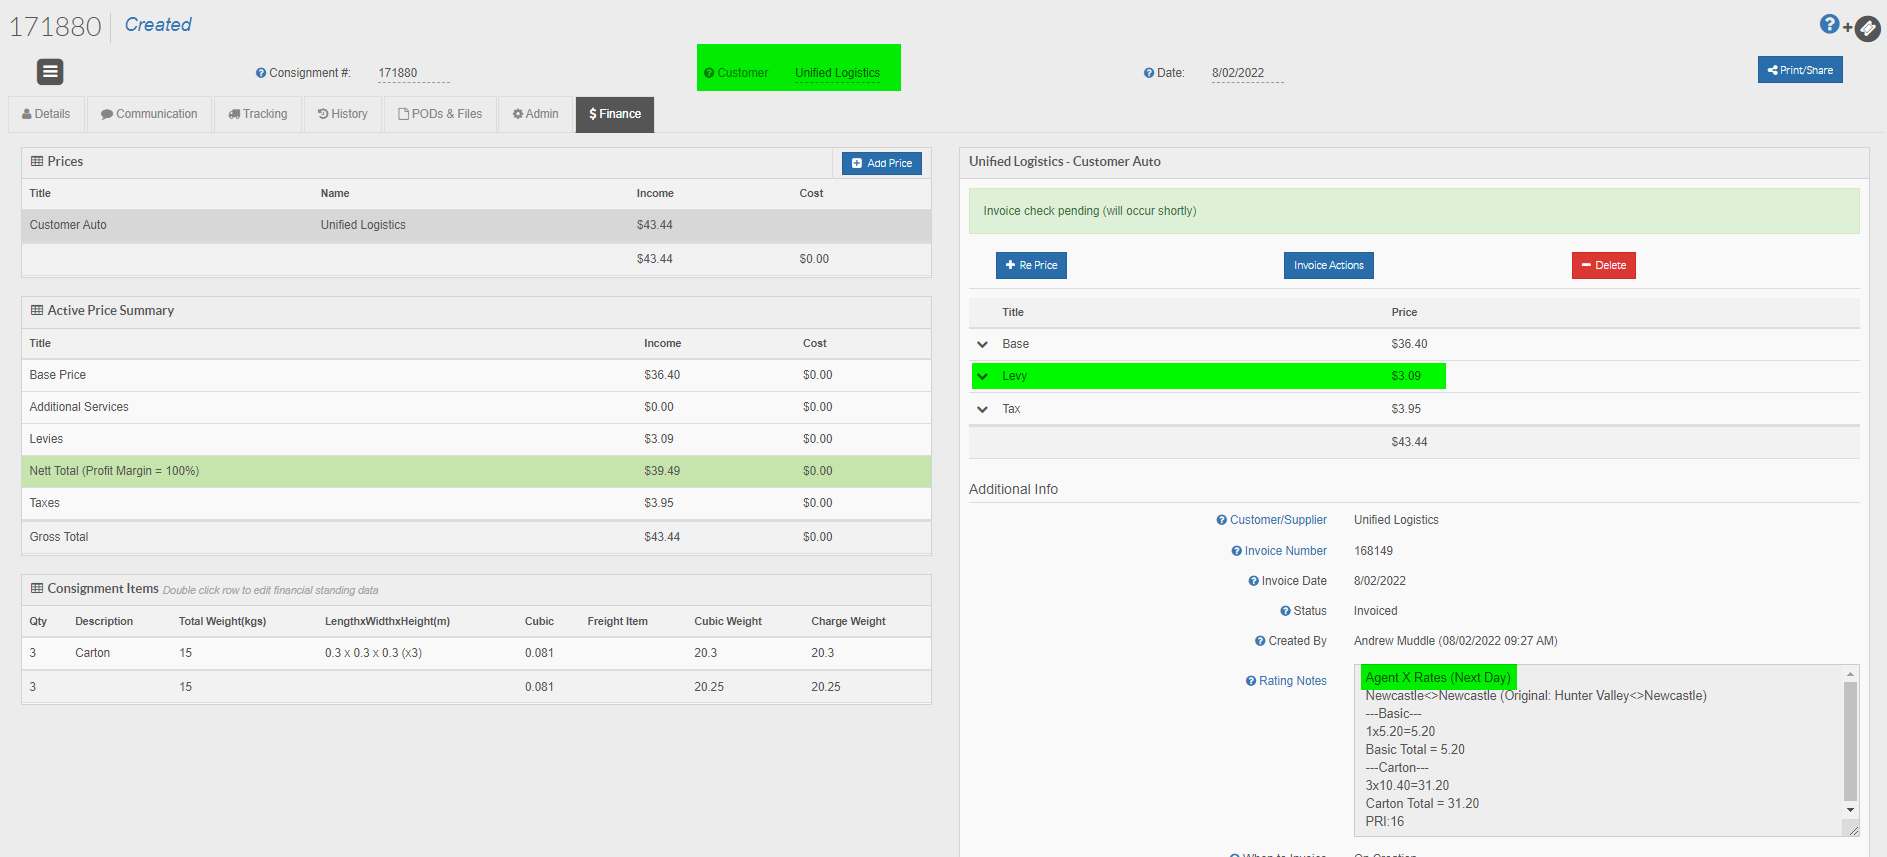
In the above consignment you can see that this consignment is for customer Unified Logistics.
The rating notes show that the rate card being used to price the consignment is the agent shadow rate card.
As a result, the fuel levy that the customer is being charged is the same as what the agent linked to the rate card acquires:
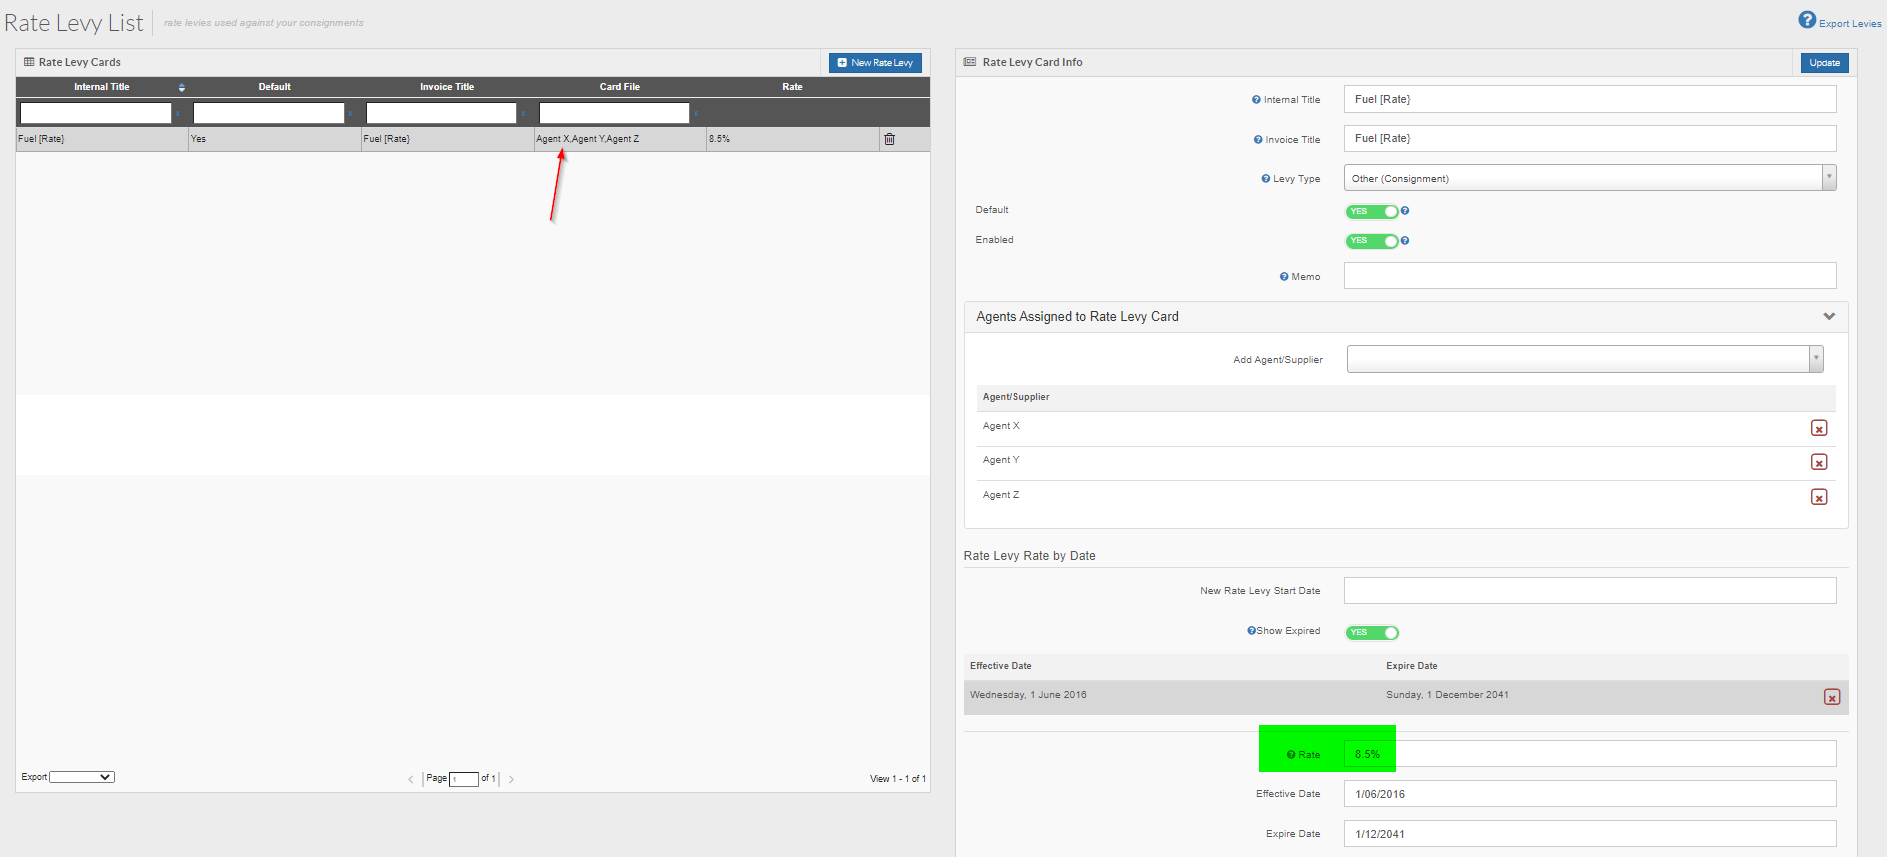
$3.09/$36.40 x 100 = 8.5% fuel levy
This is what has been setup for Agent X who is linked to the rate card being used to price the consignment.
If, for example, this same customer has another consignment that is being priced using their own detailed rate card, they will acquire the specific 25% fuel levy they have setup:
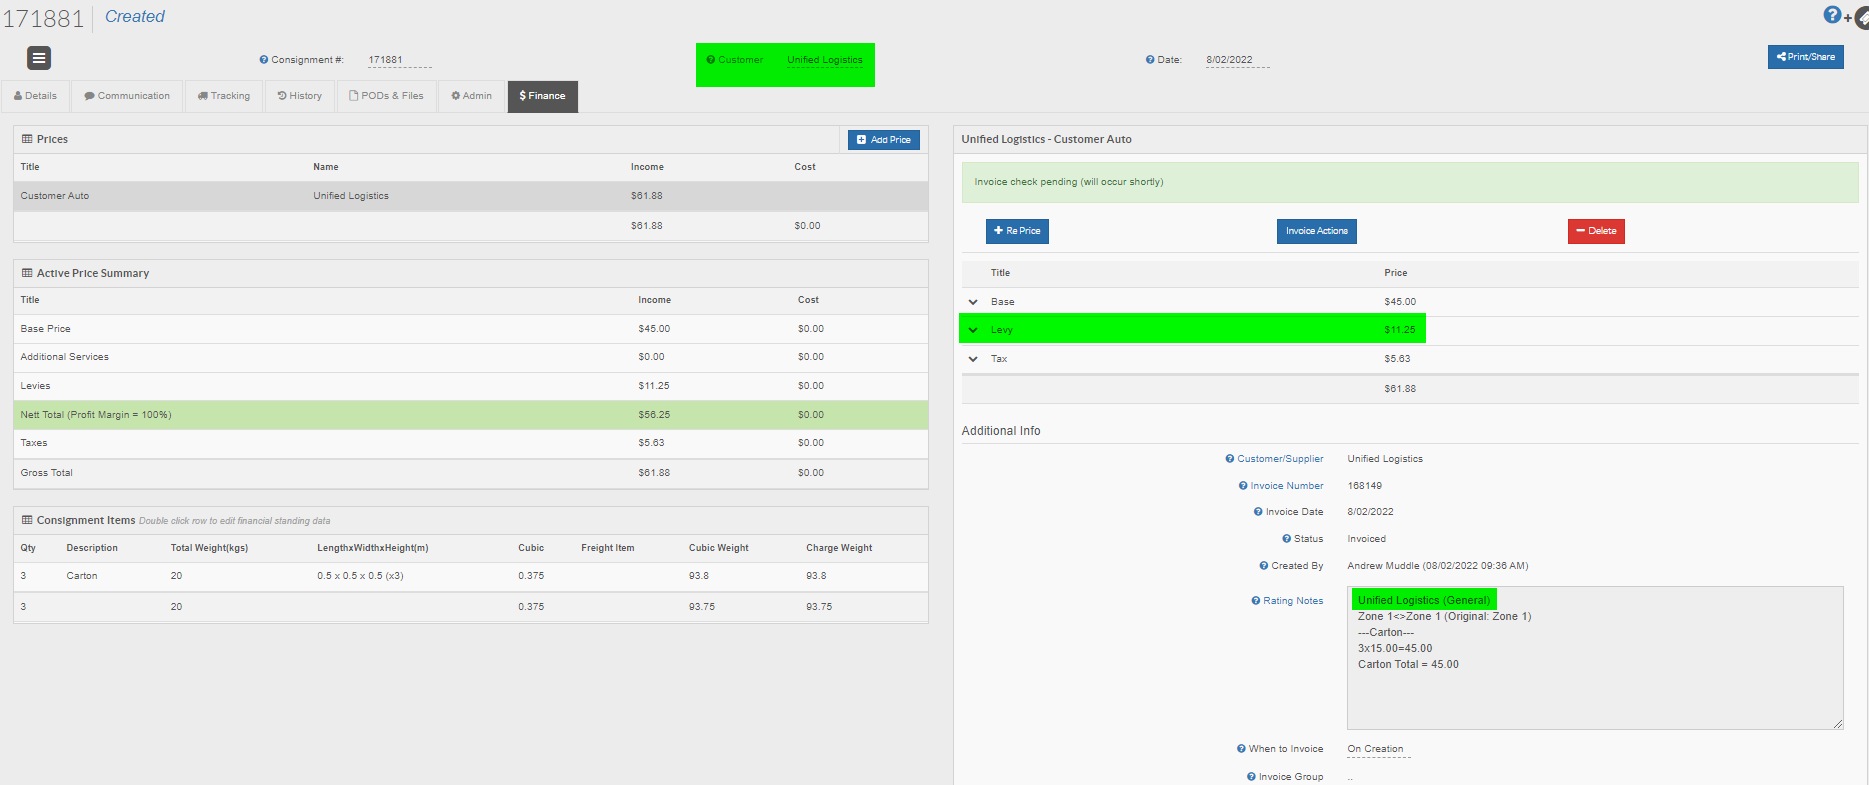
This is what has been setup for Agent X who is linked to the rate card being used to price the consignment.
If, for example, this same customer has another consignment that is being priced using their own detailed rate card, they will acquire the specific 25% fuel levy they have setup:
You can see that the customer price on this consignment has acquired a 25% fuel levy as $11.25/$45 x 100 = 25%
For this process to work as expected, you MUST NOT have any customer fuel levies setup to be a default:
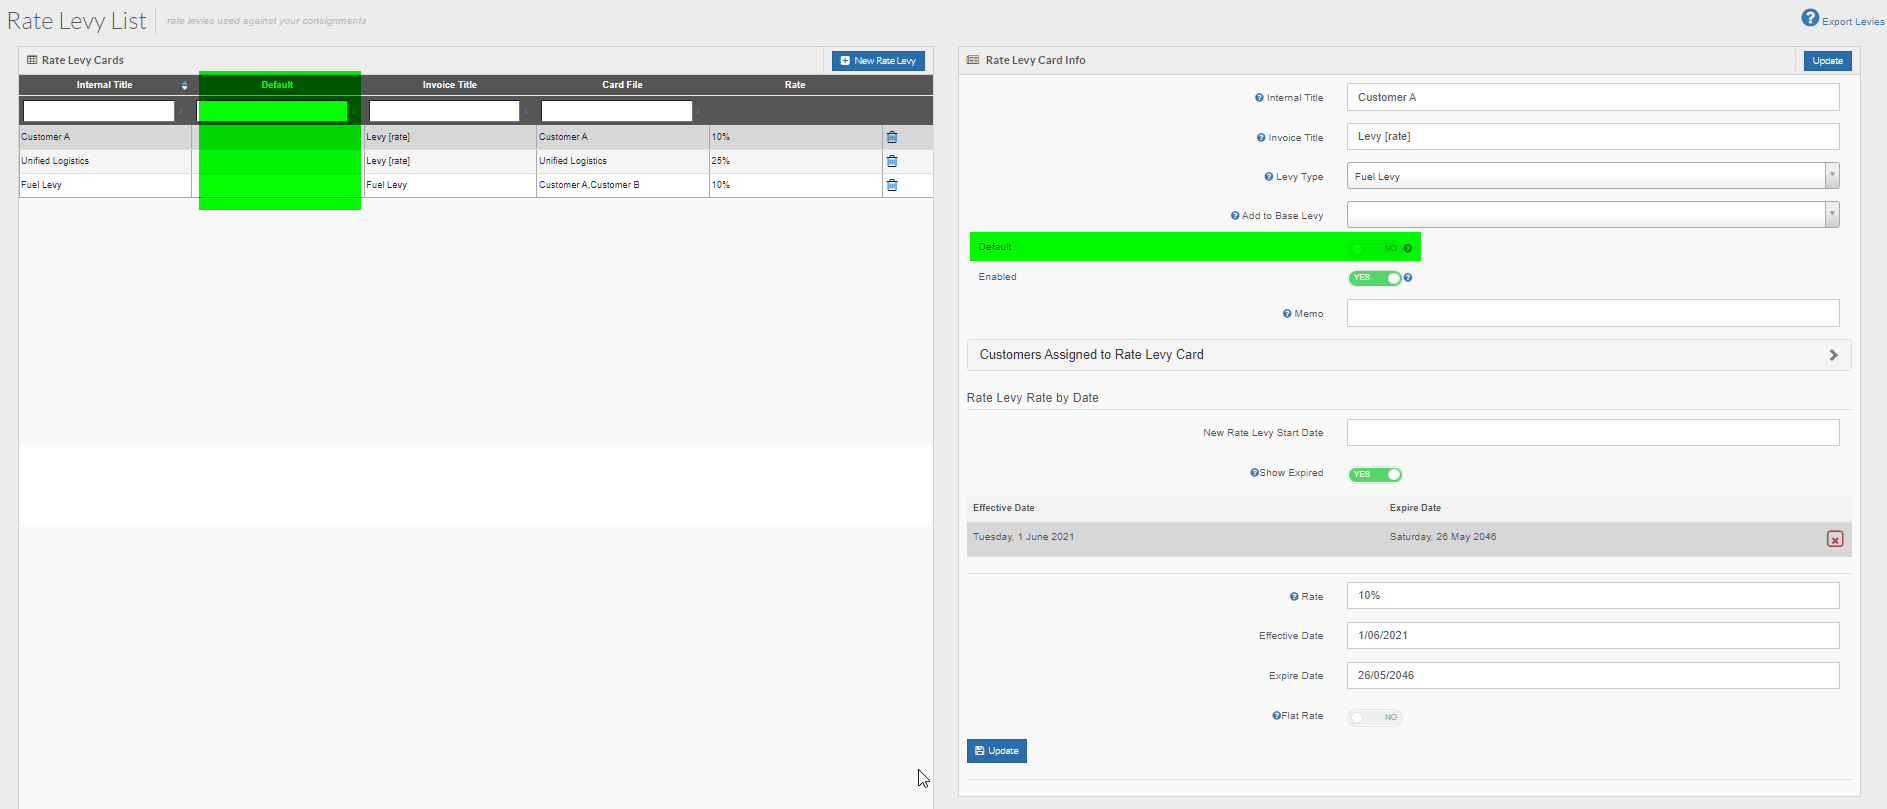
This setting MUST be disabled as if there is a default setup, any customer prices without any applicable levy will use this default, rather than correctly mirroring any applicable agent levies.
Setting up an Invoice Level Levy
There may be situations where you wish to setup a charge of some description and have it apply to invoices but only against the invoice itself, rather than add the charge to each consignment on the invoice as what would typically happen with most levy setups such as fuel levies.
A good example for this might be where you wish to apply an account keeping fee to a customer for maintaining their customer account - perhaps your staff do a lot of the admin for consignments and invoices manually and this charge is to cover the time they have spent doing that etc.
Whatever the reason for setting this up, it is possible using the below as an example on how it could be done.
Example Setup
Arriving at the levies page you will need to create a new levy and assign an applicable customer to the levy:
Then select the applicable customer and create the new levy:
From here, click on the levy from the list on the left (it will appear in orange as currently inactive) and the settings for it will appear on the right:
You will then need to amend the settings for this levy.
Similar setup to a typical fuel levy but you will need to change the Levy Type.
For this example we are going to set as Invoice Level:
Setting as Invoice Level means the charge will add to any invoices for the assigned customers (those attached to this levy). It will not apply to each consignment on the invoice, it will only add to the overall invoice.
For reference:
Invoice Level = Charge added to the overall invoice for any customers or agents attached to the levy. Will not add to each consignment on the relevant invoice - only added at an overall level to the invoice itself.
Invoice Daily Minimum = If this setting is selected the system will look at all connotes on an applicable invoice and work out how many different days exist on the invoice
Invoice Minimum: Useful if you wish to setup a minimum amount to charge for any invoices for the attached customers/agents. Perhaps there is a $ value you must not dip below so as to ensure you are still able to make money? If so, setting this means if the invoice price is below the nominated minimum the system will then bring the invoice total up to the minimum amount to ensure that amount is met.