Barcode Format Rules
Barcode Format Rules
In TransVirtual you have the ability to add in 'Barcode Format Rules' which are essentially rules that explain what a Barcode is made of, and thus how the system should read it when scanned.
If you are having trouble scanning freight it could be that the barcode is in a different format to what the system is expecting; which means when scanned, the scan will register as an unknown scan and will not appear against the consignment you have scanned.
The Barcode Format page can be found under Settings > General > Barcode Formats.
This article will explain how Barcode Formats can be created.
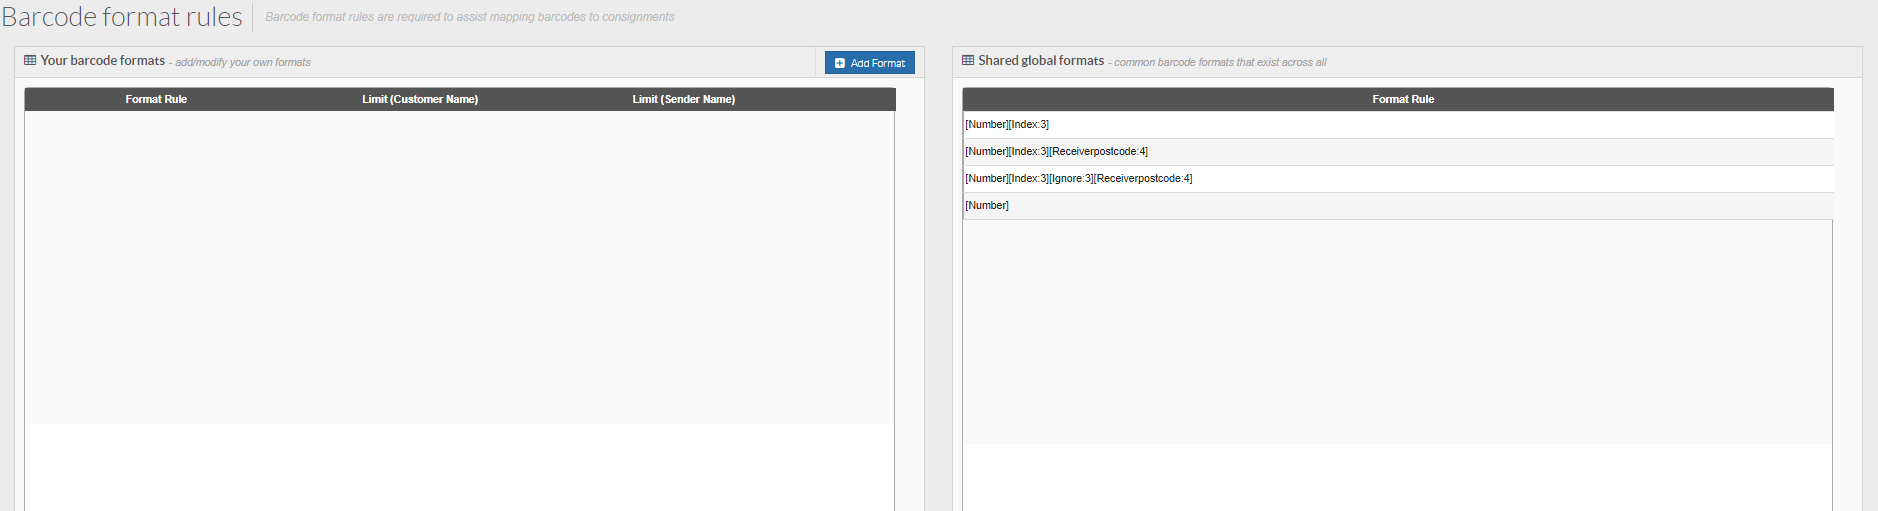
Barcode Format Overview
When you arrive at this page it will look similar to the below:
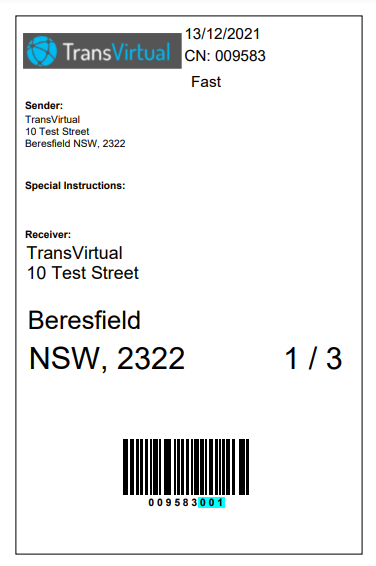
Typically, barcode values are simply the consignment number plus the index of the item. For example, a consignment with 3 items might be numbered "009583". In this case, the first item would have a barcode value of 009583001; the second item would have a barcode value of 009583002 and the 3rd item would have a value of 009583003. The 3 digits at the end of the barcode value are the item index (what item on the consignment it is). On a label, this would look something like the below:
The Shared Global Formats section on the right of the page are default rules that tend to cover most of the common Barcode Formats you will encounter.
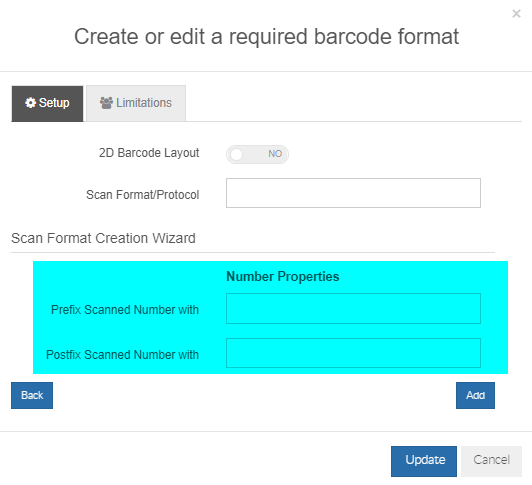
Creating a New Barcode Format Rule
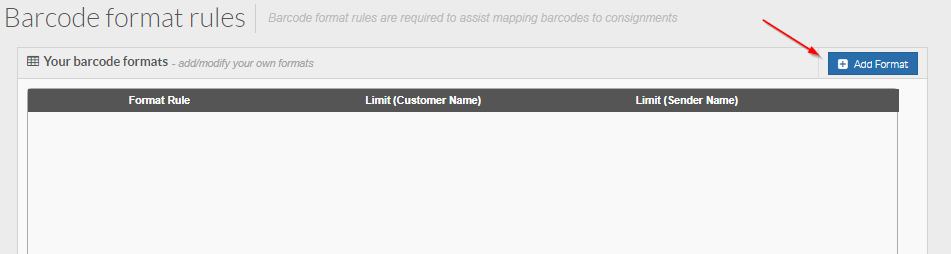
To create a new Barcode Format Rule click the Add Format button at the top of the page:
You will then see the below appear:
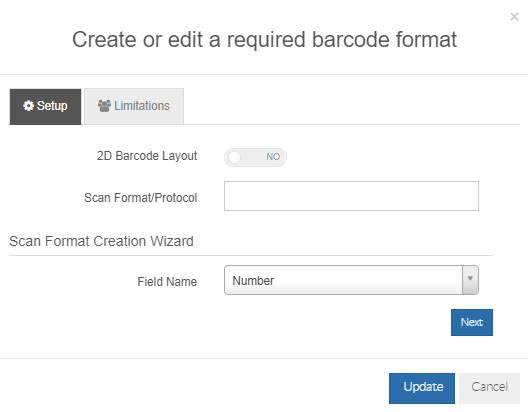
To create from here simply select a field from the drop-down at the bottom of this window and click next to add that to your Scan Format section.

Once you select a value from the drop-down you will see a section appear at the bottom where further information must be entered. For example, when clicking Number you will see the below:
You will then see the below appear:
To create from here simply select a field from the drop-down at the bottom of this window and click next to add that to your Scan Format section.
Once you select a value from the drop-down you will see a section appear at the bottom where further information must be entered. For example, when clicking Number you will see the below:
"Number" Field Name
Prefix Scanned Number with = This field is a way to add a prefix to a barcode scan value. For example, if freight for a certain customer or carrier always has a prefix of HCF before the consignment number in the barcode value, you could add HCF to this section so that the system would then correctly read the barcode. If consignment number '1234' had a physical label of HCF1234001, you can see that the consignment number is prefixed with HCF. In this scenario you'd need to add HCF as a prefix to the number for the scan to correctly apply to the consignment.
PostFix Scanned Number with = A way to add a postfix value to the end of the number value. For example, if freight for a particular customer/carrier always has the consignment number and then HCF as part of the barcode label value, then the index value, you'd need to add HCF to the postfix section of the number field; an example might be 1234HCF001 for consignment number '1234'. In this example the barcode value is consignment number (number) followed by HCF then the item index.
PostFix Scanned Number with = A way to add a postfix value to the end of the number value. For example, if freight for a particular customer/carrier always has the consignment number and then HCF as part of the barcode label value, then the index value, you'd need to add HCF to the postfix section of the number field; an example might be 1234HCF001 for consignment number '1234'. In this example the barcode value is consignment number (number) followed by HCF then the item index.
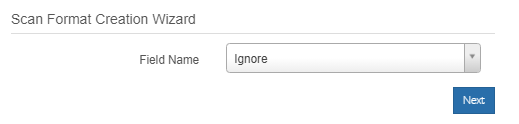
"Ignore" Field Name
You also have the ability to ignore digits or characters in a barcode value. When creating, simply select the Ignore option from the drop-down list and then specify how many characters to ignore:
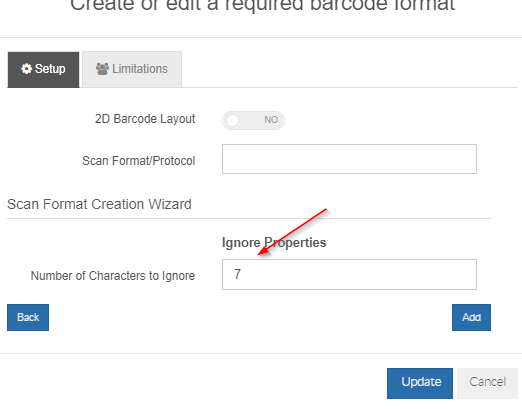
An example of where this could be used might be a Barcode value of 'abcdefg1234001'. In this example the consignment this value belongs to is 1234. The first 7 characters here can be ignored if required. The formatting for this value would look something like:
An example of where this could be used might be a Barcode value of 'abcdefg1234001'. In this example the consignment this value belongs to is 1234. The first 7 characters here can be ignored if required. The formatting for this value would look something like:
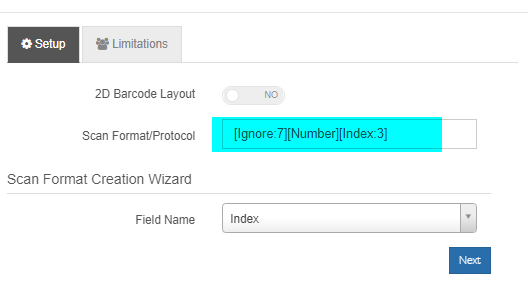
"Index" Field Name
Using the Index option from the drop-down list allows you to specify how many characters/digits make up an item index and where this sits in a barcode value.
The most common example is a barcode value where it is simply the consignment number followed by the item index which is usually 3 digits.
An example might be consignment '1234' which has two items. The barcode format for this would be [Number][Index:3] and the barcodes for this consignment would look like "1234001" and "1234002".
If required, you have the ability to specify an index that is an alphabetical value:
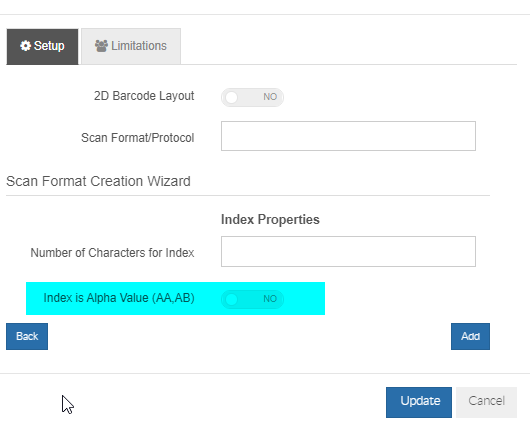
Toggle this to yes and then specify how many characters the index will apply to (1, 2, 3, etc). An example of this might be a consignment with two items.
The consignment number is 1234. Using alphabetical indexing, the Barcode Format may look like [Number][Index:2 a[ and the barcode values could be '1234AA' and '1234AB'.
The most common example is a barcode value where it is simply the consignment number followed by the item index which is usually 3 digits.
An example might be consignment '1234' which has two items. The barcode format for this would be [Number][Index:3] and the barcodes for this consignment would look like "1234001" and "1234002".
If required, you have the ability to specify an index that is an alphabetical value:
Toggle this to yes and then specify how many characters the index will apply to (1, 2, 3, etc). An example of this might be a consignment with two items.
The consignment number is 1234. Using alphabetical indexing, the Barcode Format may look like [Number][Index:2 a[ and the barcode values could be '1234AA' and '1234AB'.
"Receiverpostcode" Field Name
Using the Receiverpostcode option from the rule creation window you can specify how many digits (usually 4 in Australia) of the barcode value are a receiver postcode and where it belongs in the barcode value.
An example of this may be a barcode value of '12340012323'. In this example, the consignment number is 1234 which are the first four digits. This barcode value has a numerical index of 3 characters after the number and the last 4 digits are the receiving postcode for the consignment. The formatting for this example may look something like:
[Number][Index:3][Receiverpostcode:4]
Typically the postcode length will be 4 digits long as postcodes in Australia are 4 digit values.
SetValue Field Name
Using the SetValue from the drop-down list allows you specify a set value that will always appear in a barcode format.
For example, a barcode value of 1234THISISATEST001 is the consignment number followed by a set text value and then a 3 digit numerical index value.
The formatting for this may look something like:
For example, a barcode value of 1234THISISATEST001 is the consignment number followed by a set text value and then a 3 digit numerical index value.
The formatting for this may look something like:
[Number]THISISATEST[Index:3]
Limitations
When creating Barcode Format Rules you have the ability to limit your rule so that it only applies to a particular customer or sender:
The reason this is useful is because there may be situations where a particular barcode format rule may apply to more than one customer, but it shouldn't.
In this scenario you would specify a customer to limit your Barcode Rule to so that there is no possibility that scans are incorrectly matched to the wrong consignment for the wrong customer.
To limit your rule to a customer or sender simply enter the customer name or sender name that this rule applies to and ensure that what has been entered is an exact match to the customer/sender you want it limited to. Spelling errors in these limitations will cause issues and the rule will not work as expected.