Scanning
Scanning
Scanning within the mobile app is a major component in updating status's against consignments. as well as generating manifests and helping with your business workflow.
To access the scanning area within the application, tap on the "Scan" button on the main screen

This will present you with a screen to define your scan type and location.

To change any of these tap and hold the item you wish to change for up to 1 second.
Scan the items by pressing Volume down on a phone to activate the camera or pressing the relevant Scan button on your scanning device.
Current Location
The current location is a selection of the Headports setup against your account. This can also be forced or defaulted on a user level when configuring users.
Scan Types
The scan type is the critical to the task that is being performed. There are a list of standard scan types that can be used to generate manifests.

At Location: This scan type allows you to scan a device and update its status to be at a location (ie Headport).
Damaged: This scan allows you to scan damaged consignment(s)/item(s) to update their status.
Depot In: This scan allows you to scan consignment(s)/item(s) as you receive them in your depot. This updates each consignments status of each scanned.
Floor: This scan allows you to scan all items on the floor of you depot.
Held Over: This scan allows you to scan consignments(s)/items(s) that are being held for the next linehaul run.
Linehaul Out: This scan is done whilst loading consignment(s)/item(s) onto a linehaul run,
Misdirected: This scan is done when freight has been misdirected to the wrong location.
On Delivery: This scan is done when scanning a consignment(s)/item(s) as on delivery.
Picked Up: This scan is done when scanning a consignment(s)/item(s) as picked up.
Reverse on Del: This scan can be done to change a status of a consignment(s)/item(s) from on delivery to in depot.
Short: This scan can be done on item(s) that do exist within a consignment to show the items missing from a consignment.
Linehaul Manifests
1. Go to the scan page of the Mobile App
2. Select a scan type of Linehaul Out
3. Select the destination of the linehaul (Headport's as setup within your account)
4. Select the vehicle to be used on this route
5. Scan the freight to be loaded on the linehaul
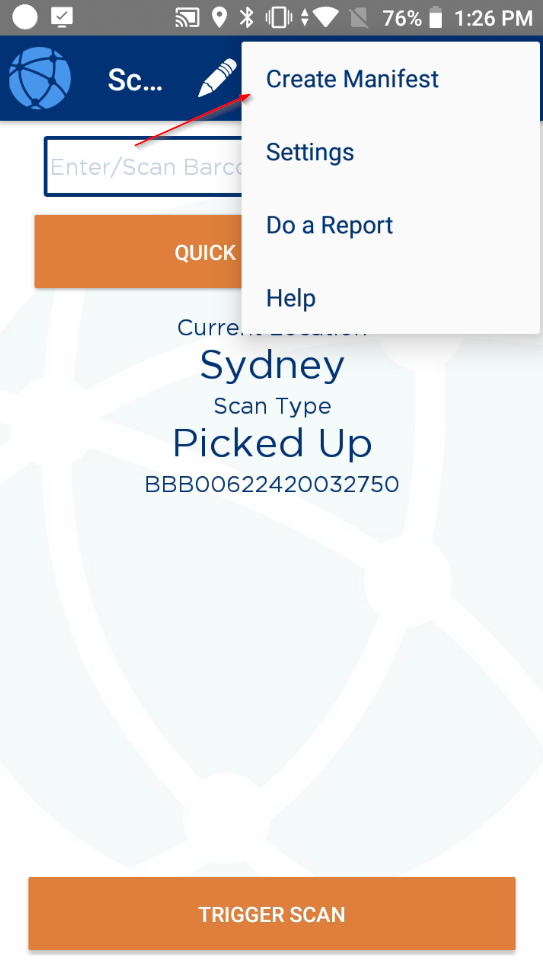
6. Once completed scanning select the menu icon from the top right of your device
7. Select Create Manifest from the menu
8. Select the time period over which the scans have been performed and then Create the manifest
Scan Manifest
To create a scan manifest, go to the scan page of the mobile app:

Open this page up:
Tap and hold the scan type to change to the type of scan you wish to apply.
You may also wish to add a scan tag at the top. Tap and hold to select from available scan tags.
Click here for instructions on Scan Tag setup if required.
Once you have the right scan type and scan tag, simply scan the freight needed.
Once the scanning has been done click the 3 dots at the top-right and click create manifest:
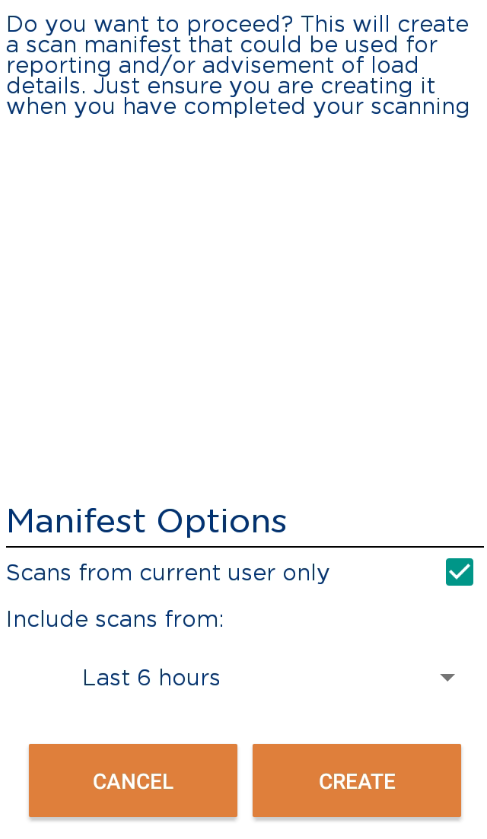
It is usually a good idea to limit current user using the checkbox at the bottom and you can also specify to include scans from a certain time period as well if required. Click create to generate the manifest. The manifest then appears in the manifest page and you can print or export if required from within the manifest itself.
Scan manifests can come in many different types depending on the scan type selected.
You may want a record of connotes that come into depot at a certain point. If so, when depot scanning simply click create manifest after depot scanning has been completed.
Another useful type of manifest is a floor manifest. Floor manifests are generated by selecting floor scan as your scan type.
Floor manifests are typically used to provide records of what is still on the depot floor at certain points throughout the day, which means selecting a scan tag when doing floor scans is a good idea because scan tags are essentially just comments as to why something was scanned the way it was.
It is usually a good idea to limit current user using the checkbox at the bottom and you can also specify to include scans from a certain time period as well if required. Click create to generate the manifest. The manifest then appears in the manifest page and you can print or export if required from within the manifest itself.
Scan manifests can come in many different types depending on the scan type selected.
You may want a record of connotes that come into depot at a certain point. If so, when depot scanning simply click create manifest after depot scanning has been completed.
Another useful type of manifest is a floor manifest. Floor manifests are generated by selecting floor scan as your scan type.