PUD Auto Assignment
PUD Auto Assignment
Overview
Transvirtual enables users to automatically assign work to drivers or suppliers based on predefined rules and criteria. This removes the need for manual intervention, streamlines daily operations, and ensures tasks are allocated quickly and accurately, freeing up time for teams to focus on higher-priority work. Many accounts use a combination of manual and automated rules.
Create a New Rule
- Go to the Auto Assignment Rules page via Configuration > Rules and Automation > Consignment or PUD Auto Assignment. The auto assignment page displays as shown below.
- You will see a list of your current rules, if any. Click New Rule. The Create a new auto allocation rule pop-up displays.
- Enter the details for this rule: Name, Priority, and Auto Allocation Type.
Note: priority tells the system which rules are checked first; the higher the number, the higher the priority. You can also choose the assignment type from the drop-down list. Delivery Assignment Only means the rule only assigns work of the delivery type, nothing else.
- Click Create to add the new rule.
- The newly added rule displays in the rule list in orange.
Note: the orange colour indicates that this rule is not yet active.
- Click the new rule. Its details display on the right side of the screen, as shown below.
Update a Rule
- Click the rule you want to update. Its details display on the right side of the screen, as shown below.
- Fill in the following details:
- Name: update the rule name manually if needed.
- Priority: sets the priority; the higher the number, the higher the priority.
- Assign Start/End Time: optionally enter a start and end time, which restricts assignment to work occurring between these times.
- Auto Allocation Type: choose whether the rule applies to Delivery, Pickup, or both, using the drop-down.
- Allocate Delivery Trigger: choose when this allocation should trigger, using the drop-down. This can be any option on the list, but "creation" is a good default.
- Assign to Agent/Employee: choose whether this freight is assigned to an employee or agent when the rule applies.
- Enable Rule: activates the rule when configured. Click the toggle to Yes, then click Update to save. Once saved, the rule colour changes to white, indicating it is enabled, as shown below.
Note: click the question mark icon next to each field for an explanation of what it does.
Data Filter
- The most common configuration of auto assignment rules uses auto assignment zones, configured in the zone list. You can also apply these rules using other zone lists, such as headports.
- To see the data filter tab, scroll to the bottom of the page to the Data Filter section. The data filter is the driving force behind when the rule will and will not apply to a consignment. To modify the data filter, use the drop-down logic selector at the bottom of the page.
- To set a data filter, fill in the details in the Select Field, Logic, and Select Value sections.
- Click Add Rule to save the changes. Once done, the data filter shows the logic as text.
Note: in this example, the auto assignment rule applies when the receiver's suburb is Sydney.
Delete the Rule
- To delete the rule, click the delete icon. A confirmation dialog displays.
- Click Yes. The rule is deleted from the database, as shown below.
Auto Assignment Using Linehaul Scanning
The above covers setting up an auto assignment rule without any device scanning. You can also assign freight automatically from Linehaul scanning on a device; this requires some additional configuration. See below for an example of how this can be set up.
Note: scan tags are useful for further refining scans; they can be used to add extra information to a scan.
- First, set up your auto assignment rules and your scan tags. Go to Configuration > Lists and Zones > Dictionary Lists, scroll down, and click Scan Tags. The scan tag list displays on the right side of the screen, as shown below.
- To add a new scan tag, click Add. The add-a-new-value pop-up appears; enter the Dictionary Value and click Add, as shown below.
Note: for example, a Linehaul scan with a tag of "Driver 1" can indicate the scanned freight is being handed over to Driver 1, who will complete the delivery from there.
- Set up scan tags matching your agent or driver names. If you have a driver called "Driver 1", set up a scan tag that matches this exactly. Once all scan tags are set up, use them in your auto assignment rules.
Note: setting up scan tags in the dictionary list means these tags are not forced, so the user scanning does not have to select a tag. You can also set up forced scan tags under Configuration > Lists and Zones > Scan Types, which opens the freight scan overrides page.
- Setting tags up on the Scan Types page means anyone doing Linehaul scanning in your account must select a tag from the available list. They cannot proceed with Linehaul scanning without a selected scan tag.
Note: it is up to you which approach suits your account better, but forcing tag selection can be useful, especially when auto assignments depend on scan tags. Forcing selection means there is no possibility of a user forgetting to add a tag; if that happened, any auto assignments based on scan tags would not work.
- The next step is to set up your auto assignment rules. Refer to Create a New Rule above.
Data Filter
- Once you have created the rule, scroll down the rule detail page to the data filter section.
- Fill in the details: Select Field, Logic, and Select Value, then click Add Rule. The data filter is created as shown below.
- In this example, Scan Tag is used in the Select Field column, Logic is Equal, and the Select Value is Test 01, as shown above.
- You can add multiple data filters. For example, when working with Linehaul-based scanning assignments, it is useful to narrow assignments to a specific Linehaul destination, since drivers or agents typically cover only certain regions. In this example, Linehaul Headport Depot is used in the Select Field, Equal in Logic, and Brisbane in the Select Value field; then click Add Rule. The rule displays on the data filter screen as shown below.
Note: it is important to limit each auto assignment rule to a Linehaul location where possible, as this refines the data and assignment process. You may have many scan tags set up, where each agent or driver only services one area. If so, ensure the data filter is limited to a destination for each rule.
- Fill in the details at the top of the page as shown below.
- The allocation type was set when the rule was created, but you can change it again if needed.
- Set the allocate delivery trigger to either Scanned Linehaul or Linehaul Manifest Created.
Note: it is up to you which of these options is best. If you choose Linehaul Manifest Created and the user scanning forgets to create the manifest after scanning, the auto assignment will not work. It may be safer to select Scanned Linehaul, since the trigger fires as soon as freight receives a Linehaul scan and does not require a manifest to be created.
- Set the assign to agent/employee field. Click the drop-down to choose either Employee or Agent, then click the drop-down arrow to select the relevant agent or employee. This is who is assigned the connote when the auto assignment triggers, as shown below.
- The assign Start and End times are optional fields that specify when the auto assignment should be active.
- If Start and End Time are set: the auto assignment is only active within these times. Outside this window, the auto assignment still happens, but the assignment is held until the Start time is reached. The connote shows the assignment to the agent or driver, but it is not active until the specified start time.
- Without setting a time: the auto assignment happens at any time.
- Once the settings are configured, review them before enabling the auto assignment rule with the toggle button.
Note: in this example, connotes are assigned to employee ShubhamDemo when a Linehaul scan with a destination of Brisbane and a scan tag of Test 01 has been performed. Both pickups and deliveries are assigned to ShubhamDemo (whatever is scanned matching the above criteria).
- Once complete, click Update to save the changes.
- Once the auto allocation details are complete, perform the Linehaul scanning.
For example: scanning the code assigns the connote to ShubhamDemo. If ShubhamDemo is a registered employee or user, the connote then appears on their device, as shown below.
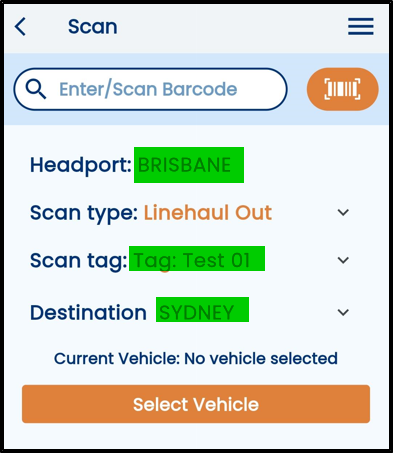
Note: if ShubhamDemo was an agent, the job would be assigned to that agent and would not display on any devices, because an agent is usually a company (a collection of users), not a single user. Assigning to an agent is useful for pricing in terms of the costs involved in a connote.
- To update the scan tag, click the drop-down next to the scan tag and select the appropriate one from the list.
Note: to see the history of this scanning, go to the consignment, filter to the applicable consignment, and go to the History tab. You will see that the auto assignment to your specified driver (employee) or agent has occurred, as shown below.
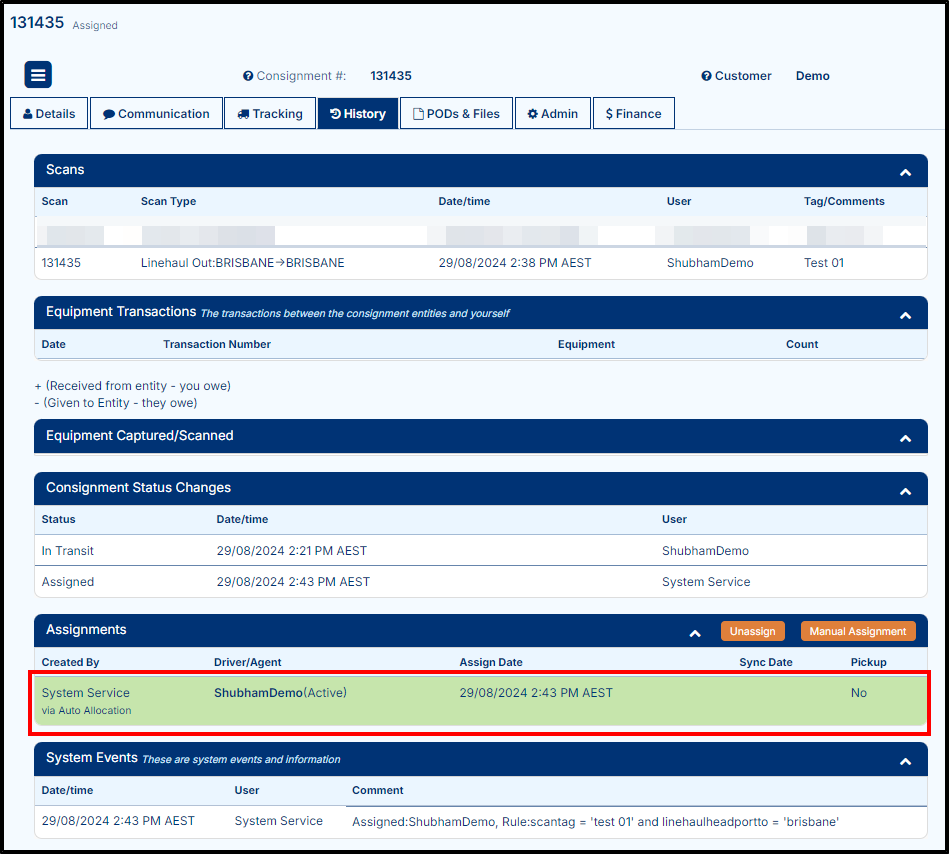
- This job now appears on that user or employee's device.
Note: if you scan 10 consignments in the same manner, the user will then have all 10 jobs on their device.
Notes
Consignments already assigned to a driver cannot be automatically reassigned. The driver must first finish their assigned tasks or remove the consignment from their device before it can be considered for auto assignment.