Proof Of Delivery EDI Export
Proof Of Delivery EDI Export
In TransVirtual there is the ability to setup Proof Of Delivery EDI (Electronic Data Interchange) Export Rules that can send out Proof Of Delivery (POD) information to a location, via FTP, Email, etc.
This page can be found under EDI > Data Export > Proof of Delivery.
This article will detail how to setup a common example; sending POD images and signatures via email to a consignment customer when their delivery has been completed.
This page can be found under EDI > Data Export > Proof of Delivery.
This article will detail how to setup a common example; sending POD images and signatures via email to a consignment customer when their delivery has been completed.
How to - Example Setup
Arriving at this page, you will see a screen similar to the below:

To create a new rule click the New Rule button at the top of the page.
You will then see the below pop-up window appear:
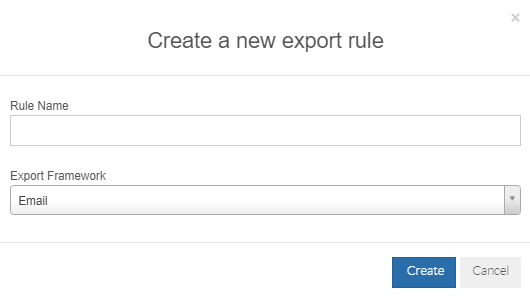
The Rule Name field is where you will give this export rule a name. The name you give this rule should be reflective of what the rule does. For this example we are going to name the rule "POD email to consignment customer".
The Export Framework section is the method that TransVirtual will use to export the data for this EDI rule. This example will use Email.
To create a new rule click the New Rule button at the top of the page.
You will then see the below pop-up window appear:
The Rule Name field is where you will give this export rule a name. The name you give this rule should be reflective of what the rule does. For this example we are going to name the rule "POD email to consignment customer".
The Export Framework section is the method that TransVirtual will use to export the data for this EDI rule. This example will use Email.
Click the Create button to create the EDI rule.
The rule will then appear in the list in Orange, indicating that is is currently inactive.
Click on the rule and the settings for it will appear on the right-hand side of the page:
The rule will then appear in the list in Orange, indicating that is is currently inactive.
Click on the rule and the settings for it will appear on the right-hand side of the page:
From here, we need to configure the settings for this rule.
At the bottom of the page there is a Data Filter.
The Data Filter is the driving force that determines when this EDI rule will and will not apply to consignments.
To configure the Data Filter, use the drop-down builder at the bottom of the page:
In Step 1 of this builder we are going to select the field called POD Type:
Once selected, click the next button to move on to Step 2 of the builder. This is where you will select the logic to apply. Select Equal and then click Next:
In Step 3 you will need to select the value this EDI rule will look for. Select Complete and then click Add Rule:
When you click Add Rule you will then see text/logic appear in the Data Filter as per the below:
The Data Filter will only apply to a consignment when a POD has been attached to it and it is a complete type POD. This type of POD will come from Sign on Glass type deliveries performed by mobile users.
However, there are different type of PODs that can be uploaded to a consignment.
For this example, we are also going to add logic to apply this rule to consignments with Signed on Paper PODs and Left as Instructed Type PODs.
To add this logic, use the drop-down builder and repeat the above process but change the value in Step 3:
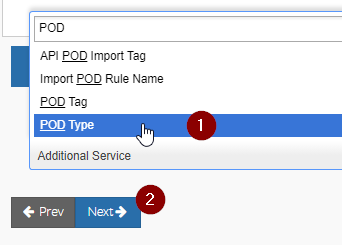
Then:
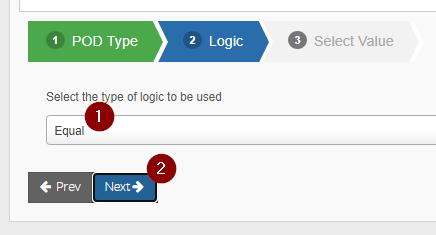
Then:
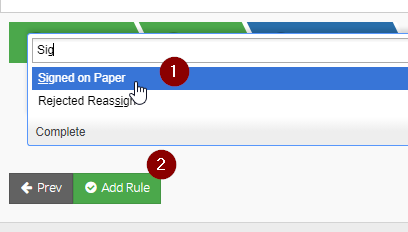
The logic in the Data Filter will now look like the below:
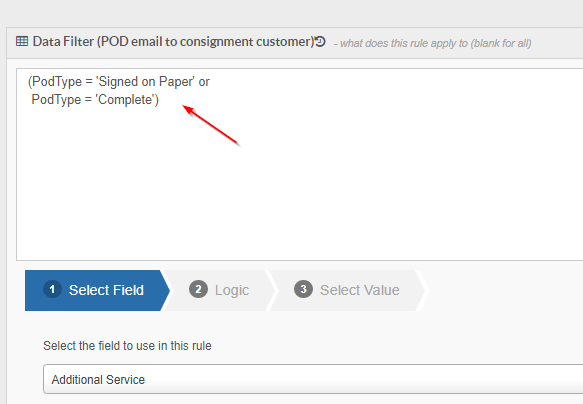
Now, the Data Filter will ensure that this EDI rule applies to consignments that that have either a complete OR a Signed on Paper type POD attached to them.
For this example we are also going to include Left As Instructed Type PODs.
Repeat the above process again but change the value in Step 3 of the Data Filter builder to Left As Instructed. Add the rule and your Data Filter will now look like this:
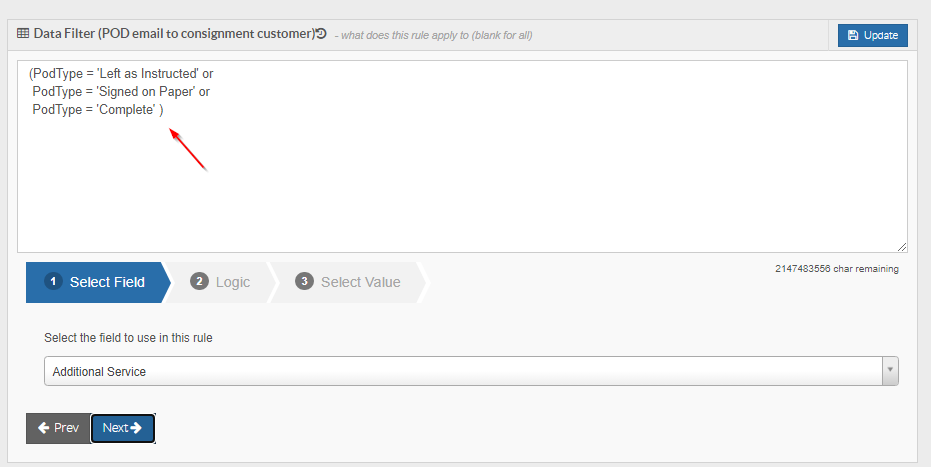
The Data Filter will now apply this rule to consignments where the attached POD type is either Complete OR Signed on Paper OR Left as Instructed.
These 3 POD types cover the standard POD types (there are other types you can add in if needed) for when a delivery has been fully completed and will be what we will use for this example.
However, there are different type of PODs that can be uploaded to a consignment.
For this example, we are also going to add logic to apply this rule to consignments with Signed on Paper PODs and Left as Instructed Type PODs.
To add this logic, use the drop-down builder and repeat the above process but change the value in Step 3:
Then:
Then:
The logic in the Data Filter will now look like the below:
Now, the Data Filter will ensure that this EDI rule applies to consignments that that have either a complete OR a Signed on Paper type POD attached to them.
For this example we are also going to include Left As Instructed Type PODs.
Repeat the above process again but change the value in Step 3 of the Data Filter builder to Left As Instructed. Add the rule and your Data Filter will now look like this:
The Data Filter will now apply this rule to consignments where the attached POD type is either Complete OR Signed on Paper OR Left as Instructed.
These 3 POD types cover the standard POD types (there are other types you can add in if needed) for when a delivery has been fully completed and will be what we will use for this example.

Note: If it suits, you can simply specify a customer name in your data filter (Customer Name = 'X') rather than specifying POD types as per the above.
Doing this will then simply send ALL POD types to the email (or other endpoint) listed.
However, if doing this, you must ensure the receiver email addresses or other endpoints are correct for any consignments with this customer - the customer listed against the rule (in the data filter) will be the customer that the PODs are sent to.
Ensure to use the data filter builder if using this method and make sure to test where possible to identify if any changes are required.
Once the Data Filter has been configured, you will need to configure the rest of the settings.
Rule Name = This is simply the name of the rule. You can change if needed, but for this example we are going to leave as POD email to consignment customer.
Rule Name = This is simply the name of the rule. You can change if needed, but for this example we are going to leave as POD email to consignment customer.
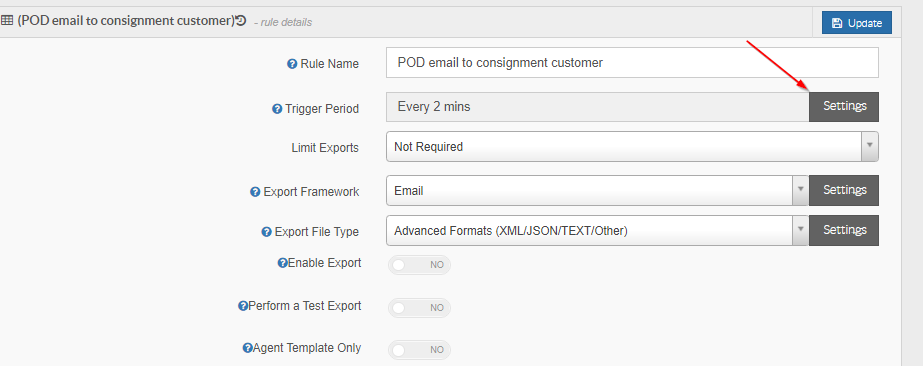
Trigger Period = This may come up blank initially, however, when the rule is enabled it will default to Every 2 mins if you don't make a selection for this field. This section is used to specify how often this EDI rule will run. If needed, you can click on the Settings button next to this field and can select when you want this rule to run:
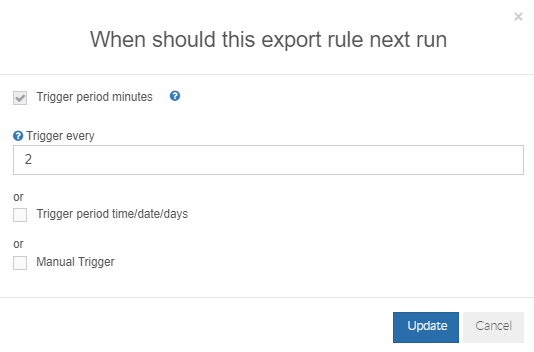
Select a time period and click the Update button to implement.
For this example though we are going to set as Every 2 mins; this essentially means any applicable POD data will be exported as soon as it becomes available.
Select a time period and click the Update button to implement.
For this example though we are going to set as Every 2 mins; this essentially means any applicable POD data will be exported as soon as it becomes available.
Limit Exports = This section can be used to specify whether this EDI rule should be triggered more than once for the same event. If needed, you can limit the number of times the same export will occur. For this example we are going to leave as Not Required.
Export Framework = This section is used to define how export data will be sent out of TransVirtual. For this example we will be using email. The Settings button next to this field can be used to customize the email that is sent with the export. Click the below button to customize:
You will then see a screen similar to the below:
The 3 toggles at the top of this window can be used to send the email to the consignment sender or receiver.
For this example we are going to send the email to a Customer Contact using the Send to Customer Contact Field:
The Customer Contact field is based on information from each customer card under the contact details tab:
For this example, we are going to use the General Customer Contact as our email recipient:
The Email To field should typically be used for internal staff unless the Data Filter for this EDI rule is limited a particular customer. Any emails listed in the Email To section will receive all emails generated by this EDI rule; so it is advisable that only internal staff emails be listed here. For this example we are going to leave this field blank as we are sending emails to a Customer Contact.
The Email Subject field can be used to create an Email Subject of your choosing. For this example we are going to use the below:

Note: @Model.ConsignmentNumber is a special coding function that will automatically populate the consignment number this EDI rule has applied to. Ensure that this code is spelt exactly as per the above for this to work.
From here, we are going to modify the Email Body:
We are going to use the below for our email body:
The Validate button at the bottom of the page can be used to preview what the email will look like. This button also validates any coding functions you have implemented and will advise if any errors.
Once the email body has been configured, click the Update button to implement these changes.
From here, we need to configure the Export File Type. This the type of file that will be sent with the email export. For this example we are going to send the POD image and POD signature. To do this, click the Settings button as per the below:
You will then see a screen similar to the below:
Toggle the above two settings to yes so that your screen looks like the below:
Click the Update button bottom-right to set this up.
At present, this export will send an xml file type with the email. For this example, we are only wanting to send the images and signatures for the relevant consignment PODs. To do this, change the export file type to None and then click Update to implement:
When the email is sent, it will now only contain the images and signatures as attachments; the settings you selected before will be remembered.
The next step from here is to enable the export using the Enable Export slider. Toggle to YES and click Update to activate this rule:
You will now see that your EDI rule is white in colour, indicating that it is currently active:
Related Articles
Proof of Delivery EDI Import
Proof of Delivery EDI Import In TransVirtual there is the ability to create EDI (Electronic Data Interchange) Import rules that allow you to upload PODs and attach them to a consignment. This process would typically be used where an outside system is ...Consignment Status EDI Export
Consignment Status EDI Export In TransVirtual there is the ability to create Consignment Status Export EDI (Electronic Data Interchange) rules that send out status update information about a consignment, to a location; via FTP, Email, etc. This page ...Consignment EDI Export
Consignment EDI Export In TransVirtual there is the ability to setup Consignment EDI (Electronic Data Interchange) Exports which are essentially a method of exporting data out from TransVirtual to another location; via email, FTP etc. This article ...Photo EDI Export
In TransVirtual there is the ability to setup Photo (Image) EDI (Electronic Data Interchange) Export Rules that can send out images/photos to a location via Email, FTP, etc. The page used to create these rules can be found under EDI > Data Export > ...Standard Consignment Process
This article will detail the standard process used from the point of consignment creation, up until consignment completion. If you are new to TransVirtual this article may help provide you with a better understanding of the best way to run your ...