Configure Printers in Transvirtual
Configure Printers in Transvirtual
Overview
Transvirtual supports two types of printing utilities, depending on where the print command originates.
1. Cloud Print Utility
Transvirtual is a cloud-based service, and desktop security permissions prevent its servers from printing directly to your local printers. The Cloud Print Utility runs silently in the background on your computer and periodically checks for pending print jobs, retrieving and sending them to your selected local printer. This allows Transvirtual's cloud servers to send print commands directly to printers on your local network. These printers are managed in Configuration > Lists and Zones > Printers.
Note: ensure you have permission to access the printer settings.
Use this for automated runsheets, manifests, and reports, and scheduled or triggered server-side printing.
2. Browser Print Utility
Allows your web browser to print documents automatically without user interaction.
Allows your web browser to print documents automatically without user interaction.
Use this for automated consignment labels and consignment notes, and high-volume consignment creation workflows.
Browser Print Utility Installation
Step 1: Download the Browser Print Utility
- Click your login name in the top right corner.
- Select Profile.
- Navigate to Printer Settings.
- Select and download the utility for your operating system.
Step 2: Install and Run the Utility
- Run the downloaded file.
- Complete the installation process.
- Refresh your browser page.
Step 3: Assign Printers
- Return to Profile > Printer Settings.
- Select a printer for consignment notes.
- Select a printer for labels.
- Save your settings.
The printer options may take 10-20 seconds to appear after installation. If prompted to reinstall, refresh your browser and wait for the utility to reload.
Note: if using this feature, ensure Adobe Acrobat is installed on your computer and set as the default PDF application. The Browser Print Utility is designed to use Adobe Acrobat as the default app to open PDFs. Other applications may work, but Transvirtual does not provide support to set up and troubleshoot them. Installing Adobe Acrobat and setting it as the default is recommended; you are often prompted to do so during installation, or you can set it from within Adobe Acrobat itself.
Step 4: Enable Automatic Printing
- Navigate to the consignment creation page.
- Use the sliders in the bottom right panel to enable consignment note printing and label printing.
- Create and save a consignment.
The selected documents print automatically without further interaction.
Cloud Print Utility Installation
Step 1: Download and Install the Transvirtual Printer Utility
- Click this download link. When the download completes, run the installer and follow the prompts.
- At the end of the installation, your default printer is added to the Transvirtual Printer Utility.
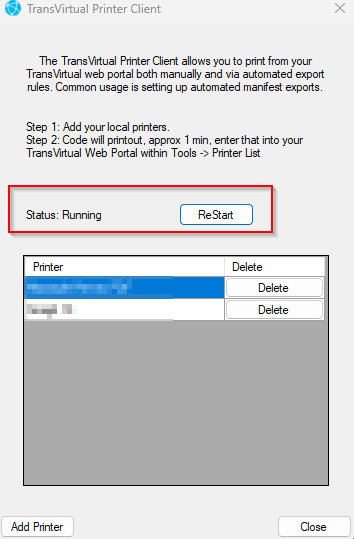
- Go to Start > All Programs > Transvirtual Print Client > Configuration and Status. You are presented with the following screen:
Step 2: Share Your Printer with Transvirtual
- Wait a minute after installation for a page to print out with a Transvirtual print code.
- In Transvirtual, go to Settings > Lists and Zones > Printer List.
- Click the Authorise Printer button.
- Enter the code from the printed "Transvirtual Printer Authorisation" sheet and click Submit.
- Your printer is now available throughout Transvirtual, and you can configure reports and other features to automatically print to it, provided the computer the software is installed on and the printer are both switched on.
Add Additional Printers
- In your Start menu, scroll to the "T" section, find "Transvirtual Print Client" and open the configuration and status screen.
- Select to add a printer and follow the prompts to select the correct printer.
- For this to update, select the Restart button next to the status.
Note: you must restart the utility after adding or removing printers. Use the restart button above the printer list on the Configuration and Status screen. - As stated in the pop-up, a code prints out. Enter that code in your Transvirtual account under Configuration > Lists and Zones > Printers.
- On this page, authorise the required printer by clicking the authorise button and entering the code that printed out.
Add Additional Printers Manually
To use more than one printer from the same computer, you need to make a change to a print server file.
- After installing the utility, find the
TransVirtualStorage.tdbfile in the Print Server folder. It can normally be found at:Local Disk (C:)/Program Data/TransVirtualPrintServer/TransVirtualStorage.tdb - Open this file using Notepad (right-click and select Open With). The file looks like this:
{'Printers':[{'PrinterName':'Canon MX920 series Printer WS','TransVirtualGuid':'abf1ecb1-dehd-4d25-a1d7-12dd94c6b5b2','PrinterEnabled':true},],'TransVirtualNumber':''} - To add another printer, edit the text to add another entry. Replicate everything within the braces for the existing printer:
{'Printers':[ {'PrinterName':'Canon MX920 series Printer WS','TransVirtualGuid':'abf1ecb1-dehd-4d25-a1d7-12dd94c6b5b2','PrinterEnabled':true} ],'TransVirtualNumber':''} - It should then look like this:
Note: the new printer name should be added exactly as it is represented on your PC, with the long alphanumeric string removed. The syntax of this file is critical; ensure there is a comma after the closing brace of the previous printer, and no comma at the end of the last printer.{'Printers':[ {'PrinterName':'Canon MX920 series Printer WS','TransVirtualGuid':'abf1ecb1-dehd-4d25-a1d7-12dd94c6b5b2','PrinterEnabled':true}, {'PrinterName':'Your new printer name','TransVirtualGuid':'','PrinterEnabled':true} ],'TransVirtualNumber':''} - Close the PrintServer utility using Task Manager, then re-launch it via the print server folder. The print dialogue box appears; select the new printer you want to add. Wait for the printout, then complete the authorisation steps above to finalise it.
Note: if your printer app needs restarting more than once throughout the day, you can use Task Scheduler or a similar program to have the printer app automatically restart when required. Typically, the printer app goes to sleep when the computer or location it is installed on is shut down or closed. Task Scheduler within Windows lets you create routine tasks for your computer, including having the Transvirtual printer app restart. This is possible to implement, but setup and configuration is done at your own discretion; Transvirtual is not able to assist with setting up Task Scheduler or a similar program for this purpose, as it falls outside Transvirtual's scope.
Automated POD Upload Using Printer App
Using the Transvirtual Printer app, you can set up a process where the app monitors a specific folder on a computer and automatically uploads any images in this folder to a designated POD import, which then assigns the image as a POD to a consignment.
- Ensure the Transvirtual Printer app is installed on the computer you want to set this up for (see the installation steps above).
- Modify the config file for the app. Find the file shown below on your computer.
This file is usually under a folder called TransVirtualPrintServer, located in a folder called ProgramData under the C drive. To find it, searchC:\ProgramDatain File Explorer.
The results display a folder called TransVirtualPrintServer.
Open this folder to find the file.
Right-click the file and select "Open with", then choose Notepad.
Select Notepad and click OK. The file looks similar to the below: - In this file, locate the section marked FTP Watchers, and insert the relevant code into this section, as shown below.
This part of the file lets you specify an FTP username and password that relate to an import rule in your account, and designate a folder on your computer as the nominated local path. The app monitors this local path and automatically uploads any image files that land in the folder to the FTP username and password specified, which relate to an import rule in your account. - Before this can work, ensure a POD import rule is set up in your account. Go to EDI > Data Import > POD and click Add New Import.
Give the rule an appropriate name and select "Transvirtual Hosted FTP Server" as the Import Framework. The rule is created in orange.
Set up the rule as follows:
Set the Import File Type to Image Only. Click Settings next to Import Framework, generate FTP details, then save/update:
This generates the FTP import details needed for this process:
Enable the rule and click Update once setup is complete: - Back in the app config file, add the username and password from the POD import rule you just set up, and nominate the folder where images for this process will be located. Using the example details above, your file should look similar to the below:
Note: the local path must be kept the same, and any images you want to upload as PODs must be stored in your nominated folder. To find the local path, right-click the address bar at the top of your documents page and copy the address:
Paste this into the file as shown above.
Important: the local path must have double backslashes between directories, and you do not need to specify the Transvirtual number or FTP URL: - Once configured, save the file to update it.
- Restart your printer app to test the setup: find the printer app, run as administrator, then click the restart button.
- Once restarted, move an image to your nominated folder:
Important things to note for any images you wish to upload: the file should be greyscale, 100-200 dpi, with only one file per scanned page; images must be separate and cannot be grouped in one file. As long as they are clear images similar to the example, there shouldn't be any issues.
After placing the image file into your nominated folder, an archive file creates automatically and your image file moves into it. This is a good sign:
Open and follow the sub-folders to find the new location of your images: - The app then works on moving the image into Transvirtual via the POD import rule you set up. Go to the Import History page (EDI > Other EDI Tools > Import History) to search for the POD rule you created:
The success count indicates the import was successful. Looking at the consignment, you can now see a POD attached, or multiple PODs if more than one was uploaded against it:
The consignment now has a Delivered status, since a POD has been uploaded via this process.
Important things to consider: this process relies on the printer app running constantly. It is strongly advised that any computer with the printer app installed is not turned off, as this causes the printer app to go to sleep. If the computer is shut down or powered off, the app needs to be restarted in the manner described above.
This process should also work with colour images, but it is advisable to use black and white (greyscale) images, as they are typically smaller files. This process does not cover how your images land in your local path folder, as there are many possibilities and each setup varies. As long as you have a process in place to ensure images land in the nominated folder, this process works correctly. A common option is to scan your PODs with a multi-function printer and have it send or save them to your computer, or to get PODs from agents by email. Move these images to your nominated folder to use the process.
Common Issues & Troubleshooting
Cloud Print Utility
There may be times when the above doesn't quite work as expected. Below are some of the more commonly seen issues, with suggestions on how to resolve them.
Issue: the printer authorisation code is not printing.
Resolution: if you have downloaded the printer app and the authorisation code for a printer you are attempting to set up has not printed out, you can find it under C Drive > Program Data > TransvirtualPrintServer > Temp in File Explorer. This is a hidden folder, so type
Resolution: if you have downloaded the printer app and the authorisation code for a printer you are attempting to set up has not printed out, you can find it under C Drive > Program Data > TransvirtualPrintServer > Temp in File Explorer. This is a hidden folder, so type
C:\ProgramData into the search bar at the top to locate the correct folder, then look for the relevant print job containing the authorisation code. Failing this, you should be able to rename the printer itself from within the printer settings on your computer, then add it again to the app as if it were a new printer. This effectively resets the process.Issue: the printer app needs to be restarted.
Resolution: navigate to Start > All Programs > Transvirtual Print Client > Configuration and Status, or search for Configuration and Status in your apps. Right-click the app and select Run as Administrator; Windows prompts you to allow the app administrator privileges.
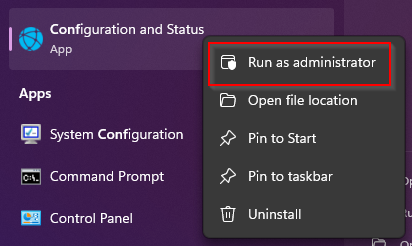
Ensure the app is running and select Restart; if the status is Not Running, select Start.
Within a few minutes, your printer should begin working again.
Resolution: navigate to Start > All Programs > Transvirtual Print Client > Configuration and Status, or search for Configuration and Status in your apps. Right-click the app and select Run as Administrator; Windows prompts you to allow the app administrator privileges.
Ensure the app is running and select Restart; if the status is Not Running, select Start.
Within a few minutes, your printer should begin working again.