PDF/Excel Reports
PDF/Excel Reports
Overview
TransVirtual offers a series of default reports that can be used to extract valuable information from your account. These reports offer information on things like costs, profit/loss, driver job activity, amongst other things.
The below runs through the reports on offer and will provide an explanation on what each does.
The below runs through the reports on offer and will provide an explanation on what each does.
Accrual Costs
This report will display consignment prices that are either not on an invoice, or the invoice is dated later than the report run date, i.e., if you run the report on the 30th and the invoice is for the 31st, then any applicable consignments will be displayed on this report. This report is for Agent prices.
Accrual Sales
This report will display consignment prices that are either not on an invoice, or the invoice is dated later than the report run date; if you run the report on the 30th and the invoice is for the 31st, then any applicable consignments will be displayed on this report. This report is for Customer Prices.
Agent Daily Min Progress Cost
This report provides figures on agent invoices and associated costs. The report shows the average daily cost associated with an agent and also provides target $ and % values pertinent to each agent.
This report provides figures on agent invoices and associated costs. The report shows the average daily cost associated with an agent and also provides target $ and % values pertinent to each agent.
Completed Load Volumes by Drivers
High-level overview of the number of consignments (and associated drops) a driver has delivered over a set period of time (does not include pickups). This report also provides an average for these values.
Completed Load Volumes by Suburb
High-level overview of the number of consignments that have been delivered in each suburb over a set period of time. This report also provides an average for these values.
Completed Load Volumes by Zone
High-level overview of the number of consignments that have been delivered in each zone over a set period of time. This report also provides an average for these values.
High-level overview of the number of consignments that have been delivered in each zone over a set period of time. This report also provides an average for these values.
Consignment Held
This report provides a list of consignments that have a status of held within the specified date range. Useful for identifying any held consignments that may need actioning.
This report provides a list of consignments that have a status of held within the specified date range. Useful for identifying any held consignments that may need actioning.
Consignment POD Capture
This report provides a list of drivers/users and details how many SOG (sign on glass) PODs they acquired and also how many paper PODs they acquired for a given date range. The report also calculates the % SOG POD that each user obtained over the specified date range.
This report provides a list of drivers/users and details how many SOG (sign on glass) PODs they acquired and also how many paper PODs they acquired for a given date range. The report also calculates the % SOG POD that each user obtained over the specified date range.
Consignment ReDelivery
This report shows consignments that have had a failed first delivery attempt and a re-delivery date has been entered. The report will not show consignments that are On for Delivery, Assigned or have been completed - it will show consignments where a ReDelivery date has been requested and only for consignments that are yet to be actioned.
This report shows consignments that have had a failed first delivery attempt and a re-delivery date has been entered. The report will not show consignments that are On for Delivery, Assigned or have been completed - it will show consignments where a ReDelivery date has been requested and only for consignments that are yet to be actioned.
Customer Service Tickets
This report will display all Customer Service tickets in your account over a set period of time except those that have been deleted/raised in error; all active tickets will be displayed.
Customer Service Tickets Outstanding
Similar to the Customer Service Tickets report; this report shows outstanding Customer Service tickets for a set period of time. Useful to see what requires actioning. This report is a bit more specific than the Customer Service tickets Report and will not show any tickets that are resolved/closed in any way.
Similar to the Customer Service Tickets report; this report shows outstanding Customer Service tickets for a set period of time. Useful to see what requires actioning. This report is a bit more specific than the Customer Service tickets Report and will not show any tickets that are resolved/closed in any way.
Delivered InFull OnTime (DIFOT)
This report provides a break-down of consignments within the specified date-range, and details what % where delivered on time in full. Useful for KPI reporting and identifying where improvements can be made in the business. The report works on ETAs and compares whether consignments were delivered before or after the ETA for each connote. Only applies to connotes with a status of Delivered or Completed.
Depot In Scans (Delivery Zone)
This report shows how many consignments got Depot In scanned and what delivery zone they were scanned under. Useful to identify where improvements in scanning can be made - maybe there's a depot in one of the zones and that zone has no scanning data at all etc.
Depot In Scans (Pickup Zone)
This report shows how many consignments got Depot In scanned and what pickup zone they were scanned under. Useful to identify where improvements in scanning can be made - maybe there's a depot in one of the zones and that zone has no scanning data at all etc.
This report shows how many consignments got Depot In scanned and what pickup zone they were scanned under. Useful to identify where improvements in scanning can be made - maybe there's a depot in one of the zones and that zone has no scanning data at all etc.
Driver KPI Activity
This report provides a high-level overview of what each driver has done for a day including login/logout times and number of jobs/consignments they have on for the day.
This report provides a high-level overview of what each driver has done for a day including login/logout times and number of jobs/consignments they have on for the day.
Equipment Transaction Summary
This report provides an overview of equipment transactions that have occurred in your account for the specified date range. This report will not function unless the equipment module is enabled and working in your account.
Form Anytime by User
This report shows forms that have been completed by users and will display forms that have the trigger set to be anytime. This requires the forms module to work.
Form Anytime by Vehicle
This report shows completed forms and what vehicles they have been linked to. Forms that have been set to an anytime trigger will be displayed. This requires the forms module to work.
Form Force by User
Form Force by User
This report shows forms that a user has completed where the trigger has been set to an event such as Login to Device. This requires the forms module to work.
Form Force by Vehicle
This report shows completed forms and what vehicles they have been linked to, where the trigger has been set to an event such as Login to Device. This requires the forms module to work.
Freight Volume Data
This report provides a high-level overview of the number of consignments per customer in your account over a set period of time. This report provides consignment count, item count and also shows weight and cubic amounts.
Invoice Agent Summary
This report provides an overview of Agent (RCTI) invoices in your account and shows the invoice number and agent name for the invoice as well as the status of the invoice and how much it was for. The report will display invoices that fall in the given date range.
Invoice Agent Summary
This report provides an overview of Agent (RCTI) invoices in your account and shows the invoice number and agent name for the invoice as well as the status of the invoice and how much it was for. The report will display invoices that fall in the given date range.
Invoice Sales Breakdown
Based on Invoice date
Based on Invoice date
Provides a breakdown of Approved and Locked invoices over a given period of time. This report will show total Base Price across all invoices, total Additional Service price across all invoices, total Levy price across all invoices and total tax price across all invoices that have been approved and locked in the set date range.
Invoice Sales Summary
This report is very similar to the Invoice Agent Summary report, but this report shows customer invoice data. Used to provide a high-level overview of customer invoices over a set date range; this data will include customer name and invoice total price.
Job activity By Driver
This report shows jobs picked up or delivered by a driver; jobs with Proof of Pickup or Proof of Delivery (for the set date range).
Linehaul Cost
This report will provide the Linehaul costs present in your account for the given date range. Linehaul costs are derived from Linehaul manifests; you might pay an agent to do the Linehaul leg for you.
This report will provide the Linehaul costs present in your account for the given date range. Linehaul costs are derived from Linehaul manifests; you might pay an agent to do the Linehaul leg for you.
Missing Scans
This report lists consignments, dated within your selected date range, that are not delivered and have missing scans. Missing scans can refer to any scan type.
Outstanding Pickups
This report shows any consignments that are currently in a pickup state in your account, that do not have a POP (proof of pickup) for the given date range.
This report shows any consignments that are currently in a pickup state in your account, that do not have a POP (proof of pickup) for the given date range.
Outstanding PODs
This report shows any consignments that are currently in a delivery state in your account, that do not have a POD, for the given date range. Excludes connotes with a status of Delivered or Completed or Cancelled.
This report shows any consignments that are currently in a delivery state in your account, that do not have a POD, for the given date range. Excludes connotes with a status of Delivered or Completed or Cancelled.
Profit/Loss By Customer and FreightType
This report provides details on how many consignments a customer has created in your account, consignment details such as weight and dimensions, the average price per item and the profit made - all for the given date range. This report also importantly details this information per freight item so that you can identify whether (for example) pallets or cartons make you more money. A handy report for financial monitoring.
It is important to note that this type of report is NOT a live report. This means that the data for this report updates periodically throughout the day.
This type of report is one that should be run for past data; for example, you may run this weekly on a Monday night but the date range you set for this will be for last week (Monday to Friday). Doing this then provides accurate information as it allows the report time to update.
A live report is one that you run and get current data at the time you run it.
These reports are not live because the background calculations are complex and require time to process and correctly populate and update the reports.
Profit/Loss By Zone and FreightType
This report provides details on how many consignments have been created for each zone in your account, consignment details such as weight and dimensions, the average price per item and the profit made - all for the given date range. This report also importantly details this information per freight item so that you can identify whether (for example) pallets or cartons make you more money. A handy report for financial monitoring.
It is important to note that this type of report is NOT a live report. This means that the data for this report updates periodically throughout the day.
This type of report is one that should be run for past data; for example, you may run this weekly on a Monday night but the date range you set for this will be for last week (Monday to Friday). Doing this then provides accurate information as it allows the report time to update.
A live report is one that you run and get current data at the time you run it.
These reports are not live because the background calculations are complex and require time to process and correctly populate and update the reports.
This type of report is one that should be run for past data; for example, you may run this weekly on a Monday night but the date range you set for this will be for last week (Monday to Friday). Doing this then provides accurate information as it allows the report time to update.
A live report is one that you run and get current data at the time you run it.
These reports are not live because the background calculations are complex and require time to process and correctly populate and update the reports.
Sales Invoice Totals by Week
This report is based on Invoice date and Invoice Net totals and will detail the total for customer invoices per week. This report will only display for Approved and Locked invoices.
This report is based on Invoice date and Invoice Net totals and will detail the total for customer invoices per week. This report will only display for Approved and Locked invoices.
Sales by Week
This report shows total sales made per customer. Displayed at a consignment level and based on consignment date.
How to Run a Report and Modify the Report Parameters
You can see each report by clicking on the Reports > Operation Tasks > PDF/Excel Reports, and can be add or update information for different customers, zones, dates etc. This is achieved by making changes to the Settings/Parameters of a report as shown below.
1. To see a report, simply click on the applicable report from the list, the detail of the selected report will display on the right side of the page, by default the setting tab will open as shown above.
2. Now on report detail page, you can update the following detail as describe below.
a. Report Rule Name: The name of the report. It is recommended to leave the system reports as they are currently name, but if needed, the name can be changed.
a. Report Rule Name: The name of the report. It is recommended to leave the system reports as they are currently name, but if needed, the name can be changed.
b. Export Framework: This is used if you want this report to be automatically run and sent at certain times of the day/week, etc. The export framework tells the system by which the report will be sent. Email is the most commonly used option here and useful to send reports to specified emails.
i. On Export framework if you want to change the setting (if choosing email) then click on the Settings button to configure the email that is being sent. The Settings tab can be used to specify when the report will auto-run, what file will be sent and how the file will be sent. When you click on setting button, a pop-up for Edit Email setting will display as shown below.
ii. Here, you can specify the Email Account being used to send these outgoing emails (this requires SMTP setup); you can specify the Email To (who should receive the email), the Email Subject (subject of the email-should be related to the report being sent), and the Email Body (any descriptions or text you wish to add to the email). Once the email settings have been configured, click on Update button to save the changes.
c. Select File Type: This is the file type that will be exported when the report is automatically sent/generated or when run manually. Select the appropriate type of file with the help of drop-down button. d. Next Run Time: This is used when you wish to have this report generated and exported automatically at specified times or dates. If you want, you can update the setting of Run Next Time by clicking on the Settings button, a popup will display as sown below.
i. On When should this report be created and sent out screen, update the times of days and days you wish this report to auto-run. Once you completed the changes click on the Update button to save the changes.
e. Enable Rule: If you wish for the report to be automatically sent at your specified times, you will need to enable the report, which will activate and start the process. To do thisd click on toggle in Yes position and then click on the Update button to save the changes.
3. At the bottom of the settings tab, you can see or download the report, to do this click on View report button, the report will be downloaded automatically.
3. At the bottom of the settings tab, you can see or download the report, to do this click on View report button, the report will be downloaded automatically.

1. The file produced will be in the format of what has been specified in the Select File Type field.
2. In the other corner, you can select a date range to run the report over which will override the date range set in the Parameters tab at the top.
2. In the other corner, you can select a date range to run the report over which will override the date range set in the Parameters tab at the top.
4. If you click on the Parameters tab you can see/update the Templates and dates, Include/Exclude Rules describe as below.
i. By default, the Templates and Dates tab will come on screen, here you can define what Report Template to Use (if there is more than one that is applicable) and will also allow you to specify the Date Range that the report will run for with the help of drop-down button as shown below.
ii. Now click on Include Rules tab, this will allow you to specify what Customers, Zones or Agents you want the report to display information as shown below.
If the fields are blank, the report will simply display ALL relevant information, regardless of Customer, Zone or Agent.
iii. To select a value in each field, click the white text box and then search and click the correct value.
If a value is added incorrectly then click on the 'x' to remove from the list.
iv. Click on the Exclude rules, this tab specifies what Customer, Zones or Agents you do NOT want to generate information for in the report as shown below.
If the fields are blank, the report will simply display ALL relevant information, regardless of Customer, Zone or Agent.
v. If you need to add values to these fields, simply click and add the value in the same manner as explained above.

Keep in mind that whatever is listed in this tab; that Customer/Zone/Agent information will NOT display in the report.
Favourites
In TransVirtual you have the ability to create a favourites list in the PDF/Excel Reports page.
1. To do this, on PDF/Excel report page, you will see a list of your PDF/Excel Reports.
Report/Rules that are coloured orange are currently in-active. You can toggle them on-should you wish-by clicking the appropriate report/rule and then toggling Enable Rule to ON over on the right-hand side.
2. Clicking on a Report/Rule on the left will show you the details of the selected Report/Rule on the right-hand side. You will also notice that there is a little star icon next to the Report name as shown below.
3. Clicking this star on the right side will add the current report to your favourites list. The star will then turn in White, and you will notice on the left side, that a star appears next to where it says Fixed Report List as shown below.
4. If you click on the star on the left side (next to Fixed Report List) you will be presented with a list of your current favourites list as shown below.
5. You can add more favourites by clicking on the star on the right-hand side next to the name of each report-after clicking on the appropriate one from the list on the left. You can also de-select a report by clicking on the star on the right-hand side again; you will notice that it goes from being black to being white/clear indicating it is no longer a favourite.
Note: The star on the left-hand side next to where it says Fixed Report List will only appear once you have at least one favourite in your favourites list. If you do not have any favourites selected you will not see the star icon on the left-hand side. You will instead see a little grid icon as per below:
Duplicating an Existing Report
1. If required, there is the ability to Copy or create another version of an existing system report.
2. This functionality is useful if there is a report that you need to limit to one customer only, but you want to get separate reports for all of your required customers in addition to having the data automatically email to yourself or internal staff.
2. This functionality is useful if there is a report that you need to limit to one customer only, but you want to get separate reports for all of your required customers in addition to having the data automatically email to yourself or internal staff.
3. This scenario or use case would require the same base report be replicated and then the parameters for each copy be unique per your requirements (such as only this customer etc).
Duplicating reports is handy if you need the same report for multiple/different parameter sets!
How to Create a Fixed Report
1. Replicating an existing report is quite simple. To do so, click on the New Fixed Report button as shown below.
2. A popup for create new fixed report will display as shown below.
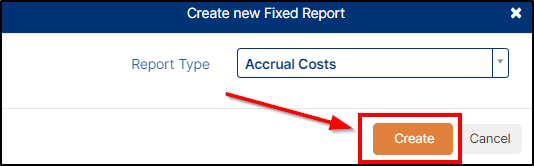
3. Now, select the report type you wish to duplicate with the help of drop-down button and then click on Create button to add the report, a new report will reflect in your reports list as shown below.
3. Now, select the report type you wish to duplicate with the help of drop-down button and then click on Create button to add the report, a new report will reflect in your reports list as shown below.
4. You can now set the parameters and settings for this report uniquely to the other report/reports of the same type.
It is advisable to amend the report name according to the parameters you set, e.g. if a report is for customer 'A' appending this to the end of the report name would help with more easily identifying what each report has been setup for.

This copy functionality can be repeated for as many reports as required and be sure to check the setup and ensure all configured as required.