Invoice EDI Export
Invoice Export Setup
In TransVirtual you can setup an EDI (Electronic Data Interchange) that automatically sends PDF, Excel, CSV (etc.) Invoice files to a Customer or Agent, based on specific situations. So, when an Invoice is Approved and Locked you can have an email (for example) send to a customer email address. This process is also possible via FTP, etc; however email is the simplest method of setup and this is what this article will show you how to do.

This requires the Finance module as that is the only way Invoices can be generated.
Setup
Start by navigating to EDI > Data Export > Invoices.
Once you arrive on this screen, click New Rule to begin your setup.
Type in the Rule Name and select the export framework you want to use; email, etc. For this example we are using email.
Click Create and you will then see your newly created rule appear on the left-highlighted in orange.
Click on your rule, and you will see the settings for it appear on the right.
You now need to setup who this will email to and the Export File Type (what is sent; so PDF or CSV etc). Click on the Settings for the Export Framework.
Once you do this you can choose who this emails to, and you can also add the Subject and Email body which will be sent with the email.
In the 'Send to Customer Contact' or the 'Send to Assigned Agent Contact' fields you can select a contact to email this information to. If you choose Accounts Payable for the Customer Contact, for example, this would email to the email address listed under Accounts Payable in the related Customer Card:
This information is found by going to Home > Card Files > Customer List OR Agent/Supplier List and then double-clicking into the appropriate Customer/Agent card.
You can also type in any email address you wish into the 'Email To' field. This email also receives this file. The 'Email Subject' field will be the subject of the email received by the contacts.
You can also add in text to the body part of the settings. This message will be displayed to the email recipient.
The Email Body (HTML) tab allows you to manipulate HTML code for the email body; this is more advanced setup and is not covered in this example.
Once you have set the Export Framework Settings, you need to set the Export File Type.
Basic/CSV export File type sends the email recipient this CSV file type. If you wish to send the customer this type of file only, select this from the list and then click update at the top.
Click on Settings beside the file type to select the CSV file fields to be sent in this email, from this screen using the 'Data to Export' field at the bottom.
Click in this field and you will be presented with a list of possible fields to include in the sending file.
From here tick the send PDF report button to include a PDF report in the email information.
If you wish to ONLY send a PDF report you need to select Basic CSV/Excel, click settings, tick send PDF report, save changes and then from the Export File Type drop-down list select 'None' and Update using the button at the top. The only way to access the setting to turn on the PDF report is through the Basic CSV/Excel settings first and then changing the Export File Type to 'None' afterwards-this to ONLY send a PDF (no Basic CSV/Excel). Selecting Basic CSV/Excel will send this file AND the PDF report-if you have both enabled.
12. Once you have these settings complete, ensure you click Update to save.
13. From here, if needed, you can change the Trigger Period to be whatever you wish; however 'Every 2 mins' is a good default to have as the system will send any information across when it is available.
14. The next important thing to do is to outline when this EDI rule will trigger on an Invoice; what conditions does the Invoice information need to meet to be ready for sending. To do this we are going to use the data filter at the bottom of the page.
Ideally, you only want Invoice information to send to someone when an Invoice has been Approved and Locked. This is because, generally, the Invoice has been checked by human eyes and this means all the prices are correct; there should be no discrepancies/issues.
So, to setup for this EDI to trigger on an Invoice when an Invoice has been Approved and Locked, you need to use the drop down menu at the very bottom to enter in this logic.
Select Invoice State. Then click Next down the bottom.
Select Equal. Click Next.
Select ApprovedLocked. Click Add Rule.
15. You will then see this logic in the data filter.
16. The last thing you need to do is to enable this rule.
17. This rule will now appear in white on the left; indicating it is now active.
Sending to an Accounts Package
In a similar method to the above, you have the ability to setup EDI export rules to send your invoice data across to your linked Accounts Package.
To do this, navigate to EDI > Data Export > Invoices OR Import/Export > Data Export > Invoices and then click on New Rule when you arrive here:

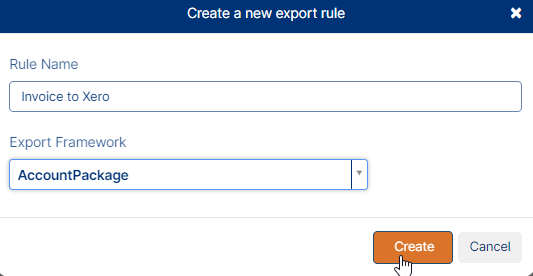
You will then be presented with a pop-up where you can enter the name of the new rule - it is advised to name the rule according to what it will do.
An example could be:
An example could be:
Set the Export Framework to be AccountPackage, then click Create.
Your rule will then appear in orange in the list on the left.
Click on it then amend the settings for it on the right-hand side, starting with the data filter at the bottom of the page:
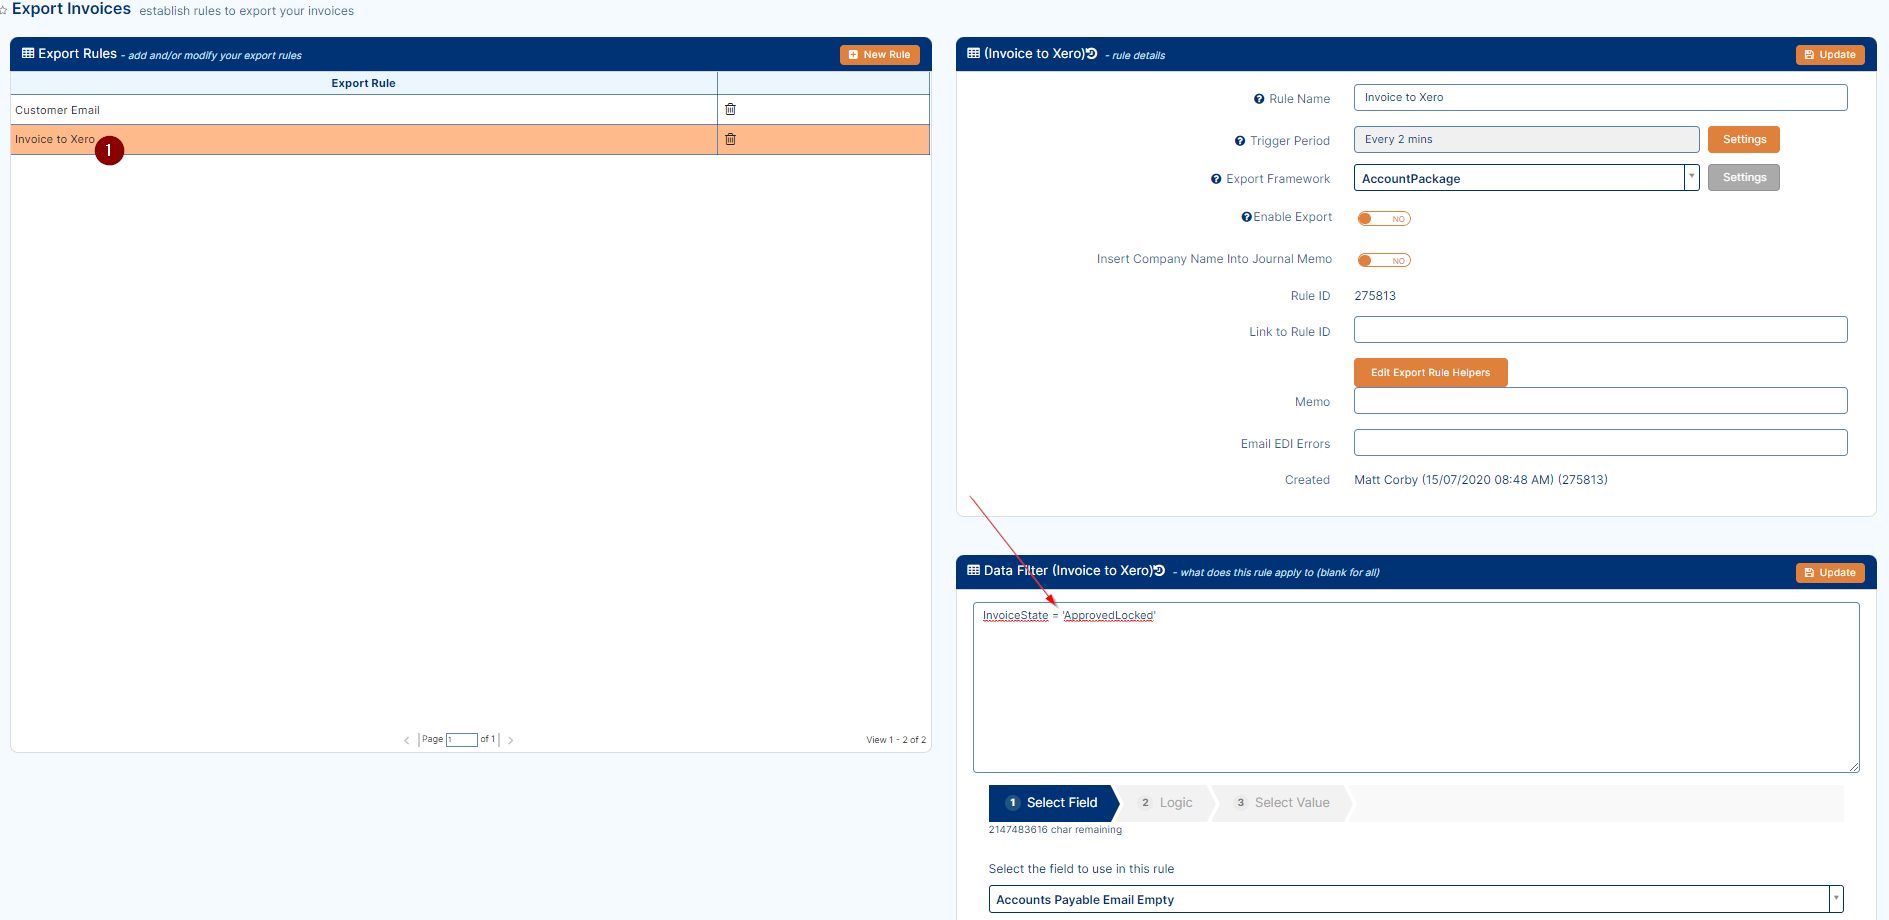
The data filter should appear as per the above.
To change to this use the builder at the bottom of the data filter and select Invoice State from step 1, click Next.
Select Equal from Step 2, click Next.
Select ApprovedLocked from Step 3 and click Add Rule.
This then populates the data filter with the text/logic seen in the above image - this particular logic means that the rule will only apply to any invoices that get locked and approved; at which point these will flag to be sent across to your Accounts Package.
Your rule will then appear in orange in the list on the left.
Click on it then amend the settings for it on the right-hand side, starting with the data filter at the bottom of the page:
The data filter should appear as per the above.
To change to this use the builder at the bottom of the data filter and select Invoice State from step 1, click Next.
Select Equal from Step 2, click Next.
Select ApprovedLocked from Step 3 and click Add Rule.
This then populates the data filter with the text/logic seen in the above image - this particular logic means that the rule will only apply to any invoices that get locked and approved; at which point these will flag to be sent across to your Accounts Package.

The rest of the settings are okay to leave as is - just need to enable the rule and turn on the rule!
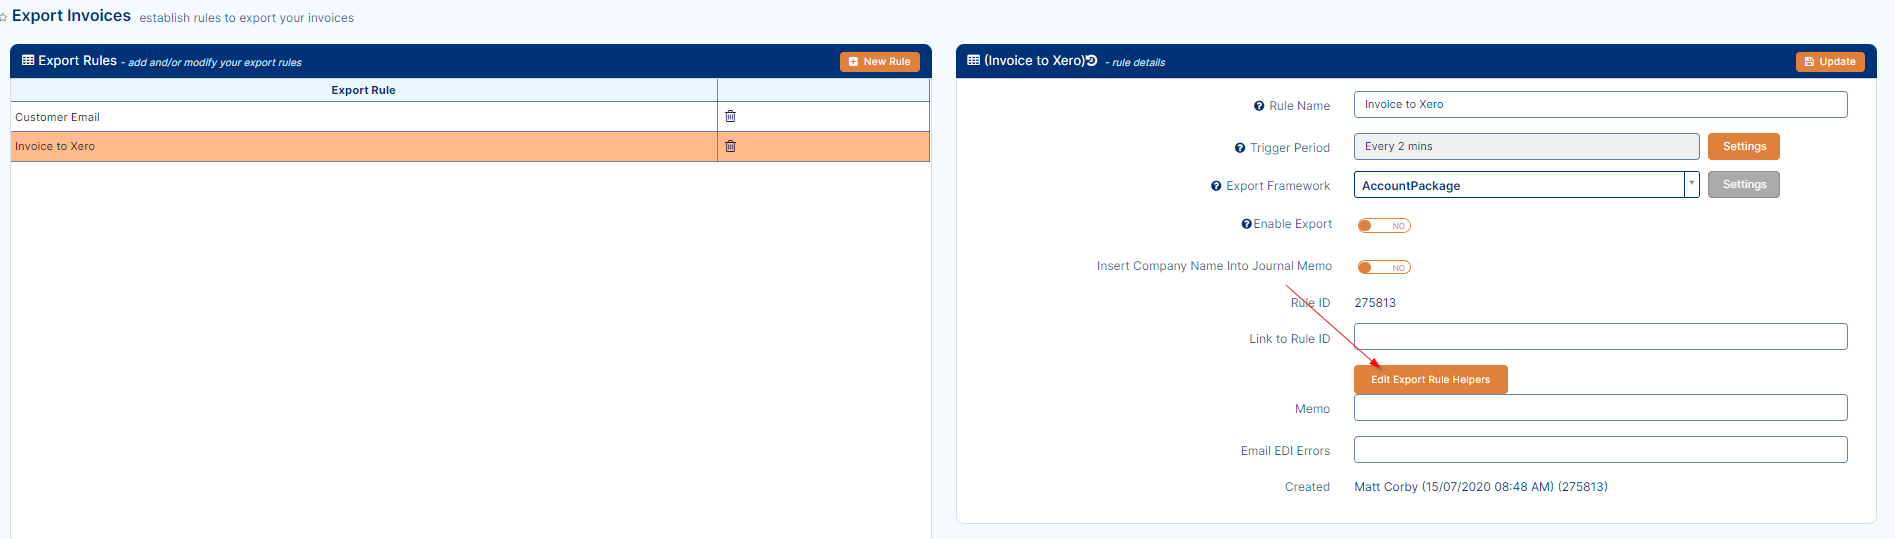
Edit Export Rule Helpers
If needed, you have the ability to extend on your EDI rule setup to send to your linked Accounts Package to be able to further split up and nominate what invoice information should be sent to what code in your Accounts Package.
This is done using this button:
This is done using this button:
Clicking on this button you will see a screen like the below:

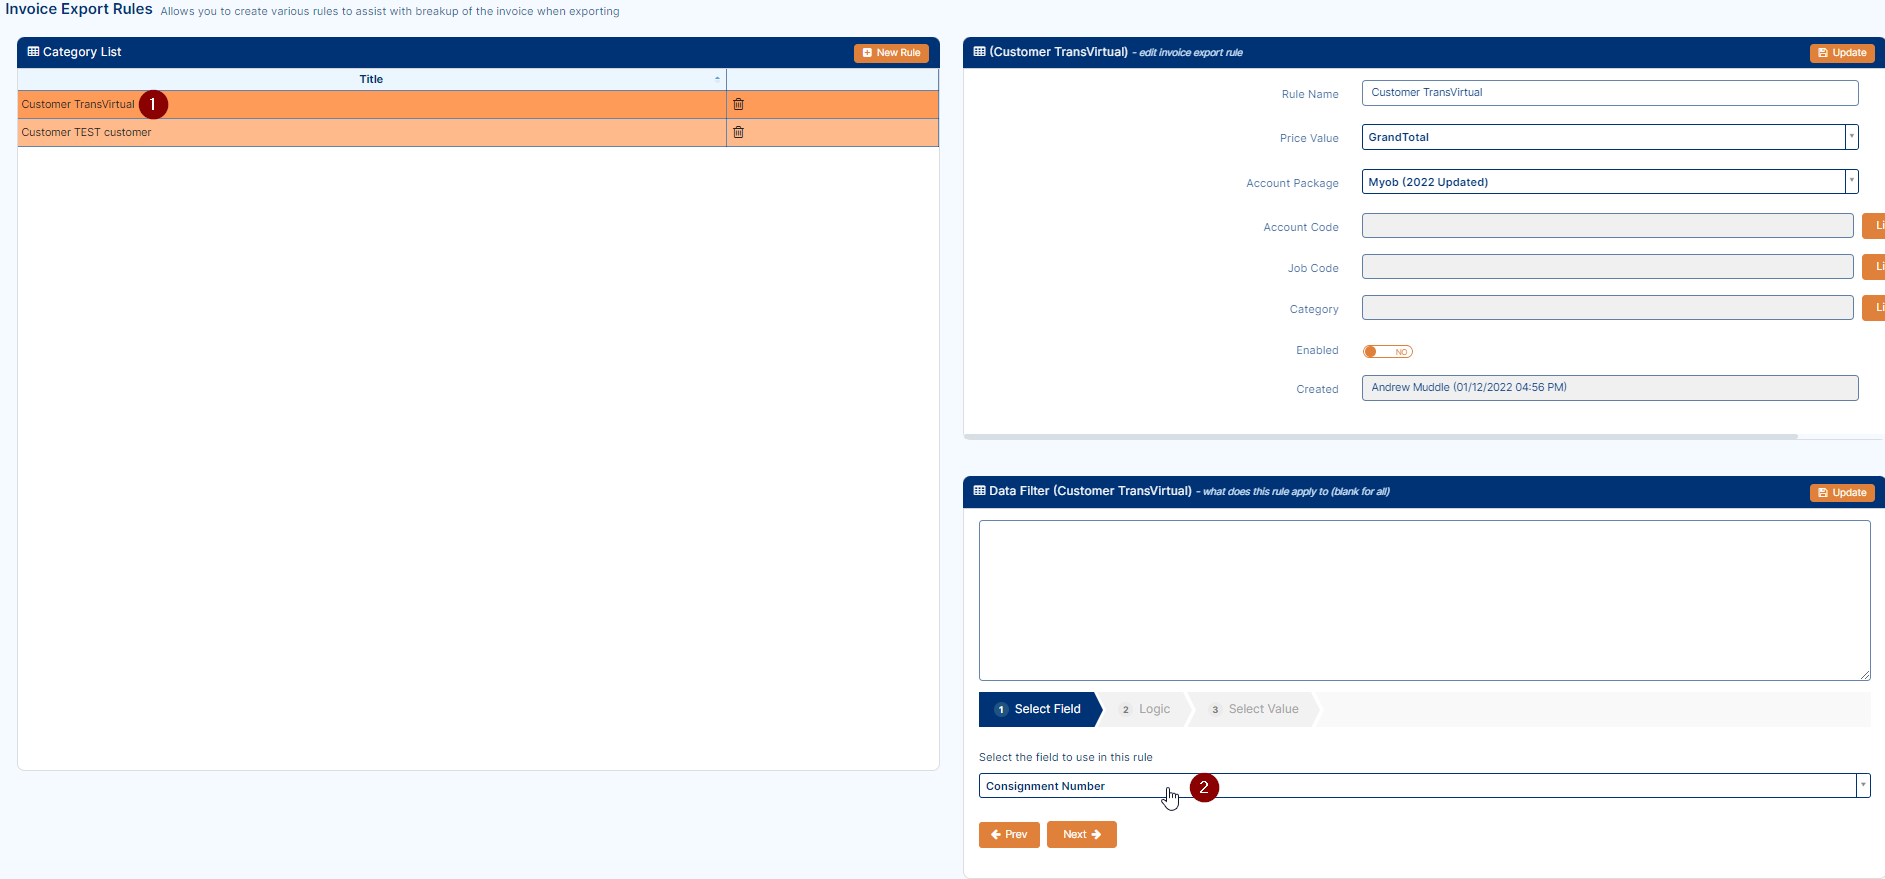
Click New Rule and you will then have the option to name your new rule - name according to what it will be used for.
For this example we are going to create two rules; one for a customer called TransVirtual and the other for a customer called TEST customer - the purpose of these rules is that we are going to send their invoice data to account codes different to the default listed against the Income Link for our linked Accounts Package:
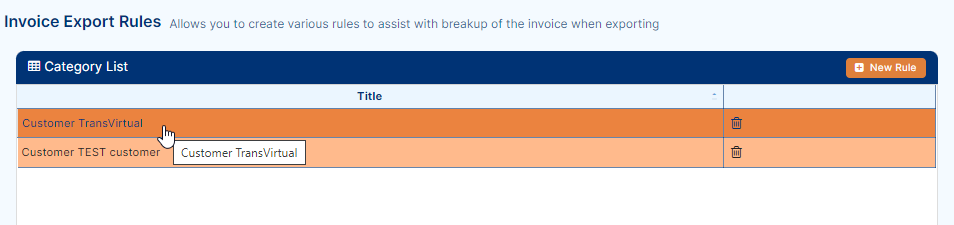
For this example we are going to create two rules; one for a customer called TransVirtual and the other for a customer called TEST customer - the purpose of these rules is that we are going to send their invoice data to account codes different to the default listed against the Income Link for our linked Accounts Package:
Once created, click on the rule on the left - our example will start with the top line for customer TransVirtual.
The settings for the clicked rule will appear on the right-hand side and will need to be amended, starting with the data filter at the bottom of the page:
The settings for the clicked rule will appear on the right-hand side and will need to be amended, starting with the data filter at the bottom of the page:
Using the data filter builder, we are going to select Customer Name from step 1, Equal from step 2 and then type the customer name TransVirtual exactly as it is listed in your account. Click Add Rule and you will then see that the data filter now has text/logic populated:
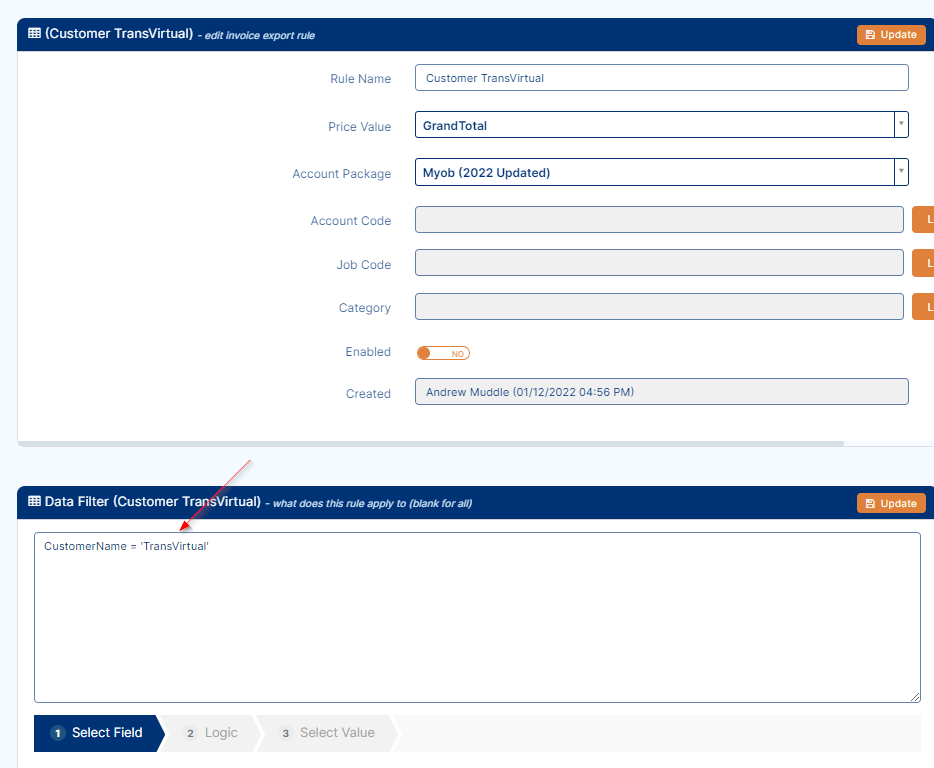
At present, this rule will only apply to invoices where the customer name is TransVirtual - which is what we are after for this example.
From here, we will amend the settings at the top to complete this setup:
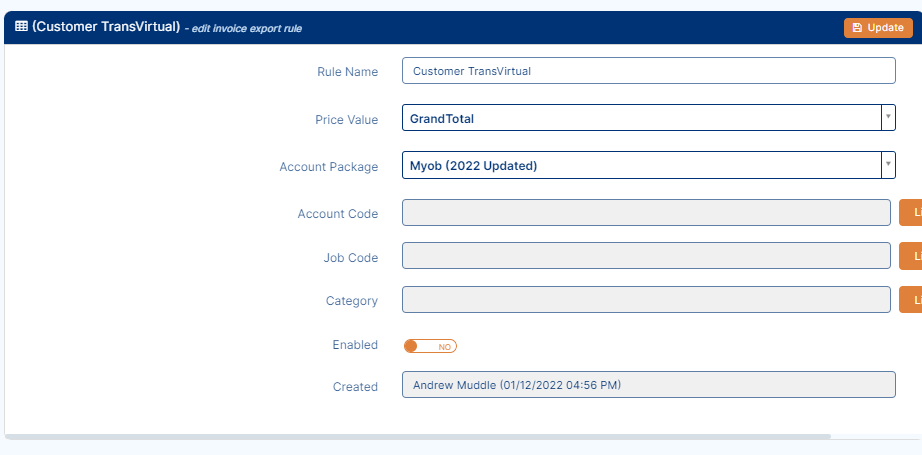
Rule Name = Setup when the rule was created. Can be changed if needed but should reflect what the rule will do.
At present, this rule will only apply to invoices where the customer name is TransVirtual - which is what we are after for this example.
From here, we will amend the settings at the top to complete this setup:
Rule Name = Setup when the rule was created. Can be changed if needed but should reflect what the rule will do.
Price Value = This is what information will be sent to the nominated Account Code, Job Code and Category.
For this example we will set as Grand Total which means the Grand Total invoice amount will be sent to the listed Account Code, Job Code and Category.
Account Code = The Account Code you wish to send the Price Value to; where you wish to send this data to in your linked Accounts Package.
For this example we will set as Grand Total which means the Grand Total invoice amount will be sent to the listed Account Code, Job Code and Category.
Account Code = The Account Code you wish to send the Price Value to; where you wish to send this data to in your linked Accounts Package.
Job Code = The Job Code you wish to send the Price Value to; where you wish to send this data to in your linked Accounts Package.
Category = Category you wish to send the Price Value to; where you wish to send this data to in your linked Accounts Package.
This example will be changed like the below:
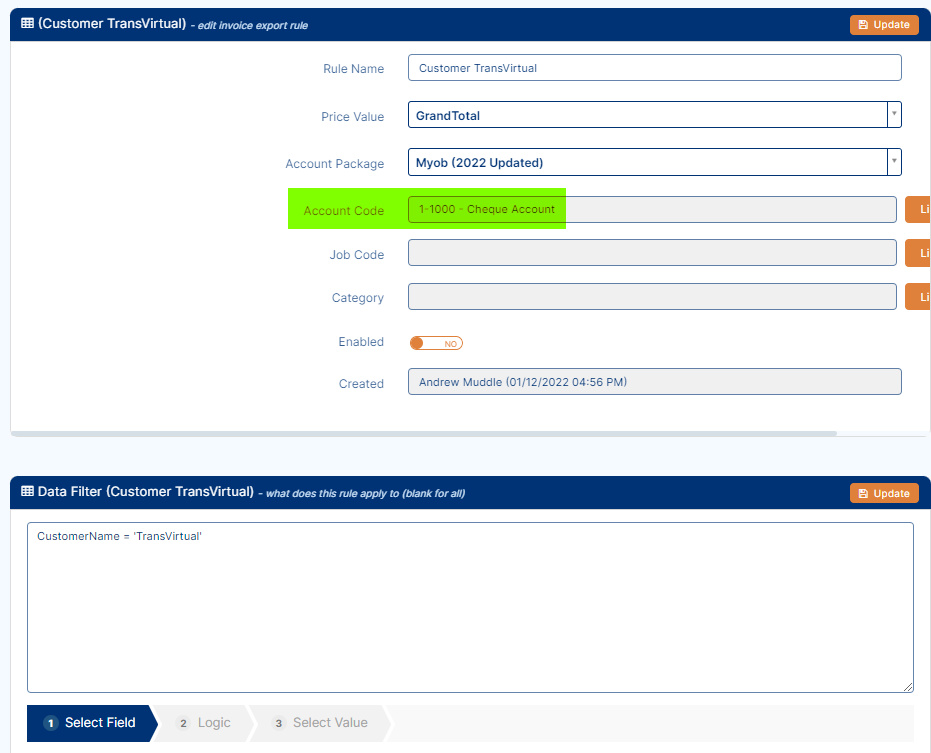
To summarize, when invoices for customer TransVirtual are approved and locked in this account, we are going to have the Grand Total price of the invoice send to the Account Code listed against this rule. This Account Code is different to the default listed against the Accounts Package.
We would then repeat the same process for the other rule for customer TEST customer, but instead of sending to Account Code 1-1000, the invoice data will be sent to another code in the Accounts Package.
We would then repeat the same process for the other rule for customer TEST customer, but instead of sending to Account Code 1-1000, the invoice data will be sent to another code in the Accounts Package.
This is just a basic example of what can potentially be setup here.
There are many possibilities available here such as sending all Fuel Levies to a nominated Account Code or sending Tax only to a nominated Account Code.
Any changes made or setups implemented should be thoroughly checked and tested to ensure all works as expected!
There are many possibilities available here such as sending all Fuel Levies to a nominated Account Code or sending Tax only to a nominated Account Code.
Any changes made or setups implemented should be thoroughly checked and tested to ensure all works as expected!
Extra Information
It is possible to setup EDI Invoice rules and have them send via means other than email. These are generally more complicated and require more advanced knowledge.
It is also possible to have other criteria/conditions in your data filter. The logic in the above example is the most basic, and is a good default setup. If you wanted to only send this information to one Customer, you could also add logic into the data filter that says when the Invoice is Approved and Locked and the Customer name is 'X', send this information to this email address. There are many possibilities for EDI setups.
Note: The setup for an agent invoice EDI export is much the same as the above with the main differences being where the email is sent and what information is sent with the csv or export file. Please keep in mind that if exporting pricing to an agent, make sure you check you are NOT sending customer prices instead of supplier/agent pricing UNLESS that is what is required.
Please also consider the data filter for this setup if required and also ensure that all necessary testing is performed where possible before the rule is implemented.
Please also consider the data filter for this setup if required and also ensure that all necessary testing is performed where possible before the rule is implemented.
Error messages
There may be times when you get an error when trying to send data across to an accounting package (such as Xero, MYOB).
If this occurs, it could be due to an error/configuration issue from the accounting package end or from within your TransVirtual account.
Typical issues that could arise include:
If this occurs, it could be due to an error/configuration issue from the accounting package end or from within your TransVirtual account.
Typical issues that could arise include:
- Locking a month/accounting period in the accounting package. Xero (for example) allows users the ability to Lock or close an invoice date which means if you are trying to send an invoice across to Xero and the date falls within that locked range, Xero will not let the data transfer across, and the export will continue to fail from the TransVirtual end (until the period is 'unlocked' or the export stops trying to send across from the TransVirtual end).
- If a transfer is not occurring, you may need to Refresh your accounting package link:
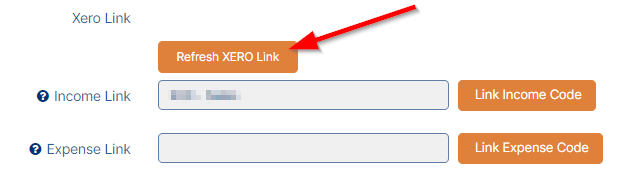
If changes to contact details/cards in the accounting package have occurred, a 'refresh' may need to be performed to allow any invoice exports to sync across.
- You may also see an error of card file not mapped. This simply means that the customer or agent has not been linked to a spot in the linked accounting package within their card file (under the Finance tab):
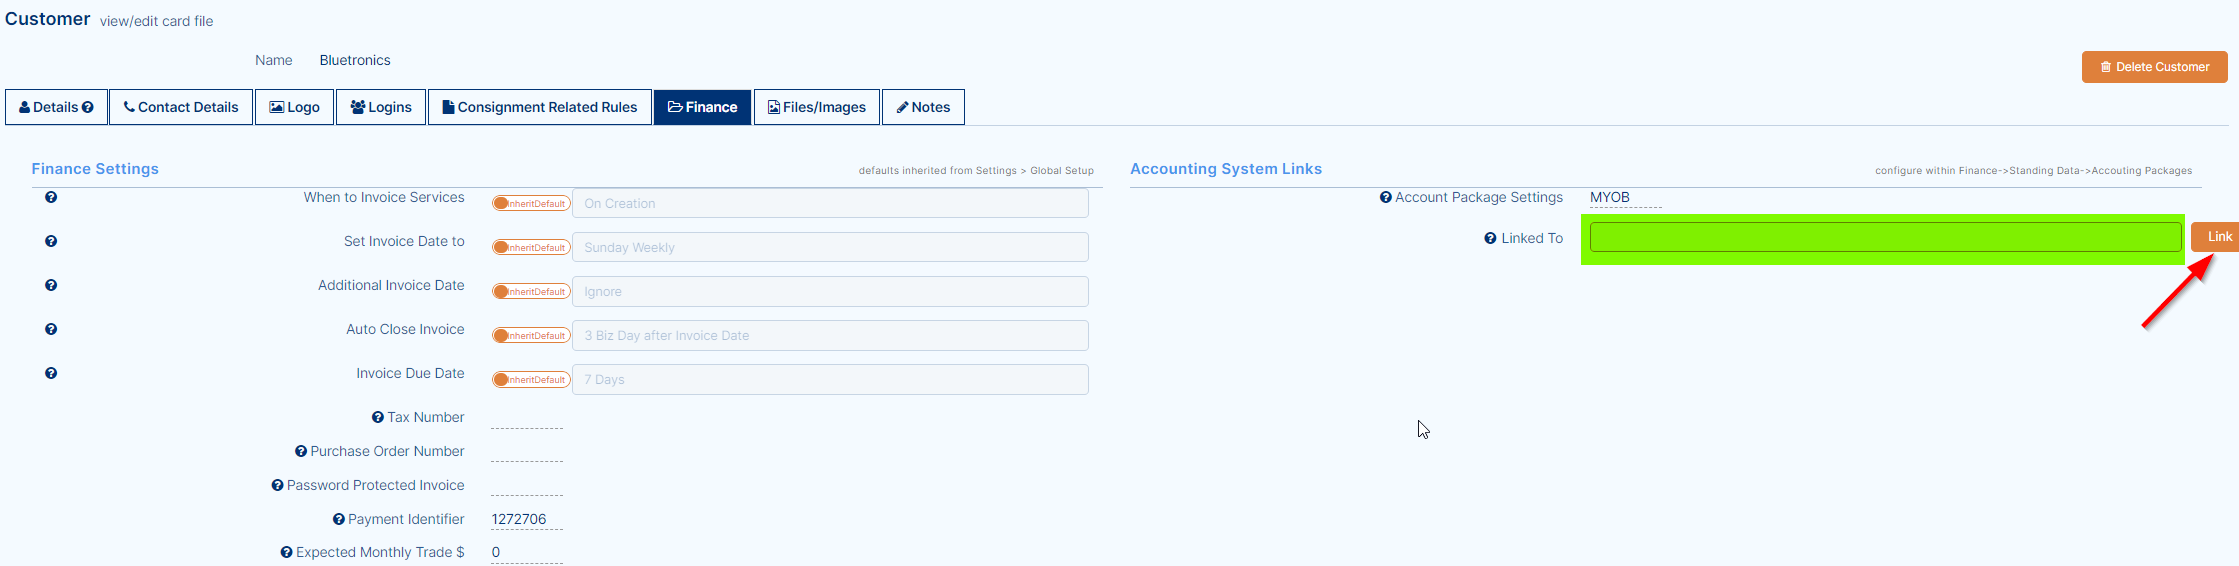
TransVirtual needs this information to know where to send the invoice data for that customer/agent.