Freight Items
Freight Items
Freight Items are simply what type of goods are being sent on a consignment, e.g., a pallet, carton etc. This article will detail how to setup and configure your Freight Items which are used for rating and pricing purposes; as well as to convey what type of freight a consignment will have.
1. In Transvirtual you have the ability to create as many Freight Items as you need, to do it, go to Setup > Rates > Freight Items, the freight item list page will display as shown below.
Create/Add a Freight Item
1. To create a freight item, on freight item page, click on Create Freight Item, Create a new service item popup will display as shown below.
2. Manually enter the Freight Item name and then click on the Create button to create a new Freight Item, the freight item will add in the freight item list as shown below.
3. Now, click on the newly added freight item, the detail of freight item will be display on the right side in Red color as shown below. 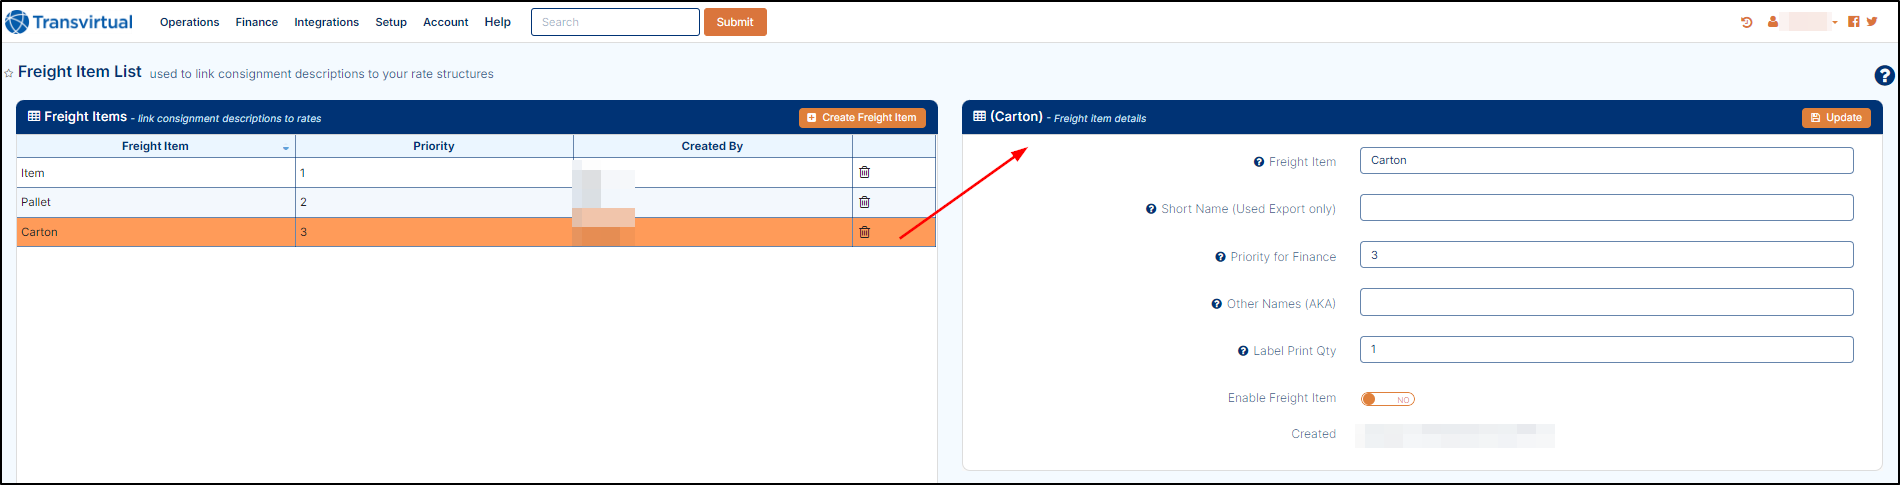

The Red color shows that this Freight item is not yet enabled.
4. Now, fill the item details and then click on Update button to save the changes, the color of the rule turns into White instead of Red which state that the Rule is Enabled.
To Update/Edit the Freight Item
1. To update the freight item, on freight item detail page, follow the instructions as described below.
a. Freight Item: This field is simply the name of your Freight Item. This can be changed if needed but should be reflective of what type of goods this represents i.e., pallet, carton, etc.
b. Short Name: This field is a place where you can enter a short name for this Freight Item if needed. This is for export EDI rules and is not a commonly used feature-only used if exports require a short name for a freight item (there could be character limits when sending to other systems etc).
c. Priority for Finance: Higher numbers are used first when multiple freight items could apply to the same consignment line row. This setting is used to determine what Freight Items take precedence when more than one applies to a consignment - you might have two Freight Items, and both have an AKA description of 'item'; any consignments with 'item' as the description could possibly use either of these Freight Items. This is where you'd enter a higher/larger number against the Freight Item that you would want to be used in this scenario.
d. Other Names (AKA): This field can be used to enter a list of descriptions against a Freight Item. For example, you may have a Carton Freight Item. You may have a customer that, instead of creating a consignment with Carton as the description, they might create with Item instead. If you wanted any 'Items' to price as Cartons, all you would need to do would be to add Item as an AKA to the Carton Freight Item. This field can have multiple AKAs and each value should be separated by a comma.
e. Label Print Qty: A way to have the system print multiple labels for a consignment using this Freight Item. For example, you might want to always print 4 labels for any pallets you get because you might want each side of the pallet to be labelled so that forklift drivers can see the label easily etc. The maximum you can set for this field is 4 and the label that will be printed will depend on what you have configured in the system.
f. Enable Freight Item: This setting is used to enable/disable the Freight Item. To do it, click on toggle button in Yes position, the rule will be enabled.
2. Once you complete the above steps, click on Update button to save the changes as shown below.

The data filter at the bottom of this page is under development and currently does not function.
To Delete Freight Item
1. If you want to delete the rule, simply click on the delete icon, a confirm dialog will pop-up, click on Yes button, the rule will be deleted from database as shown below.
Related Articles
Service Levels
Service Levels play a crucial role in Transvirtual as they are used to determine what type of freight a consignment falls under and are therefore very important in pricing a consignment. 1. This article will detail how to create new Service Levels ...Card Files (Customer)
1. In Transvirtual web portal menu, go to Setup > Card files > Customers, the Customers page will display as shown below. 2. On Customers card files, you can Add/Edit the Customer, Import/Export the customers. Add a New Customer 1. To add a new ...Consignment Creation
How to Create Consignments Refer the below steps to create a consignment(s). To create a consignment, on FMS web portal, go to Operations > Consignment Data > Consignment, consignment filter page will display. On consignment filter page, click on the ...Consignment Auto-Assignment
Transvirtual allows users the ability to automatically assign work to Carrier or Employees and there is no manual intervention is required-freeing up time for other tasks. Create a New Rule 1. To create a new rule, first go to Auto Assignment Rules ...Manifests
Manifests are simply a collection of consignments into a group. In Transvirtual there are many different types of manifests, the below will detail the different types that can be generated in Transvirtual and what they are used for. Carrier ...