Consignment EDI Export
Consignment EDI Export
In TransVirtual there is the ability to setup Consignment EDI (Electronic Data Interchange) Exports which are essentially a method of exporting data out from TransVirtual to another location; via email, FTP etc.
This article will run through the basics of a Consignment EDI Export and will demonstrate an example setup that is commonly used.
This page can be found under EDI > Data Export > Consignments.
Example Setup
A common example for this type of rule is sending an email to a customer that includes labels and consignment PDF note for a consignment that have just created.
To do this, navigate to the Consignment EDI Export page. Arriving here you will see a screen similar to the below:
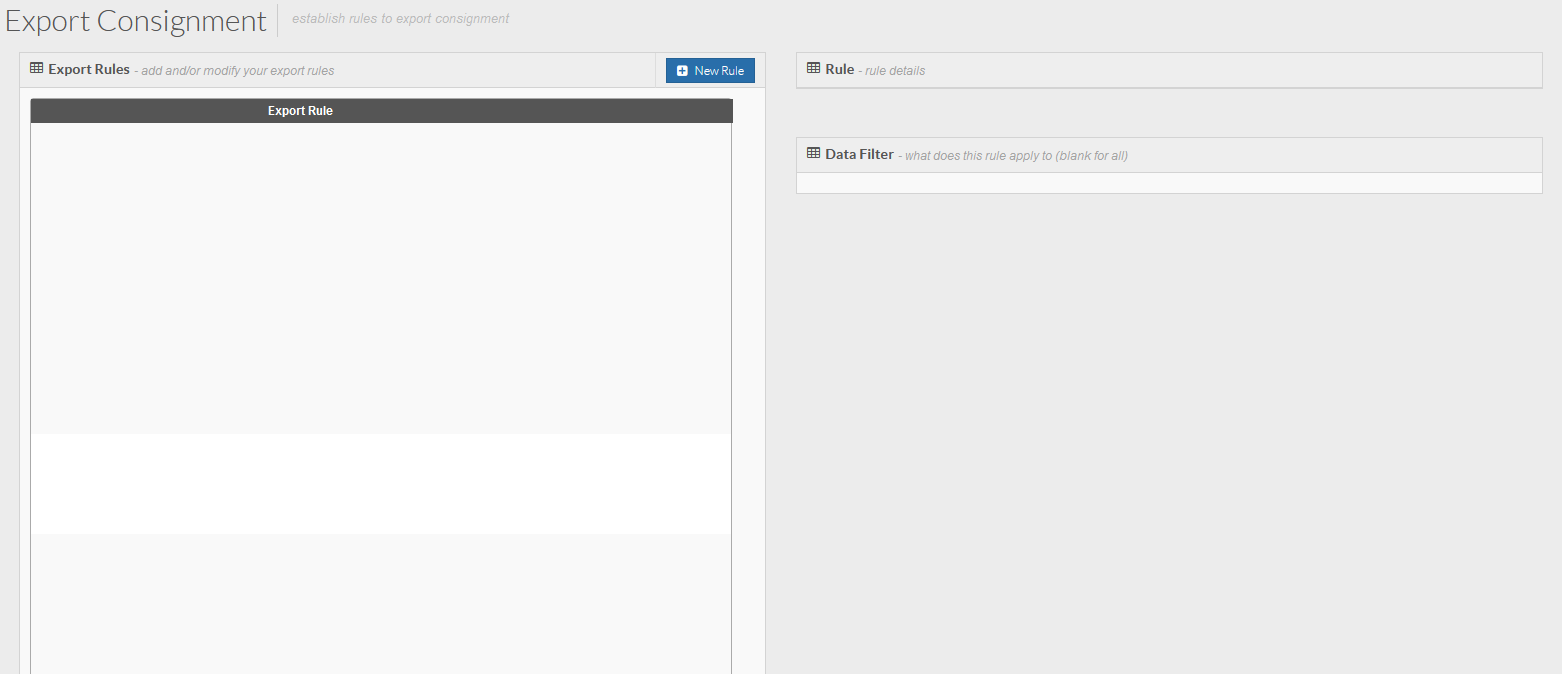
To do this, navigate to the Consignment EDI Export page. Arriving here you will see a screen similar to the below:
To create a new rule, click the New Rule button:
You will then see the below pop-up appear:
The Rule Name field is where you input what you want this rule to be called; give it a name that relates to what the rule will do. A good name for this example setup might be "Email to Customer with labels and consignment PDF" .
Select Email as the Export Framework; this will be how the information is sent out from TransVirtual.
Click Create to create this rule.
You will now see the rule has been created and will appear in your list, highlighted in Orange as it is not yet active.
Click on the rule and the settings for it will appear on the right-hand side of the page:
The next step from here is to configure the settings for this rule.
You will notice at the bottom of the page there is a Data Filter.
The Data Filter is the driving force behind when the rule will and won't apply to a consignment.
The logic entered into a data filter will be the criteria for when the system should apply this export rule to a consignment and thus, in this example, when an email would be sent to a customer.
To modify the data filter, you will need to use the drop-down logic selector at the bottom of the page:
For this example (and all Consignment Export EDI rules) you will need to specify a Sub-Event that will determine when this rule will apply.
The Sub-Event in this case will be 'Consignment Created'.
To add this in click on the drop-down and find the field 'Consignment SubEvent':
Click to select, then click the Next button.
Step 2 of this builder is where you apply the logic. In this example you will need to select 'Equal' from the list. Click Next to move to Step 3 of the builder:
Step 3 of the Data Filter builder is where you will need to specify what SubEvent we are going to use as the trigger for this rule to execute.
In this example select 'Consignment Created':
Select this value and then click the Add Rule button to add this logic to the Data Filter.
Once you have done this you will now see that the Data Filter has text (logic) in it like the below:
If you want this rule to only apply to a specific customer, you could add an extra line of logic to the Data Filter like the below:
To do this you would need to again use the drop-down builder. In Step 1 you would select the field 'Customer Name'. Step 2 would be 'Equal' and Step 3 would be the name of the customer you want this to apply to.
If you want this rule to work for all customers you can simply leave the Data Filter with just the first line of logic as per below:
For this example we will be applying to all customers.
Once you have the Data Filter configured, the next step is to edit the settings at the top of the page.
For this example we are going to set the Trigger Period to be Every 2 mins:
The Trigger Period is simply how often this rule will send out any pending exports that it has accumulated. You can change this if required using the Settings button to the right of this field; but for this example we are going to leave as Every 2 mins.
The Trigger Event for this example will be Consignment SubEvent. This setting is used to define the event or action that will result in this Export being performed. When set to Consignment SubEvent this will work in conjunction with the Data Filter; Consignment SubEvent is the trigger and the Consignment SubEvent is Consignment Created = only applies when a consignment has been created.
Single Export Only can be toggled if needed; but for this example we are going to leave set to No. This setting simply prevents the same export from occurring multiple times.
The Export Framework setting is used to specify how the information will be exported from TransVirtual. In this example we are setting as Email.
You have the ability to customize the email using the Settings button:
Clicking this button you will see a screen like the below:
This allows you to customize what will be sent in the email.
The toggles at the top of this window allow you to send the email to the email listed on the consignment against the Sender or Receiver.
For this example, we are going to send the email to the Customer which means we need to specify what Customer Contact to send to:
The Customer Contact emails will be based on what has been setup in the relevant Customer Card under the Contact Details Tab. For Example:
If you selected 'General' as the Customer Contact field, when the export triggers against a consignment with AR1 as the customer, it will send to the email listed against the General contact which is test@test.com.
In this example we are going to set this field as General.
The Email To field should only be used for internal staff email addresses unless you are limiting the Data Filter to a specific customer. All emails listed in the Email To section will receive the emails this rule generates.
In this example we are going to leave this field blank because setting the Customer Contact to General means that emails will be sent to the relevant General email for the customer of the consignment that the rule has triggered against:
The Email Subject field can be used to include an email subject.
In this example we are going to use the below as the email subject:

Note: The @Model.ConsignmentNumber is a a coding function that will automatically populate the consignment number into the email subject when the email is sent.
From here, you can edit the email body to include a message of your choosing. For this example, we are going to use the below:
Type the message in.
When using the @Model.ConsignmentNumber it is always advisable to use the validate button bottom-left. This button checks to ensure that any coding in play has not been entered incorrectly.
Using the validate button, provided you have typed @Model.ConsignmentNumber correctly, you will be returned with a white screen which will display an example of what your email will look like. Click the Ok button on this window to return to the main email settings window you were in previously.
Once the email settings have been configured, click Update on this window to put them in place.

To setup a Tracking link to send to your customers, use the same method as above but add this code snippet into the email body:
@Model.ConsignmentTrackingUrl
@Model.ConsignmentTrackingUrl
From here, the next step is to configure the Export File Type:
For this example we are going to send the labels and consignment note PDF.
To do this, change the export type to Basic/CSV, then click the settings button next to this:
You will then see a screen similar to this:
Toggle the two settings in the above to Yes and your screen will look like the below:
Click Update to enable this.
At present the export will send the labels, consignment note PDF and an excel/csv file with information about the consignment being exported.
If you do not require an excel/csv file to be sent, change the file type back to None and click update:
For this example we are going to set the file type to None as we are simply going to send the labels and consignment note PDF; we don't want to send an excel/csv file.
Even though the export file type is set to None, the settings are still there in the background which means the labels and consignment note PDF will still be sent.
From here the next key step is to enable the rule:
Toggle to Yes and click Update the rule.
This rule is now active.
You will see that it has changed colour from Orange to White confirming this:
This rule will now sit there and will email the consignment customer any labels and consignments note PDFs for any consignments they create.
This is a common example as lots of your customers may book in a consignment and ask that you pick it up.
Setting this rule up means that they can then print out and label their freight ready for when your drivers pick the freight up.

If you'd like to, it may be a good idea to include your own email in the below section Email To section:
The reason you may want to do this is so that you also receive any emails generated by this EDI rule; which then means you'll know the EDI rule has worked and also what the email will look like when received by the customer.
A handy way to be able to test an EDI rule if needed - you can remove your email after you are happy the EDI rule is setup as expected.